
Home › Forums › MGTD Kit Cars › VW Based Kits › Rear Suspension Bump Stop Install
- This topic has 9 replies, 6 voices, and was last updated 12 years, 7 months ago by
 KentT.
-
AuthorPosts
-
July 6, 2013 at 11:44 am #234790
Folks,
A while back I was poking around the back underside of the TDr and noticed one of the bump stops was missing. So, naturally, I ordered a set.Well the set got here yesterday and I can’t figure out how to affix the stops to their mating holder. Can anyone shed some light on how these things are held in place?July 6, 2013 at 2:25 pm #256938Jack,
I beleive they are just pressed in. The bottom of the stop is sort of buldged (for lack od a better word) and you spray a lubricant on it (Dawn dishwater liquid qorks great) and just twist it in while pushing down. If I’m wrong, please someone else chime in.Allen Caron
VW based 53MGTD - "MoneyPenny"
"If one thing matters, everything matters" - from the book The ShackJuly 6, 2013 at 2:43 pm #256939Allen,
I have been trying to figure this out also as I have a bump stop on my passenger side but the driver’s side is missing. All that remains is a semi-flat piece of metal which constituted the base for the bumper. It seems (from a lot of reading on the Samba) that there is supposed to be a mushroom headed bolt that is welded almost vertically so that the bumper is pressed down on top of the mushroom which due to its shape captures the bump stop.I am going to try welding a carriage bolt that is slightly larger than the hole in the new bump stop and see if it works. (And it gives me a chance to improve my MIG welding technique. My welds (no gas) sure are ugly but they tend to stick. This is a perfect job for my skill level, since no one will ever see that the weld is ugly.)(My brother who is an expert welder said to weld it up, then put JB weld on the ugly spots, then grind it down to “pretty” then paint it and no one will ever know.)July 7, 2013 at 9:06 am #256940Allen,
I rechecked and as Roy noted on his car, the center bulged area on both of my bump stop mounts are long gone…Once Roy practices on his car, I will try to convince him to improve his skills by practicing his MIG welding technique on mine. I’ll even supply the JB Weld and spray paint for the finishing touch.July 7, 2013 at 11:38 am #256941It’s been a while since I replaced the bump stops. And the last one I did was on my 74 Ghia. Perhaps they are different. Wish you and Roy great luck with yours.
Allen Caron
VW based 53MGTD - "MoneyPenny"
"If one thing matters, everything matters" - from the book The ShackJuly 7, 2013 at 1:51 pm #256942I hope someone can help here. I have included a couple of pics of the bump stops which are supposed to “fit” atop a post. The hole in the bump stop is a 5/8″ and extends 2-3/8″ into the inside.
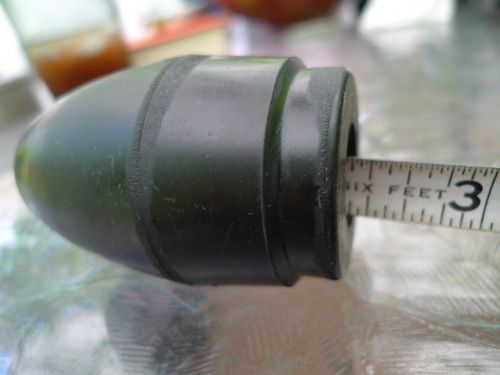
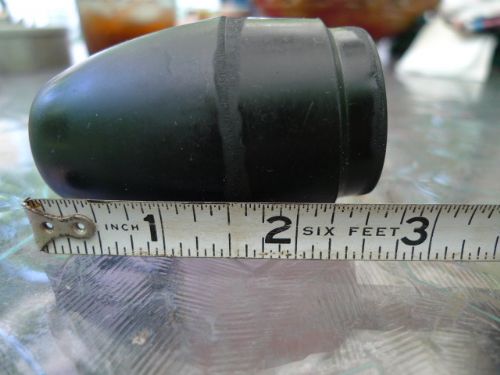 So, there is about 3/8″ of rubber at the top of the domed bumper stop. Starting about 1/2″ into the bottom there is a relief of about 1/16″ for the next 3/8″. Here the inside diameter is about 3/4″. I have revised my initial plan of using a welded carriage bolt to the frame and intend to use a 5/8″ bolt and nut. I can press the nut into the inside of the bumper stop and it will be held quite securely. Then weld the bolt to the bottom plate and literally screw the bumper stop on.Now, my question is: Should the threaded bolt (which I am using as a post) extend all the way to the top, which would only give 3/8″ of rubber to compress or should it only extend to just past the top of the nut? The later would give much more compressibility (if it’s not a word, it ought to be) but may allow the stop to flex to the side and possibly less secure.
 Or does anybody have a better idea?July 7, 2013 at 7:37 pm #256943
Me guessing here but I’d think less bolt is better. I believe I read on that Ghia racer’s thread that the snubbers get cut about in half on their application, which woud suggest there is less than full metal inside the snubber.
July 7, 2013 at 8:28 pm #256944Thanks Ed, that’s what I’ll do.
July 8, 2013 at 10:47 am #256945I agree with Ed on this. You do not want to run a bolt all the way to the top of the rubber bump stop. That would negate the purpose of the RUBBER bump stop. Having solid steeel inside the bump stop would turn it into a solid “thud.”
As far as installation, this thread says “grease em up and hammer them in” to their mounting bracket:And this thread is called “bump stop repoair procedure,” and it does cover that. But it also has some great floorpan/chassis repair stories and pictures.Paul Mossberg
Former Owner of a 1981 Classic Roadsters Ltd. Duchess (VW)
2005 Intermeccanica RoadsterIf you own a TDr and are not in the Registry, please go to https://tdreplica.com/forums/topic/mg-td-replica-registry/ and register (you need to copy and paste the link)
July 8, 2013 at 11:05 am #256946Agree that the bolt/stud should not run all the way to the top. Note that bottoming out the rear suspension, which has likely been lowered by rotating the trailing arms one or two splines is what has likely knocked the old, original one off.
The racers who’ve also lowered their cars cut off the snubbers as Paul suggested and linked. The rubber snubber should stop the suspension travel at essentially the same time that the shock bottoms out, so all the force is not transferred to the shock mounting bolts nor to the snubber — they should BOTH dissipate the force.Just one more example of how modifying suspensions can get tricky when it comes to fine-tuning…Early FF TDr on 69 VW pan
Slowly coming back from the ashes... -
AuthorPosts
- You must be logged in to reply to this topic.