Home › Forums › MGTD Kit Cars › Chevy/Ford Kits › Dash: Flush or proud?
- This topic has 16 replies, 5 voices, and was last updated 12 years, 9 months ago by
Gabor Kesseru.
-
AuthorPosts
-
April 30, 2013 at 7:41 pm #234655
I noticed that the original TD dash was flush with the sides and dash top. The dash was trimmed with a narrow chrome strip and separated from the body with welting. My kit, and most all of the kits I see here have a dash made of a 3/4 thick board sitting proud (i.e. surface mounted) of the surrounding body. This makes the welting back and aside the panel instead of in front. Do any of the cars have the dash flush, or have any of you gone through the effort to make it flush? I like the original look of the dash and also would like to move the steering wheel forward as much as possible.
April 30, 2013 at 7:52 pm #255627On the originals, it’s actually a bit proud of the scuttle, by my eye. The wood is about half-inch thick ply and the rexine cover adds a sixteenth more. The back is recessed just slightly because of the way the scuttles are formed, and that tends to push the welt forward just slightly. But the difference is hardly noticable.
Indeed, I never noticed it until a month or two ago, just as I finished B’s dash.
The key is making the welting the right thickness and adding the chrome bead.
If you make yours like I made mine, maybe using half-inch plywood, you’ll get the original look.
edsnova2013-04-30 21:13:14
April 30, 2013 at 9:18 pm #255628I was considering using SS trim strip like this one, probably hammered a little flatter. Better than $280 at Moss Motors.
http://www.ebay.com/itm/Stainless-Steel-6-FT-Molding-J-Channel-Trim-Strips-/380407207764
PMOSSBERG2013-04-30 21:25:14
May 1, 2013 at 6:38 am #255629That looks like it might work as the top bead, maybe if the short leg is cut and the end bent over. Lotta work.
I will again suggest my cheat: $14 stick-on 1/8-inch chrome strip from Auto Barn and aluminum tape stuck to the top edge which will be mostly hidden by the welting. This took 10 minutes to do & I doubt anyone I don’t tell would notice it’s not stock and correct.
May 1, 2013 at 9:00 am #255630Gabor: one more thing I forgot: The top of the dash is radiused (if that’s the word for it?). The front face of the dash is just a little bit bigger than the back face of the dash, and the angle of the top edge, as it compares to the front face, is less than 90 degrees. More like 75 or so.
So when you install it on the scuttle, there’s a sort of shallow channel between the front face of the dash and the face of the fiberglass lip you’re screwing it into. That’s part of what makes the welting want to cover up the top edge, and one of the reasons the cheesy tape job I did on mine is perfectly acceptable.
May 1, 2013 at 9:24 am #255631I used a router to make a rounded edge on the top of my dash which is made of 1/2 ”plywood.I used chrome fender welt between the dash and the cowel.
May 1, 2013 at 10:27 am #255632Here’s a look at an original being restored. Looks like a lot of work, but there are some good ideas here.
http://www.dbraun99.com/mgtd15470/Instrument%20%26%20Fascia%20Panel/Fascia%20%26%20Panel%20Restoration/slides/Position%20of%20fascia%20after%20shimming%20the%20sub%20dash.html
PMOSSBERG2013-05-01 10:45:49May 1, 2013 at 10:58 am #255633Why all the consternation about how to install something that wasn’t original to the TD? IMO, that’s kinda like fretting over wire wheels… Neither a wood dash nor wire wheels were standard, stock, and authentic to the 1952 or 1953 TD as far as I know…
KentT2013-05-01 11:10:09Early FF TDr on 69 VW pan
Slowly coming back from the ashes...May 1, 2013 at 11:00 am #255634Good link, Paul, and it illustrates my point. The original TD had a Perlite dash, with the golden looking instrument panel in the center….
The wood dash was an aftermarket option, was it not? So, there’s no “one right way” to install one, as far as I can tell…I think the easiest/best way to deal with it is to use the big, fat welting, like was used to trim headliners and such, if you’re striving to look true to the period… Note how big the welting is that the guy is using on his restoration.I’m not sure what others have used, buy mine was assembled with the smaller fender welting, not the thicker stuff. Mine is also the fiberglass one-piece one, rather than wood of any type. Most of it is grained, but the instrument panel is smooth, and there’s a “fake” thick welting ridge around the center instrument panel. A new dash made of wood, with proper size gauges (5″ perhaps), covered in vinyl may happen some day, but that’s low on the priority list…
KentT2013-05-01 11:08:02Early FF TDr on 69 VW pan
Slowly coming back from the ashes...May 1, 2013 at 11:56 am #255635Givign credit where it’s due….Greg provided the dashboard renovation link. All I did was fix it so the link was live.
I’m with Kent on this one. One of the best features of reproductions is that we can do whatever we want, simply because they ARE reproductions. To each his own…even that skull painted, hood scooped, bronze and black TD on ebay last week!Paul Mossberg
Former Owner of a 1981 Classic Roadsters Ltd. Duchess (VW)
2005 Intermeccanica RoadsterIf you own a TDr and are not in the Registry, please go to https://tdreplica.com/forums/topic/mg-td-replica-registry/ and register (you need to copy and paste the link)
May 1, 2013 at 12:40 pm #255636The last thing I am is an originalist, especially with my approach to put in a V6. I’m pondering this because I am trying to think through how I will install the dash, how I will put in the piping, how it will fit, how it will look and how to mount the steering column behind the dash. It all ties together and right now all I have is a fiberglass lip and a beautiful flawless wood dash that doesn’t even come close to fitting. The provided dash is too wide to fit and it’s upper curve does not match the body curves. So I have the option of solving this area several ways, none of which includes using the provided dash panel. Since I have to make a dash from scratch, I want to consider several solutions before I pick the way to go.
May 1, 2013 at 1:00 pm #255637Once you have the correct shape, you can glue the piping/beading to the back of the dash, then install it all at once. Trying to get smooth curves on the beading and cutting holes to clear the bolts on an already installed piece can be a PITA… or at least it has been for me.
Early FF TDr on 69 VW pan
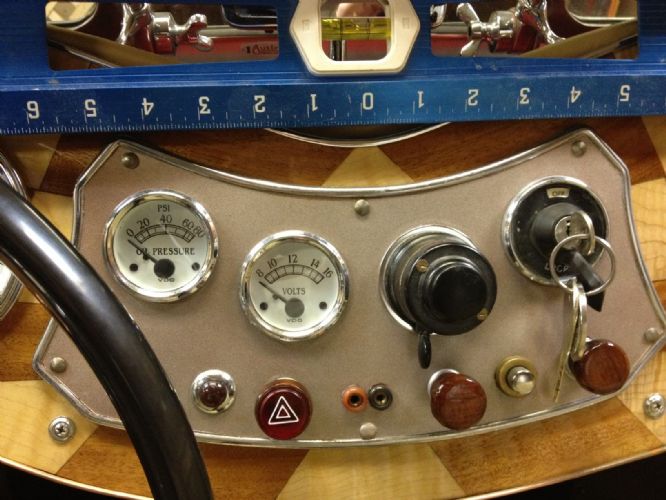
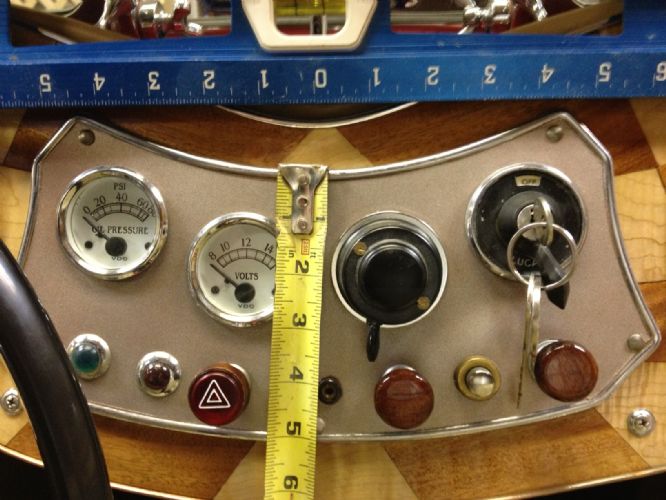
Slowly coming back from the ashes...May 7, 2013 at 1:36 pm #255638Does anyone have a drawing or a trace of the TD instrument panel? I want to make my own. The outside outline is all I need. Maybe just basic outside measurements would be a good start.
May 7, 2013 at 2:05 pm #255639I have an original in my basement. It’s a tiny bit wider than the one I actually made for Bridget, but the main shape was very helpful. I can trace it for you and send if you’d like. PM me your address or, if you want I can bring it to Carlisle.
–wait. you mean the center cluster, don’t you? That one is on my car. Hard to trace without taking all the junk off it….
edsnova2013-05-07 14:06:22May 7, 2013 at 3:08 pm #255640I mean just the center cluster panel. I have been reverse engineering this from a few web photos. Hoiw about just an outside set of dimensions, like tip to tip width and chord (thickness across middle). I can scale my guesses up or down. I can draw this a few dozen times until it starts to look aesthetically pleasant. I have plenty of patience. I don’t need hole placement, since that is totally driven by components. Thanks for your offer. Really wish I could drive to Carlisle, but am many months before it will move under own power.
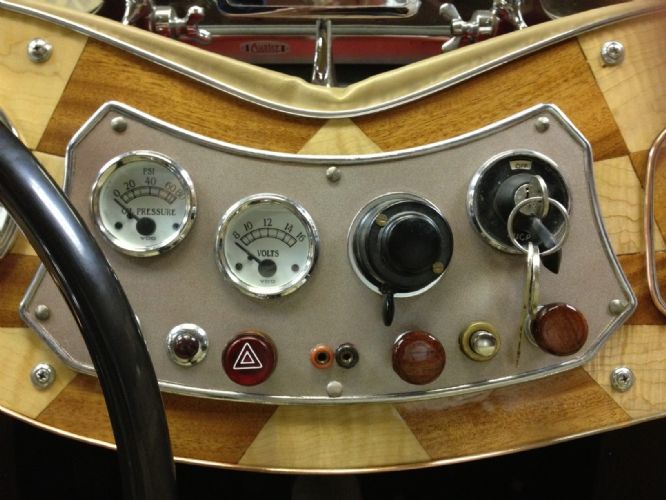
May 7, 2013 at 10:46 pm #255641hope this helps . . .


(This is an original TD cluster I adapted to my replica. The horn button and ignition switch are original/repops, as are the power plugs. Everything else is either from the BCW kit or could have been.)
edsnova2013-05-07 22:48:37
May 7, 2013 at 11:16 pm #255642Great, Thanks.
-
AuthorPosts
- You must be logged in to reply to this topic.
