Home › Forums › MGTD Kit Cars › My Project › loking to wood veneer my dash
- This topic has 19 replies, 7 voices, and was last updated 9 years, 11 months ago by
 billnparts.
-
AuthorPosts
-
February 21, 2016 at 6:50 pm #236026
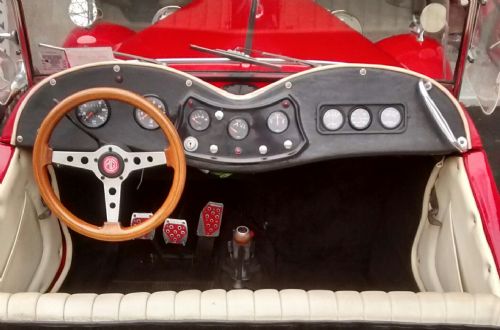
I currently have a fiberfab black vinyl dash with 5 gauges. (previous owner put the cluster on the right to cover up radio hole) I am looking to replace the vinyl dash with a wood grain dash and was wondering if anyone else had this done to their beauty before that can share some tips or a reference to someone who can perform this work.
thanks all
 February 21, 2016 at 7:29 pm #267307
To do veneer work, you have to have a very flat, smooth, well-prepared surface, then you have to be able to glue it and clamp it down flat across the entire surface or else you either end up with unsightly bumps or it just comes unpeeled. Theoretically you could just temporarily remove your instrument panel, gauges, and screws, and work the wiring “through” the veneer so you could then clamp it. That would be a lot of work if it’s even possible (since the dash would be slipping down or coming off while you’re doing it, and I’m still not sure how you could clamp the whole thing while it’s in the car.
You could also remove everything and do it off the car. The woodwork would be much easier and better, but then you have to rewire everything when you replace it. However, removing a dash creates its own set of issues. I took off the original mahogany dash from my Fiberfab and created a whole new wood dash out of walnut plywood, stained it, varnished it, and replaced all the instruments using a real MG TD instrument panel. Just cutting, staining, and varnishing the dash was quite the task, but the big problem was the rat’s nest of wiring that had to be replaced. I had tagged everything and I still could look at that mess of wiring without this feeling of helplessness. I finally had a professional rewire my car at a cost well into four figures, which was probably far too much but I was over a barrel, and worse was that was the feeling that I had created the barrel myself. Now that it’s all finished, it’s very nice but not worth anywhere near the blood, sweat, tears, time, and money I put into it. I would never recommend anyone do what I did unless they are proficient at automotive wiring and have a lot of patience as well.I have a much easier suggestion for you: PAINT your dash with faux woodgrain paint. You can do this yourself using paint you buy at Home Depot, and you don’t have to do anything other than mask off whatever you don’t want to be woodgrained. Woodgrain paint is used on a lot of real antique cars, and if you do screw up, all you’ve lost is a few hours time and you can just re-do it. Frankly the only thing less than perfect about your dash right now is the black color isn’t very appealing, but faux woodgrain paint would totally solve that and match your steering wheel as well.Another alternative would be contact paper, but IMHO the woodgrain paint would turn out much better, and it won’t peel off and look bad later on.johnsimion2016-02-21 19:30:55
February 21, 2016 at 7:44 pm #267308Thanks for the suggestion. I’m going to replace my gauges with white dolphin so I’ll have to rewire everything anyway. I’ll def look into the wood grain paint option.
February 21, 2016 at 9:14 pm #267309Dashboard=fun
Here’s the start of my long saga. Keep clicking “next” at the bottom to follow along.I had put new(er) gauges in before starting the new dash process and I think that made most of the difference. My wiring is also a rat’s nest and ought to be re-done, but I was able to mark wires AND leave the gauges wired up under the scuttle while I worked on the dash. When the time came, I passed the whole center cluster through the new dash. This made the wiring much easier, as I didn’t have to remember how anything was wired for more than a few minutes while switching things in and out.Best way to make one is NOT to do a mosaic like I did. Buy a piece of furniture grade hardwood plywood, 1/2 or 3/4 inch thick. Or get one-side 1/4 inch and laminate it to a piece of half-inch marine ply. You only need a quarter sheet to do two TD dashes.If you join big sheets of wood together, I highly recommend furniture epoxy like I used. For an in-the-weather piece like this which will heat up and cool down a lot, it beats the heck of out contact cement, yellow wood glue, etc.February 21, 2016 at 9:30 pm #267310Ed is a genius. I have seen his dash. And he also had the common sense to keep things wired up while doing his woodworking. Do what Ed says.
February 21, 2016 at 9:57 pm #267311I just finished making a new dash out of solid black walnut finished with six coats of Sikkens Cetol oil based finish. I have replaced all the gauges with 4.5″ Speedhut speedo and tach. Installed VDO white face Royale gauges for fuel, temp, oil pressure and voltage. I had the benefit of the electrical connection diagrams from the original build which I have used to creat proper schematics with additional fusing and relays so that I am not relying on the condition of the 30+ year old switches for turning on high amperage loads.
Pics to followToller2016-02-21 22:07:57David B Dixon
Port Perry ON CA
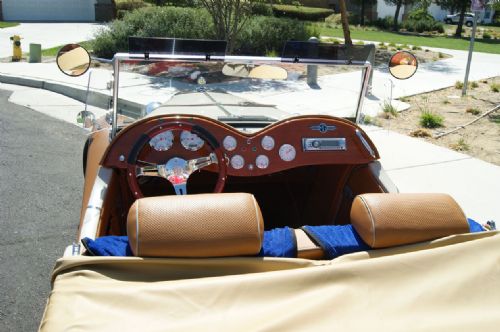
SabineFebruary 22, 2016 at 12:35 am #267312Justin,Easy way out, buy a new dash from MG Magic like I did, but then I’m a lazy sort of guy.Bill
Bad Bill
February 22, 2016 at 12:37 am #267313Justin,
I got the White Dolphin gauges as you can see in the above picture, they have been working fine for over a year now.BillBad Bill
February 22, 2016 at 3:42 am #267314I used this to clean up the rats nest.
http://www.painlessperformance.com/webcat/30301
Just unplug it to remove the dash.
For the wiper and heater switches I used flat four trailer connectors.Bill Ascheman
Fiberfab Ford
Modified 5.0, 5sp., 4:11
Autocross & Hillclimb
"Drive Happy"February 22, 2016 at 7:42 am #267315Bill the dash looks great. is there a notch out for the steering column? I cant tell from the pictures.
a friend of mine also told me to look into a wood grain vinyl wrap. he said you take the dash out, bring it to a wrap installer would cost under $100 and look like a Bentleys interior when its done. has anyone wrapped their dash in vinyl?
February 22, 2016 at 10:36 am #267316Here are the pics of the new dash that will be installed when the weather improves
 The wiring for the dash with colour coding for polarity and numbers as per electrical connections in build book. Only real problem was with the LED indicator lights, the housing was not robust and had to hot glue the wires to the the bayonet connectionsInstead of just using the original wiring harness and connecting the switches and gauges used terminal blocks that will allow elimination of the butt connectors used in the old wiring. Will also allow an easier job of testing and diagnosis of problems should they occur. For most of the switches the feeds will be coming from a new marine ATC fuse blocks The brass bar in the lower right is a buss bar for all the ground connections on the dash, ergo there will only be one ground wire from the harness connected to the dash versus the 12 that are now used
David B Dixon
Port Perry ON CA
SabineFebruary 22, 2016 at 2:19 pm #267317looks great David. I have a 2 year old daughter and my son coming the end of April so I think ill go Bills route and just buy one from mg magic. something tells me itime will be in short supply for my northeast driving season.
bill love the steering wheel can you tell us the manufacturer I might just have to copy your interior!!!
February 22, 2016 at 2:28 pm #267318I’ll have to see if I can find the paper work from 2 years ago, at 75 I tend to forget things.
I think I got it on Amazon, so I’ll look through their achieves to see if I can find it.BillBad Bill
February 22, 2016 at 2:40 pm #267319I told you I was getting forgetful, I got it at MG Magic, $195.00.
BillBad Bill
February 22, 2016 at 9:44 pm #267320Great job, both of you.
And +1 on the MG Magic ready-made dash. It’s a really nice piece, particularly if you have, or want, a radio on the passenger side.It would be very hard to duplicate for the money.February 23, 2016 at 12:48 am #267321Rosebud and Bill wrote:Justin,I got the White Dolphin gauges as you can see in the above picture, they have been working fine for over a year now.BillBill, where did you get the sunvisors? Do they interfere with the top in any way?
Kent
Early FF TDr on 69 VW pan
Slowly coming back from the ashes...February 23, 2016 at 12:50 am #267322Sun Visors were from Moss Motors. Can’t tell you about whether they interfere with the top, this is California, No Tops allowed on our cars or women”.
BillBad Bill
February 23, 2016 at 7:22 am #267323I will be in Southern California in July for the end of MINI Takes the States. I’m hoping that’s true.
Bill Ascheman
Fiberfab Ford
Modified 5.0, 5sp., 4:11
Autocross & Hillclimb
"Drive Happy"February 23, 2016 at 9:42 am #267324Bill,
Where will you be staying when you come to CA, are you bringing your MGTDr?BillBad Bill
February 25, 2016 at 3:43 am #267325Sorry, driving one of the MINI’s. Will only be there one weekend.
http://www.minitakesthestates.com/
Bill Ascheman
Fiberfab Ford
Modified 5.0, 5sp., 4:11
Autocross & Hillclimb
"Drive Happy" -
AuthorPosts
- You must be logged in to reply to this topic.
