
Home › Forums › MGTD Kit Cars › My Project › Modified Daytona MiGi
- This topic has 11 replies, 6 voices, and was last updated 17 years ago by
Steve Crites.
-
AuthorPosts
-
February 25, 2009 at 10:53 am #232543
I just purchased this car a month ago, (from a used car dealer no less) and it is not in very good shape. It looks pretty good, but as we all know, beauty is only skin deep!
I am currently working on the brakes. When I first drove it she had no brakes at all. In fact the fluid reservoir was empty! The dealer was to fix the brakes, but I think the only thing they did was to renew the fluid. I managed to get it home on one wheel “grabby” brakes (grease on the shoes) and a wild shimmy.
I have the steering damper now, and am going through each wheel to free up the adjusters. all were frozen with the exception of the left front, and I used rubbing alcohol to clean the grease off of the shoes. I have not solved the mystery of how the grease got there in the first place.
The car had no power to speak of, and I discovered it had been detuned to cover up the “flat spot”. I discovered it had the wrong carb match for the distributor (009 centrifugal paired to a 28 PICT 1). I have replaced the undersized carb, but I’m still tweaking point gap and timing to get the idle right. As soon as I get the brakes fixed, I will address the engine maladys.
On the ToDo list are front bumper, dash, muffler, front body re-position, directional signals, brake lights (only work with the lights turned on), ignition switch (I start the car with a screwdriver right now), and several items I have yet to discover.
I have already discovered what a valuable resource MGMagic happens to be! (thanks to this site!) I ordered a front bumper, and even though I am a woodworker, I opted for their dash blank, and it is a beauty!
I’ll have to make the brackets for the bumper, but the front end will have some protection. While investigating attachment points for the brackets, I discovered that only two of the four bolts attaching the front torsion tubes to the body are there! I’m beginning to wonder what other surprises I will find.
From the reaction to the pics I posted and the comments, I will take the advice of the group to leave her in her current dress. I have abandoned thoughts putting a top on, and will opt for a tonneau only, although I think I will lower the roll bars a couple of inches.
I’ll post pics of the changes as I go, for now it’s back to the brakes!
February 25, 2009 at 11:17 am #238306Protection is a relative thing when it comes to bumpers on these VW based cars. Keep in mind that you are driving a sheet metal VW floor pan with a flimsy fiberglass body on it. It’s like driving a 4 wheeled motorcycle as far as protection goes. That’s just the nature of these cars.
As far as the brakes, if the shoes were greased up, replace them. All the solvent in the world won’t help. When they get hot from normal use, more grease will come out. It’s OK to clean up the drums and other metal hardware with some Brake Kleen, but the shoes are shot once there’s grease on them.
If I were you, I’d go over the whole brake system, hoses, wheel cylinders, hard lines, master cylinder, etc. Anything that sat for a while will have brake issues. If you have to replace the master cylinder or wheel cylinders, try to buy German made parts, not Brazilian. Their quality is better and worth the extra $$.
A 009 disributor is not neccessarily the best set up for a street VW. VW Trends and Hot VW’s ran articles on using vacuum advance units that really woke up the performance on stock engines. It think Hot VW’s is still published, but sadly, the more tech oriented VW Trends is gone.
Probably the biggest improvement to your car would be to change that front beam that was half-attached to an adjustable beam and remove torision leaves to correct the spring rate up front. Then get the rear suspension aligned. this modification will make your ride a pleasure to drive, not to mention handle a lot safer and better.
Pink MG39869.4707060185
March 2, 2009 at 10:23 pm #238307Good Evening Pink:
I agree with you, that the only way to get the front end down is with an adjustable beam.
I was lucky enough to find an OEM unit with German adjusters over at CIP1.
It will be here in a week or so, then I’ll be back to your tuning thread.
Thanks,
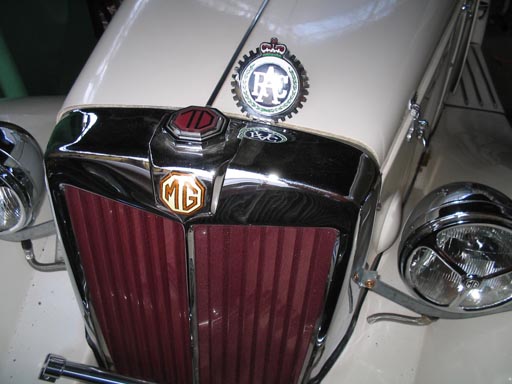
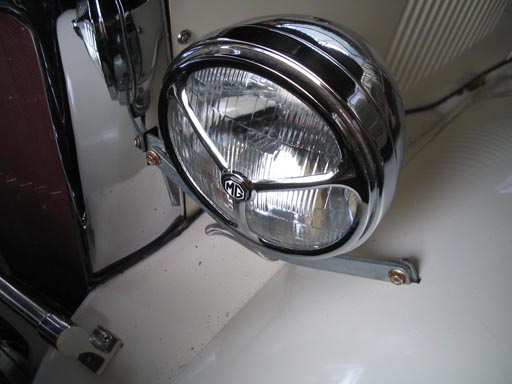
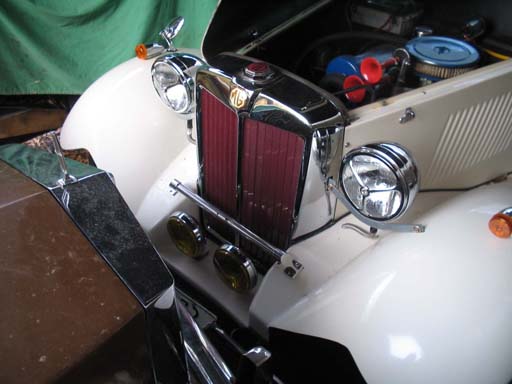
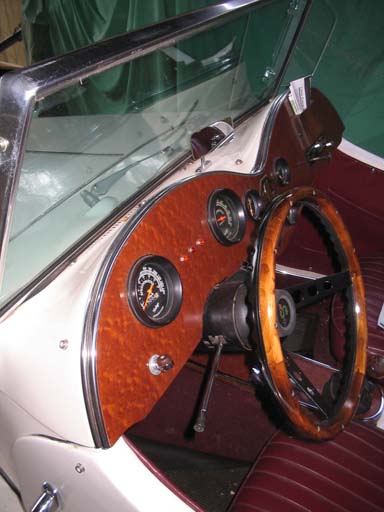
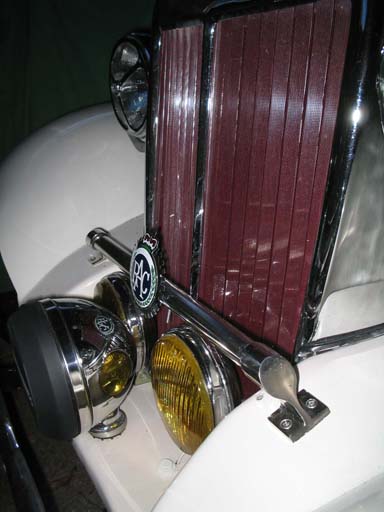
BobApril 9, 2009 at 2:36 pm #238308The radiator slats on my replica are chrome. I wanted to add some color without painting the chrome. I removed the slats and inserted a section of metal window screen that I had painted to match the interior. I replaced the polished chrome slats behind the painted screen material. From side angles, the slats pick up the color, but from straight on, you only see shiny chrome. The screen also grabs bugs before they get to the slats. I also added some headlight trim pieces that I found on ebay, switched the TD radiator logo to the top as the radiator cap and placed an MG logo on the front of the radiator. Got some 1/4″ flexible chrome wheel well trim (self-adhesive) to dress up the dash. top edges of the carpeting, the centerline of the hood, and the two edge bands on the false gas tank (like in the original MGTD). I used amber truck lens on the front turn signals that I got at a truck stop for about a buck each, fit perfectly. I did add some clear silicone to seal them. They really light up nicely. Added a 100 watt chrome driving light (Walmart $17) to the front center between the fogs. At night it will light up the countryside. The dash was clad with veneer and a wood pew holder placed where a radio had been. A mahogany MG logo was centered on the dash. The steering wheel was added from a marine supply house, it fit perfectly, is real wood trim, and cost a fraction of automobile steering wheels. It also has sure grip for wet boating hands, which helps holding the wheel. I picked up a van cargo net that is across the back seat area. I can either place stuff on top of the stretchy net or under the net to hold things inside the car. I also use a folding tire step on the spare as a luggage rack (photo pending). The step folds flat for storage and then opens out to fit over the top of the spare. It supports 250 pounds of luggage (my wife’s suit case) or picnic basket (lot’s of food), not bad for $30. It also doubles as a seat for watching soccer. I added polished aluminum strips in the bottom of the backseat area, under my cargo net, for luggage runners and to prevent carpet wear.


More later since this is an ongoing (never ending) project. I also have dimensioned drawings for the CMC/Fiberfab top bows in PDF format if anyone would like a copy emailed to them.
James
April 9, 2009 at 2:55 pm #238309James,
Real nice details! Some creative and unique modifications for sure. I especially like the trim on the dash and the TD radiator cap. Very cool. Thanks for posting pics, Post more!!
April 9, 2009 at 3:00 pm #238310Also, that is a very interesting solution for getting some color to the grill slats. How is it to clean though? Just wondering.
I don’t know if you have seen it, but Ringo’s MG has reflective tape over it’s slats that also looks really cool.
Keep up the creativity, it’s giving me some good ideas!
April 9, 2009 at 4:23 pm #238311Hey James!
You’ve been busy! You have to get that beauty outside and get some more photos so I can add them to my Screen Saver collection.
One question: I thought all CMC/FiberFab TDs had a joined split between the fog lamps. Yours looks like a solid piece. Another mod?
One request: I like the shape of your Wind Wings much better than my FiberFab stock shape. Can you give me the dimensions so I can make up a set? Width and the height of the long and short sides will suffice.If you can, send them to RichBelfay@aol.com.
Thanks and keep up the great work!
Rich
April 9, 2009 at 5:05 pm #238312The screen has been easy to clean so far. It doesn’t have much surface for bugs to stick, some just bounce off when they hit. The others get a hose blast.
The split between the fogs had been filled and gelcoated before I got the car. When I installed the driving light it mounts thru the wood blocking that holds the split together. It seems that the crack had been epoxied together and filled with gelcoat and buffed.
I forgot to mention that the braided S/S headlight wire covers are from the plumbing depatment of Home Depot, they were sink water supply lines, cheaper than Autozone. Rich, I’ll get you those measurements. I’ll try to scan a tracing into a PDF. The wings came from Moss Motors. I removed my bumper overriders because they started rusting a lot. The plating was flaking off. The bumpers were fine. I think the overriders were old VW, but not for sure.
James
April 9, 2009 at 6:34 pm #238313I forgot to say that I looked at Ringo’s car with the tape on the slats. That is so cool. I really like it. I also really like Ringo’s car, it’s absolutely stunning. She looks like she is ready to fly. I wish my wire baskets looked better. Does Ringo have real wires? The red slats with the black body and the chrome are awesome.
Every car in the group is fantastic. I keep looking at Geoff’s, Rich’s, and Ringo’s everytime I login. I hope everyone will post their rides to Jay Leno’s garage, we need to fill his virtual garage with our replicas.
Here is the link to the Leno garage
http://www.jaylenosgarage.com/your_garage/park_car_shell.sht ml
James
April 9, 2009 at 9:56 pm #238314James I actually posted mine there a week ago. All the same photos that you have already seen though. I won’t have new ones until I get the car here in AZ 🙂
http://yourgarage.nbc.com/cars/geoff104?vehicleID=184203geoff10439912.9174537037
April 9, 2009 at 11:50 pm #238315I was the first to comment
 . Top votes all the way
All voters be sure to VOTE TO FEATURE THIS CAR just below the picture. Great job Geoff.
James
April 12, 2009 at 7:42 pm #238316James;
Nice work! The devil is in the details and you’re coming up with some great ideas. I’d like to see some photos of the net and chrome strips for the luggage area. I’m working on a better toolbox idea for my compartment and the net and strips sound promising.
Thanks for the comments about my duchess. I do have wire wheels. they are made by Dayton wheels and are original to the car. By the way, I really love the product Hot Rims chrome wheel cleaner. It’s the first product I’ve used that is truly spray on and rinse off. Glad it does, cause if I had to clean and polish those wheels every time they got some grunge on them, I’d wouldn’t have time for driving!

Take care, Ringo
-
AuthorPosts
- You must be logged in to reply to this topic.