
Home › Forums › General Discussion › New Custom Made Steering Wheel & Dash
- This topic has 6 replies, 4 voices, and was last updated 12 years, 5 months ago by
 Royal.
-
AuthorPosts
-
November 1, 2013 at 3:43 pm #234960
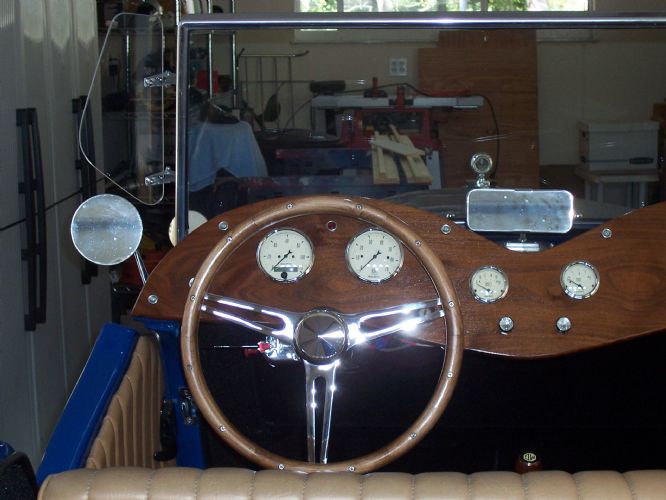
Attached is a photo of the Walnut Dash & Walnut Flat Dish Steering Wheel which I built for my TD, and just installed with new gauges. If anyone would like to know now I built the Flat dish Steering Wheel pls. let me know and I’ll get with you. Its not hard to do, but does cost a few $$$.
 November 1, 2013 at 3:56 pm #258638
Mark, funny that you should mention it. My steering wheel is the thing on my car most needing of restoration. I have a standard 3 spoke flat Grant wheel with wood around the perimeter just like yours. I have been looking for brass rivets to replace the original rivets once I take it apart and reassemble. The real wart on my wheel though, is the chrome. It is pitted and can not be cleaned or polished to look good. I had planned on taking the walnut wood off and refinishing. And while apart, grinding/sanding the chrome until glassy smooth and then powder coating prior to reassembly. I have been considering powder coating bright red or chrome. My brake drums and a few other small accents are red and I kinda like the idea. My badge bar is ugly also and I am considering doing it red along with my headlight rock guards. (I have been experimenting with home powder-coating lately. It’s relatively simple and the finished product looks terrific.)
Any pointers you have would be appreciated.November 1, 2013 at 4:14 pm #258639Roy I could not find the rivets any where. So I drilled out the rivets on the steering wheel and where the rivets were on the back side I filled the holes with walnut doll. I took the dish part to a Polishing company in Sarasota and had them flatten the dish and polish it. Then I took the polished part and reinstalled it using no. 6 1 inch long stainless steel screws instead of the rivets. When drilling the rivet I used a smaller drill then the rivet its self because the counter sunk hole left by the original rivet acted like a stop for the new screws. Also I did not screw the screws into the plugged hole but just next to them where the wood was much deeper. Also I used a very small amount of epoxy on the ends of each screw to make sure it bonded. Hope this helps. Any other questions pls. let me know.
November 1, 2013 at 5:34 pm #258640Tks Mark.
November 1, 2013 at 8:17 pm #258641Mark, that looks great! Well done!
Roy–please fill us in on this “home powder coat” thing. I am intrigued.All: One way to get a new and different wheel might be to go to a machine shop and have them CNC you a new wheel center. Since ours are (mostly) not dished it’s just a matter of getting a piece of 1/4 or 3/8-in aluminum plate in the diameter you want. If the old Grant fits you right and the wood is salvageable, all the better. Have ’em cut a new center, 3 holes or four or like Mark did with long slots–whatever. Then polish it or anodize it however you like.I almost went this route myself–was going to make the wood rim too–before I fell for the SoCal copy of the Brooklands Bluemels that I ended up with.November 1, 2013 at 8:19 pm #258642Any thought of using knife-making rivets? Like this for example
http://www.knifemaking.com/category-s/75.htmedsnova2013-11-01 20:22:40
November 1, 2013 at 9:24 pm #258643Gabe, thanks for the idea. I’ll have to wait until I disassemble my wheel to check the size needed against what’s available. I’m probably going to wait until January when I start work on my TDr list.
Powder Coating:About 18 months ago, when I first got my wire wheels, I became interested in powder coating since I really couldn’t afford to buy new wheels and also couldn’t afford to re-chrome mine. Also looming is the difficulty in finding a good chrome guy. (I have had bad experiences with chrome shops in the past.)So, two months ago, when Happy Jack bought my spare set of 5 wire wheels, I told him that I had considered buying the stuff necessary and powder coating them myself. That was the beginning of our experiment. I watched many (all available) You Tube videos on powder coating, and read a lot of dos-and-don’ts on the internet.Jack bought a $60+/- Harbor Freight powder coating gun that hooks up to any air compressor big enough to call itself an air compressor. I bought a toaster oven. And we were off and running. The first couple of pieces that we did were very impressive. Looked super good. I had scraped around for various pieces of metal that we could test on. Steel, aluminum, shiny, galvanized, and heavily rusted. Everything came out terrific. Very professional. I have in the past tried, unsuccessfully, to paint on highly polished chrome. No matter what undercoat, or even if I etched or sanded first, I was never happy and the top coat of paint never adhered well. So, I grabbed a brand new 3/8″ socket and we tried powder coating. Worked great. This stuff really is super tough. And it adhered to the chrome with no (as in NO) prep work on the highly polished chrome. Almost impossible to scrape off with a pen knife.Next, we went and spent a few hours talking to a guy here in New Bern that does powder coating professionally. Looked at many samples of his work and all of his tools. He had a few machines that cost thousands of dollars. But, the finished product didn’t look any better than what we had done. He had a standard kitchen range and a toaster oven for small stuff and he had built a walk-in sized oven for larger pieces like motorcycle frames. He showed us a small hand held gun that has a fan in it and he said that he liked it for small jobs. Craftsman. No air compressor needed. I became even more interested. Soon after, we had a Craftsman hand held powder coater also and a few selections of powder. This past week, I bought a used electric oven and now we can powder coat anything up to a standard 15″ wheel. (We are limited to 16″ by the size of the oven.)It is very fast. The “cook” time is about 12-15 minutes at 380-420 deg F. Powder seems a bit expensive, but it goes a long way. We built a make shift spray booth out of cardboard and it is good enough. You’ve got to do it in your garage because the powder is light, like talcum and any breeze carries it away. The gun puts a positive charge on the powder and you attach a negative wire to the piece you are coating. The gun, either by built in fan or air compressor, stirs the powder up inside the mixing cup until it is in suspension and homogeneous. When you pull the trigger, the powder travels out the nozzle past an electrode that is at some +13,000 volts. The powder is attracted naturally to the oppositely charged item that you are coating. (You attach a negative lead to the item.) It covers easily and surprisingly uniformly. Then you carefully put the item in the oven. You need to be gentle else the powder will fall off. Within a few minutes, you can see that powder turn to liquid and flow. A dozen or so minutes later, and you’re done.The finish is far superior to rattle cans and similarly priced. No disadvantages except that the piece must be metal and you can’t do rubber, wood or anything that couldn’t withstand the oven temperatures. Cleanup is easier than painting with a brush and the results aren’t even in the same ballpark. Powder comes in a very large assortment of colors and finishes.The above are my words as a novice powder coater. Come to Carlisle in May 2014 and see some samples.Royal2013-11-01 21:29:25
-
AuthorPosts
- You must be logged in to reply to this topic.