Home › Forums › MGTD Kit Cars › My Project › Update: New Dash!
- This topic has 20 replies, 7 voices, and was last updated 12 years, 2 months ago by
 KentT.
-
AuthorPosts
-
November 7, 2013 at 3:28 pm #234965
So aside from the long list of things to do to my TDr, I have been having some fun working on a new dash seeing as how the old one was cracked and faded and in general no longer good. I ordered a nice piece of 1″x12″x10′ mahogany and have been jig-sawing and sanding and drilling over the past week or two as life allows.
I also decided to make it much more like an original TD dash, adding a glove compartment, and fine tuning the shape a bit. This came about by tracing the original onto cardboard and from there cutting it down to the right size, tracing that onto the mahogany, then measuring and drawing for all the instrumentation.It is now entirely cut out and ready to be sanded, stained, and finished this weekend (I get friday off so yay for extra time!) Have a piano hinge and a simple lock on order from McMaster Carr. Going to try to find some chrome beading for around the edge of the dash and glove compartment too. Once I have it finished and installed I will try to post all the progress pics on here (Thanks in advance to Paul for helping me figure that out.)Next fun woodworking project is a new matching steering wheel! Found a really cool step-by-step guide for that HERE.Thanks to everyone for all the help! It has made this project much easier and less stressful. (so far, still lots to do though :P)November 7, 2013 at 3:41 pm #258707I would be very interested in where you find some chrome beading. I have been unable to find any that is small enough to look good.
November 7, 2013 at 3:43 pm #258708Yeah, I have yet to find any also, most of it seems to be the same size as the body beading.
November 7, 2013 at 8:40 pm #258709Here’s your bead, gentlemen.November 7, 2013 at 8:44 pm #258710You da man Ed!
November 11, 2013 at 3:10 pm #258711Well so much for “finished this weekend” ha! These quick little projects always seem to take forever! For some reason one of the coats of clear coat must’ve dried funny so now I need to sand it down a little and put on a few more layers, then clean up the instrument holes seeing as how they got clear coat in them and don’t fit any of the gauges properly.
Sooo… soon. hopefully!November 15, 2013 at 8:35 am #258712Ed, I really like your dash and just received some of the chrome trim tape that you referenced. Could you send (or send the link) of the details of how you applied it and also the details on your glove box build, including hinges, and clasp? It’s getting cold enough down here to start on my winter work list. Thanks.
November 15, 2013 at 8:45 am #258713Ed, I found your link. I guess that you just applied the chrome bead directly to the wood on the face with the chrome tape behind?? It really looks great. But, how has the chrome trim holding up? I expected to find at least a small skirt behind the chrome bead trim.
November 15, 2013 at 10:58 am #258714Roy, it’s holding fine. It’s made to go around fenders and stuff, so I don’t expect a problem.
As for the glovebox build, just search my blog for “glovebox” and it should pop up. The hinges and ball catch (as well as the beading around the glovebox door and the underside of the dash itself) are original TD stuff I scavenged from a used dashboard I got on ebay. If not for those things I’d just use regular mini hinges and a magnetic catch, and maybe just one strip of the stick-on beading surrounding the outside of the glovebox door, since it’s thicker than the original stuff.
edsnova2013-11-15 10:58:54
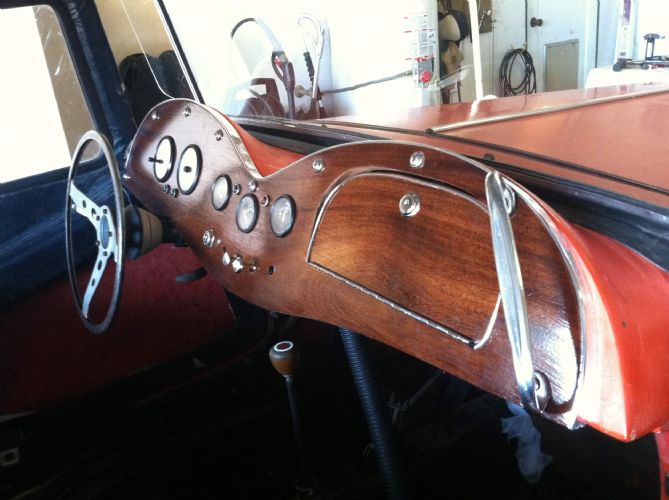
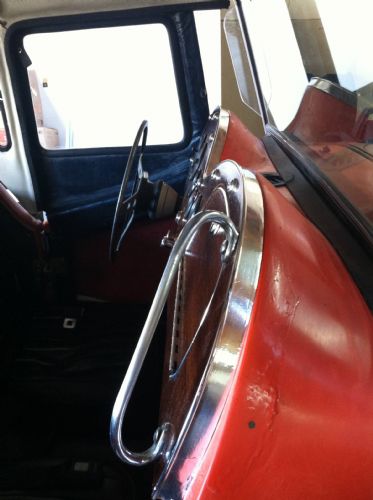
December 4, 2013 at 4:20 pm #258715While I am uploading pictures of the hard top I figured I might as well post some progress pictures of the dash. It is pretty much done right now except for finishing the glove box and putting the chrome on the edges. Anyway, enjoy the pictures! (Note they are not in the exact order)


 These two are testing the stain and screw styles.


Nobody2013-12-04 16:21:58
December 4, 2013 at 5:55 pm #258716yeah, man!
December 4, 2013 at 6:13 pm #258717Great looking dash!! How did you cut out the glove box door?
December 4, 2013 at 6:32 pm #258718Looking good

Bill Ascheman
Fiberfab Ford
Modified 5.0, 5sp., 4:11
Autocross & Hillclimb
"Drive Happy"December 4, 2013 at 7:14 pm #258719I did the glove box by first doing a cut along the bottom with a handheld circular saw, then going the rest of the way with a jigsaw.
December 11, 2013 at 2:43 pm #258720Got more work done over this last weekend, the dash is now done. At least until I decide to pay out some cash to get a stainless center console made… But I really like how it turned out! the glove box could use a little work but I’m sure that will get sorted out easily enough.
Anyway, here are a few pics, they are not great due to the top being on right now because of cold weather.
 December 11, 2013 at 3:39 pm #258721
Very nice job, Derek. One question: What kind of Minwax did you go with? My eyes aren’t sharp enough to read the label.
1981 Lafer TI
1600 cc Type 1 engineDecember 11, 2013 at 4:40 pm #258722The stain is 225 Red Mahogany. I used one coat of it on 1″ mahogany plank that I got at the local lumber yard. The clear coat is just a standard gloss water based finish also by Minwax.
December 11, 2013 at 4:56 pm #258723Nicely done. I like the chrome piece on top.
December 11, 2013 at 6:17 pm #258724Beautiful! Can you tell us the dimensions of the board you bought?
Early FF TDr on 69 VW pan
Slowly coming back from the ashes...December 12, 2013 at 12:22 pm #258725The only piece of mahogany they could order was 1″x12″x10′ so I had them cut it in half to 5′ when I picked it up. It ran me about $75 for the whole thing, and I still have half of it left that I plan on planeing (That is spelled incorrectly, but the action of using a plane on the wood…) down to 1/2″ and doing my steering wheel in the same mahogany color, following this pattern.
All your feedback is much appreciated! Thanks guys!Nobody2013-12-12 12:49:25
December 12, 2013 at 1:02 pm #258726Thanks! The 1×12 was the dimension I was looking for… I couldn’t tell if a 1×12 would be wide enough for all the curves…
Early FF TDr on 69 VW pan
Slowly coming back from the ashes... -
AuthorPosts
- You must be logged in to reply to this topic.
