
Home › Forums › MGTD Kit Cars › VW Based Kits › TDR Interior
- This topic has 37 replies, 12 voices, and was last updated 10 years, 2 months ago by
 davearoy.
-
AuthorPosts
-
November 15, 2015 at 3:27 pm #235929I am looking at gutting the interior of the TDR and replacing dash, carpets and seat/door vinyl. I could do a like for like replacement (carpet on floor, sides, back of seat and area behind the seats) but would be interested in seeing what others have done. There is no question that the seats will be covered with faux leather vinyl but looking for ideas on design (quilted or sculptured finish) piping or no piping. Like the idea of using webbing as opposed to plywood to save the numb butt that others have reportedIdeas on dash layout, switch placement, gauges etc. I know the wiring will be a nightmare as the previous owner disconnected all the wiring to remove the dash and ran it through a thickness planner to remove finish and try to eliminate cracks in mahogany. He used butt connectors which have pulled apart on some wires and have led to a number of problems. I intend to solder and shrinkwrap joints or if possible replace wires with multiple joins as each joint is a potential point of failure in the future.So if there are any members who can take some pics of their TDR interior and post I would appreciate their assistance. Also if anyone has done what I propose doing can offer any advise on pitfalls to avoid would welcome their input
David B Dixon
Port Perry ON CA
SabineNovember 15, 2015 at 4:10 pm #266236Take a tour through the photo gallery for ideas. Thousands of photos posted there.
Bill Ascheman
Fiberfab Ford
Modified 5.0, 5sp., 4:11
Autocross & Hillclimb
"Drive Happy"November 15, 2015 at 6:10 pm #266237billnparts wrote:Take a tour through the photo gallery for ideas. Thousands of photos posted there.I agree! This place is a gold mine of ideas.

No matter what you’re looking to do, your level of experience or abilities, you can get all sorts of good ideas.
Tweak them according to your likes and you can’t miss!
Amor Conquista Todo
November 15, 2015 at 6:15 pm #266238Another place to check is Bing or Google.
Search in images for something like; MG TD interior.
You’ll find lots of picsAmor Conquista Todo
November 15, 2015 at 8:27 pm #266239When I did Bridget I decided to go with vinyl on panels in a lot of places the original kit had carpet. I did this to get the car closer to what the TD looked like originally. Here’s a blog post on some of that.
Similarly, I went with the stock TD gauge placement, as far as possible. It’s a very good layout, IMHO, with the speedo and tach dead ahead and the oil pressure (+temp on later cars) just to the right. I’ve also become something of an evangelist for the 5-inch tach and speedometer, though there are good reasons to go with a 4-inch or even smaller dial, depending on the steering wheel you favor and how it lines up with your eyes.Here’s the start of my dash thread. One need not go the mosaic route but as far as making the shape right and considering (if that is your fancy) how to get a replica dash to look something like an original TD, the principles are the same.You have the right idea with the wiring. There’s not really all that much to it on these cars, so clean and orderly, with solders and shrink tubing, is the way to go. Don’t let anyone talk you into using Lucas bullet connectors!:-)November 15, 2015 at 10:15 pm #266240Your dash, glove box and interior is off the hook..Mucho skill in all of that ED !
November 15, 2015 at 10:31 pm #266241Ed’s photos demonstrate exceptional craftsmanship that I could never emulate in a million years — yet the photos omitted what I consider to be critical in making a new dash … getting the shape and the holes in exactly the right spot. My old FF dash was “close” to the outline of the cowl, but not quite right. Also, I thought the FF dash was not tall enough (bottom to top). The way I addressed these was to cut a hole in my walnut plywood approximately where the steering wheel passed through, then cut “through” the hole and generously around and below it to the sides, so as to leave plenty of wood for the lower edge later on. I then fit the FF over the top of it and used it to mark the holes where the bolts would go, then drilled out the holes and attached the whole piece of plywood to my car … and literally traced the outline of the cowl onto the wood. Now that that was cut, I laid the FF dash back on top of the plywood but about 1-1/2″ lower down than the original height, and traced that. The lower part required additional fitting because you need to go around the doors.
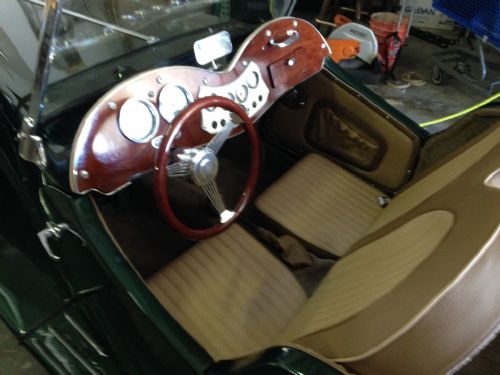
I bought an original TD instrument panel, and as modified, it is a perfect fit for four (4) 2″ gauges and some marker lights, and the original TD ignition switch (and a pushbutton starter is also necessary). Trace the new-old instrument panel onto the dash and move the lines inward an inch to cut the holes out. I found out the hard way that the wiring gets in the way unless you carve back the inside edges.The speedo and tach that I bought are 4-1/2″ units. I bought a 4-1/2″ hole saw and centered them on the steering wheel as Ed did.I have insufficient skills or tools to make a glove box or inlaid wood. I did cut a hole for a radio, then stacked more plywood behind that hole and cut a hole in those pieces, too, and mounted the radio inside the hole so that the knobs are below the level of the dash. My “glove box cover” consists of a small piece of walnut that I bought off eBay and some tiny hinges and a magnetic catch. A 7/16″ plastic chrome strip around the perimeter completes the dash.The seatback imitates the shape of the cowl, with the “high spot” behind the driver and passenger to serve as a headrest in the event of a rear-end collision. I’m also fitting seat and shoulder belts although they aren’t in the car yet.Well, I tried to upload three photos, but the usual dash photo turns itself upside down, the second showing the seats was okay, but the third one showing the shape of the seats wouldn’t load. Obviously I’m a lot farther along since the dash photo was taken but just hold your computer upside down and it will show my work.
 November 16, 2015 at 8:52 am #266242
Great dash, John.
Regarding the steering column relief: The BCW cars have the column under the dash, so there was no need to fuss with that.To get the shape I bought a clapped-out original TD dashboard. I took my old dash and traced it on my new wood, then I put the TD dash on top and traced that. The final piece took some trimming as well.The good news about these dashboards is that they don’t have to be all that precise. You leave a half-inch or so reveal at the scuttle top and the windlass bead finishes it off. If you look at the original TDs, you see the scuttle reveal gets larger on each side, obviating the need for a “door notch.” It’s still a bit fiddly fitting the vinyl bead so it’s snug against the door top bead, but you only need to get it close for it to work and look right.As you say, having an original gauge cluster makes the centerpiece pretty straightforward. If you can find the center you can get it right–though it does tend to take some patience with the jigsaw.The speedo and tach look just right on yours. I tried to get mine close to what the TDs were–meaning that the speedo, on the left, was a little lower than the tach. I ended up getting the gap between the two gauges slightly too larger, on account of my speedo being slightly smaller than the original, and my using the outside edge as the guide. Yours look better spaced.The key, again, is getting them where you see them when it counts. It’s exceedingly hard to make a polished hardwood dashboard look bad.November 16, 2015 at 9:11 am #266243John, beautiful! One minor point: the starter on a MGT (all) was a “pull to start” black octagon headed switch.
November 16, 2015 at 9:22 am #266244
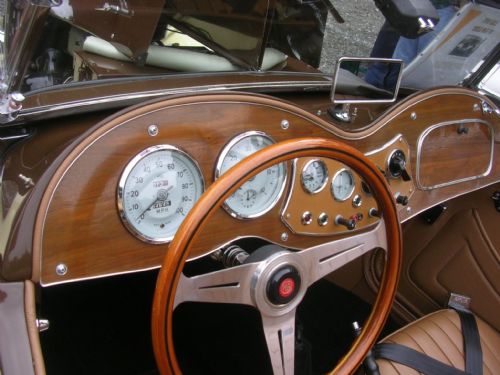
I found this excellent close up of a TD MKII interior.
It shows the dial, glove box and switch layout very well.
(BTW I NEED this steering wheel!;))Amor Conquista Todo
November 16, 2015 at 9:25 am #266245Here’s an even better close up.
Amor Conquista Todo
November 16, 2015 at 9:50 am #266246Steering wheel looks to be a Flat 4 product. Nice looking dash in both pics.Allen Caron
VW based 53MGTD - "MoneyPenny"
"If one thing matters, everything matters" - from the book The ShackNovember 16, 2015 at 9:22 pm #266247Here is the link to my steering wheel. (Warning: it is big. Mine is 17 inches across). This is a good repro of the Bluemels Brooklands wheel popular on 1940s TCs, ’50s TDs, Jags and Morgans of that era.
Smaller diameter ones are apparently available here–but you’ll have to make your own center hub.November 17, 2015 at 1:19 pm #266248Actually this is the link to my wheel … unfortunately it currently shows out of stock:
They also have a lot of other interesting wood-rimmed wheels. The only problem I had with this wheel was that it comes with a horn button that I really wanted to work, and it took some rewiring to get that accomplished. BTW, you do NOT need the extension piece if you buy their product.The really awesome wheels are from Moto-Lita: https://www.moto-lita.co.uk/our-products/Wheel_Details_01.aspx?WH_ID=21I really wanted this wheel but couldn’t be sure what adapter to get, plus it’s expensive and slow to bring over here from England.PMOSSBERG2015-11-17 15:18:11
November 17, 2015 at 8:45 pm #266249The Moto Lita would be something of a gold standard. I’d love to see one like that on one of our cars.
November 22, 2015 at 7:39 am #266250John
Absolutely a beautiful dash. Exactly what I am looking to be doing. Are your gauges VDO or Dophin? The white face versus black makes for great contrast with dark walnut. What is the diameter of your your steering wheel? As I am 6′ plus I struggle to get in to TDR with 12″ – 3″ dish steering wheelDavid B Dixon
Port Perry ON CA
SabineNovember 22, 2015 at 7:59 am #266251Bill
Tried going thru the photo gallery but members take more pics of exterior than interior and without proper titles for pics cannot do a search to filter for what I am looking for. Doing Google search for TD interiors has been more productive but what I was interested in was what the members have done and can be done different from original kitsDavid B Dixon
Port Perry ON CA
SabineNovember 22, 2015 at 8:38 am #266252David, You may find some answers in my picture gallery (18705). I’m only 6′ tall but sit “high in the saddle”. I had a lot of difficulty finding a steering wheel that fit both the car and me. Also notice that my steering shaft and wheel are mounted about 2″ higher than those which are hung under the dash. Mine now fits me perfectly with good sight lines to the gauges. I tried at least 6 different wheels before settling. No dish. All the dished wheels put it too close to my chest. Ed’s wheel is nice but was too big in diameter. The grip on some of the wheels is so thick, it blocks the speedo and tach.
Trial and error. You’ll find it. (Moving the steering column up is not hard.)
Roy
November 22, 2015 at 12:20 pm #266253Ed
Your blog should be required reading for any new members the almost step by step pics chronicles your work from good to great. My apologies to anyone who has done the same as Ed that I have yet to read. I see that Paul has made some posts sticky and ones that have been done eg Suspension should be considered by new members like me the place to start reading before tackling any repairs or modifications. Where some great ideas are “lost” is when some folks go off on a tangent within a posting and when one is scanning through old postings the subject heading does not cover what I am looking for. The search feature is able to find some of the “lost” gems provided the search string matches the words used and I know the correct terminologyDavid B Dixon
Port Perry ON CA
SabineNovember 22, 2015 at 6:58 pm #266254Toller, my gauges are from Speedhut. One example is the speedometer, which I’ve linked here:
I obviously customized this and all the other gauges in the same manner. It takes a 4-1/2″ hole saw (which I’ll sell really cheap if you need one!)to cut the dash for the speedo and tach. The other four gauges (fuel, amps, oil pressure, and oil temperature) are 2″ and fit perfectly into the original TD dashboard. I simply made a new hole in the center for the TD key/headlight switch.The steering wheel is 15″ diameter with no “dish” and no extensions. I am 6′-4″ and do not have an issue with clearance, but that may be because I built new seat bases that lower me waaaay down and I also made a new seat back that tilts waaaay back to get me away from the wheel. In fact, I’m in the process of raising the seat upwards about an inch because right now I’m almost too low (I can touch the ground from the driver’s seat without even stretching). The only issue I have with this wheel is that it really blocks my view of the speedo and tach. That may improve a little when I raise the seat up, but visibility of the tach and speedo will never be good. Fortunately for a VW powered TDR, speeding and overrevving are not really major concerns.I’m hoping to get everything together and have a full photo shoot before Christmas. I am tantalizingly close and yet it still seems like a million things left to do.November 22, 2015 at 9:41 pm #266255Those Speedhut gauges are the bomb, far as I’m concerned.
November 23, 2015 at 3:51 am #266256Take the seat back and shorten it and place it further back into the rear well.
Bill Ascheman
Fiberfab Ford
Modified 5.0, 5sp., 4:11
Autocross & Hillclimb
"Drive Happy"November 23, 2015 at 1:30 pm #266257I read this post for the first time today and when I read the words “I’m thinking of guting the interior” I immediately felt I had to offer this advice: beware of taking too big of a bite of the project at once. Yes, you want to work from the ground up and yes you don’t want to undo something you just did BUT… I think that there are a great many uncompleted kits out there because the owner got discouraged and lost interest. I’m in favor of getting the car running well enough to drive it and have some fun while chipping away at the enhancements. Try to match the scale of the project to your personal working style. My 2 cents.
😛November 23, 2015 at 3:30 pm #266258“Beware of taking too big of a bite of the project at once.” I’ll second that, but it’s easier said than done. If you are a perfectionist, I have one piece of advice: Get another vehicle. I bought my car off eBay because I thought it was “cheap” even though I wasn’t sure whether I’d fit in it. I didn’t, but I thought it would be a simple matter to lower and recline the seat … it wasn’t. It became a major struggle to gain just a few inches of headroom and “chestroom.” I did finally succeed, which is the biggest advantage the TDR has over the real MG TD. But the more time, $$$, and effort I put into the car, the more I tore it down, the more the project snowballed. The gauges are a perfect example … several of the old ones weren’t working and I wanted to replace them. But what was the point in replacing them in an old beatup dashboard? So out comes the dashboard and a new project, and I forgot that I’d have to rewire everything and I had no idea how to do that, and then WTH, why not a repaint since I have this much time and money in? And so on and so forth. Nothing you do is ever simple, everything breaks or doesn’t fit, and one thing leads to another, hence my car’s name: “Murphy.” At one point I was totally ready to just chuck “Murphy” and all the parts, except that you really can’t resell a disassembled kit at all, let alone for anything like you have in it. I felt once I had reached a certain level of investment, I mean once I had wasted “X” number of dollars and “Y” amount of time, I felt WTH, I am already screwed on this financially, I might as well keep at it and do everything and get it done right so I will finally get it “just right” and keep it forever. What is bad is that I probably will NEVER be entirely happy with “Murphy,” but one way or another, “Murphy” is going to be finished.
Now, if you’ll excuse me, I have to go work on “Murphy” some more so I can put back the hood as soon as the grill comes back from the chrome shop. Etc. etc.November 23, 2015 at 6:52 pm #266259The Speedster guys talk about the “madness” as an incurable disease affecting all who get bitten by the Speedster bug.
Apparently we have our own TDr strain of the madness.
I assume they are similar diseases and cause similar actions and symptoms. But of course, TDr madness is pronounced with a proper British accent.
Paul Mossberg
Former Owner of a 1981 Classic Roadsters Ltd. Duchess (VW)
2005 Intermeccanica RoadsterIf you own a TDr and are not in the Registry, please go to https://tdreplica.com/forums/topic/mg-td-replica-registry/ and register (you need to copy and paste the link)
-
AuthorPosts
- You must be logged in to reply to this topic.