Home › Forums › MGTD Kit Cars › My Project › Another project reported
- This topic has 224 replies, 22 voices, and was last updated 13 years, 6 months ago by
 ray10.
-
AuthorPosts
-
March 27, 2012 at 12:25 am #244767
Not to slow your progress but the fitting you have are the wrong ones they should look like this
threads only on the outside any auto parts store will carry them. Also did you find a new fuel sender unit?ray102012-03-27 00:31:47
TDREPLICA Map
http://www.arcgis.com/home/webmap/viewer.html?webmap=7f9174ad614e43b680deba085b0abf48
March 27, 2012 at 12:38 am #244768Here are the type of fitting I used from Napa auto parts

TDREPLICA Map
http://www.arcgis.com/home/webmap/viewer.html?webmap=7f9174ad614e43b680deba085b0abf48
March 27, 2012 at 1:00 am #244769Anonymous
InactiveRay, hard to explain but here goes. Your picture is exactly what I made up. The flare at the end of the tube has to press against something to seal. Normally a nipple shaped protrusion at the bottom of the threaded hole. My cylinders have a threaded hole WITHOUT a nipple to seat on. In other words what is pictured above will thread into the hole. BUT it will not seal because there is no contact (or nipple) at the bottom of the hole. The flare just spins around. The adapters I pictured above are an attempt to provide a way of sealing the connection. They have a nipple for seating. It just seems strange that an extra part is required. Extra parts cost extra money and provide additonal areas to leak.
March 27, 2012 at 1:18 am #244770Anonymous
Inactive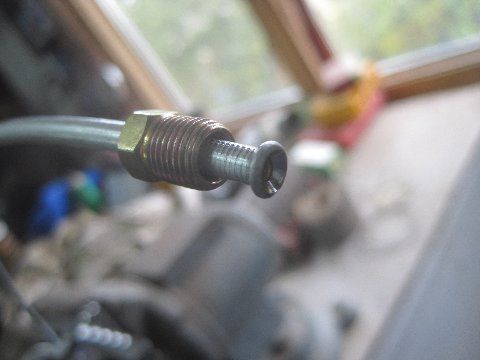
This is the double flare fitting. That recess on the end is looking for something to mate to.
March 27, 2012 at 1:26 am #244771Anonymous
Inactive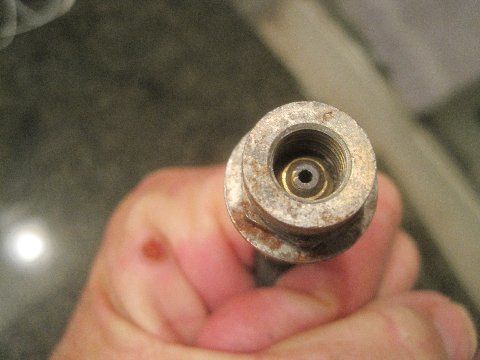
The bottom of this hole has a raised protrusion. A nipple. The flare pictured previouly fits against it to form a seal. My wheel cylinders have no protrusion. The adaptors above would provide such a seal. Like I said hard to explain. Hope this clears it up.
March 27, 2012 at 11:04 am #244772Ok got what your saying. by the way nice double flare.

TDREPLICA Map
http://www.arcgis.com/home/webmap/viewer.html?webmap=7f9174ad614e43b680deba085b0abf48
March 27, 2012 at 4:39 pm #244773Anonymous
Inactive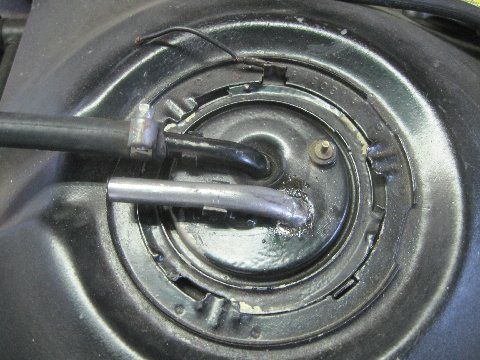
Soldered in a 3/8″ tube (silver)on the gas tank sending unit. Don’t know where it goes. Vent? The other one (black) is the supply line up to the engine.
March 27, 2012 at 5:11 pm #244774Anonymous
Inactive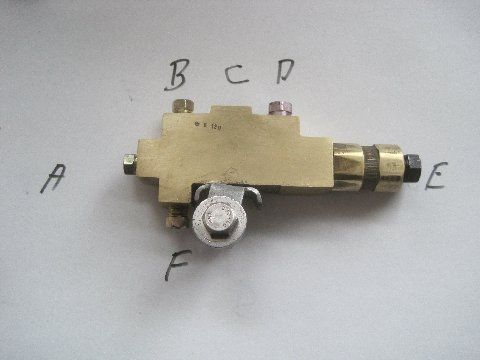
This is the undocumented “Brake Distribution and Warning Switch Assembly.”
Both Haynes and Chilton repair books mention it in passing. They say, “Plumb it like you found it”.I found mine in a box, bare. Here is my best guess where it connectsA=Left front brakeB= Master Cylinder front?C= Electrical connectionD= Master Cylinder rear?E=Rear brakesF=Right front brakeMarch 27, 2012 at 5:44 pm #244775Yup…vent line.
Ray10 confirmed this back on page six of this thread!Not sure where it should vent to or whether or not a line should come off it and lead to …?PMOSSBERG2012-03-27 17:45:39
Paul Mossberg
Former Owner of a 1981 Classic Roadsters Ltd. Duchess (VW)
2005 Intermeccanica RoadsterIf you own a TDr and are not in the Registry, please go to https://tdreplica.com/forums/topic/mg-td-replica-registry/ and register (you need to copy and paste the link)
March 27, 2012 at 8:15 pm #244776Here’s a diagram of the brake warning blah blah blah. Looks like you’re about right. Not for sure though. I’s you I’d check to see if fluid put in at D comes out at E, and fluid dropped in B comes out A & F. That’d confirm your suspicion.
March 27, 2012 at 8:45 pm #244777I think mine runs from the over flow on my carb. back to the gas tank? Not 100%sure will check when I get home on wednesday.ok checked my shop manual it says one is for fuel pick-up- pipe , the other is fuel return pipe.that goes to the carb.
ray102012-03-28 12:23:27
TDREPLICA Map
http://www.arcgis.com/home/webmap/viewer.html?webmap=7f9174ad614e43b680deba085b0abf48
March 28, 2012 at 12:30 pm #244778Anonymous
InactiveWheel cylinder problem solved! At the top of this page Ray posted a photo of hard line with a BUBBLE FLARE on the ends. This is what was required and not the Double Flare. The Bubble Flare seats on a machined convex at the bottom of the hole. The adapters shown on previous page seat on that machined surface. Then they have the Double Flare on the other end. The wheel cylinder is drilled and tapped deeper than normal so it requires extended fittings.Lots of time spent on a simple thing. Life long learning!
March 28, 2012 at 2:14 pm #244779I checked the fuel lines on my ”factory built ”BCW with the Chevette engine.The vent line runs up the left side of the chassis paralall to the fuel line to a point near the top left side of the radiator.It must have connected to the emmissions system but all the smog stuff had been removed before I got the car.It just sits there beside the radiator ,not connected to anything, no cap or plug on the end of the metal pipe. works OK as it is.
March 28, 2012 at 5:41 pm #244780Yeah, venting the fuel tank to the air was SOP until about 1973 or 4.
Charcoal canister after that, and then came The Era of Spaghetti Pipes Out Yer Gas Tank, which we are still in.
Glad to hear the brake line thing is solved, conceptually.
March 28, 2012 at 6:33 pm #244781Anonymous
Inactive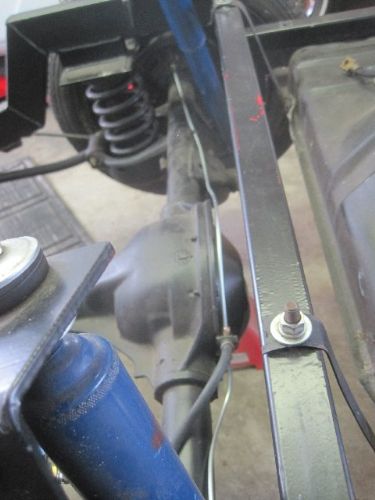
DRUM ROLL PLEASE! Its fun when a 10 minute job takes days. Four threaded connectors fastened. Rear axel officially braked! Did some learning, meet some nice auto parts salesmen.
Oh ya. So I went to Kohlweiss Auto Parts for the brake cylinder problem. The first guy that waited on me, and I won’t mention Tony by name, never made eye contact, never took his hands off the keyboard and basically was a much help as
. So I strolled around the store looking at all the goodies when another REAL saleman said “Can I help you”. I explained the problem. He went in the back and pulled a Chevette wheel cylinder, opened it and looked up the correct adaptors. Huge sale of $5.25 for 2 adaptors. Yahoo! Old school service. You bet I will be back!March 28, 2012 at 6:47 pm #244782Anonymous
Inactive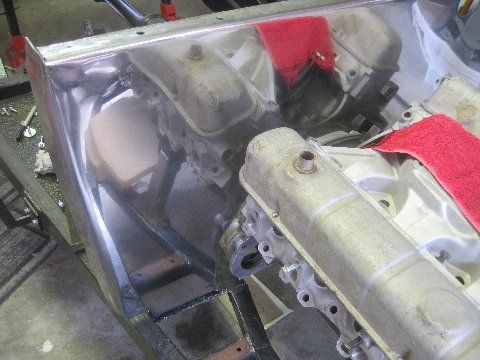
After all this success I decided to check the brakes. Put the car on stands, pulled the rear drums and all was fine. Need to run the front to back brake lines. Master Cylinder needs monted. Fire wall needs placed. Put maybe the last cut on the stainless firewall. Not sure if you could shave with it but it is more reflective than the wood one was.
If anyone wanted to reveal the path of the fuel line and brake line and the position of the undocumented brake switch/valve I promise not to tell where the info came from. Inside the left frame rail is what the Gaselle/Chevette book says. That make the brake/fuel line the lowest point at a couple of places. Guess no off roading!March 28, 2012 at 8:25 pm #244783I think parts Guys come to 2 types those that know and those that think they do!! I found a store N.P.A. the guyes there are all older and most know with out the book and have never made a mistake .
March 28, 2012 at 8:31 pm #244784Scott, check my post from 7:15 pm yesterday for a link to a diagram of how your brake distribution/warning switch goes. It’s from the Auto Zone web site, but looks probably right.
By the way, you kick ass, build-wise. I am in awe.
March 28, 2012 at 10:19 pm #244785I need to make a correction on the hook up of the vent line . the vent line hooks up to the gas tank and is ran along the drivers side frame rail with the gas line and brake line , it goes up to the fuel pump where it attaches to a gas line that goes up to the charcoal canister.
TDREPLICA Map
http://www.arcgis.com/home/webmap/viewer.html?webmap=7f9174ad614e43b680deba085b0abf48
March 29, 2012 at 1:05 am #244786Anonymous
InactiveEd
Thanks. Confirms guess, but I will do a drip test as suggested.B=rear connection on master cylinder (front brakes)D=front connection on master clyinder (rear brakes)RayGuess I will leave it disconnected for now. Don’t seem to have a charcoal canister.DanI hear you loud and clear on the parts guys. I felt like looking for a tip jar or buying donuts when Mark gave me SERVICE!THANKS AGAIN TO ALL FOR HELP AND ENCOURAGEMENT!!!!!!March 30, 2012 at 6:00 am #244787I realize this may be to late.But should help in the future.
Next time buy the brake line with the needed bubble flare,Then cut to length and double flare the other end.There is nothing in books,or in stone that says both ends of a brake line need be flared the same.I have done it this way for years.Got tired of expensive adapters that would crack when tightend.March 31, 2012 at 4:19 pm #244788You can get an in-line fuel filter for a Chrysler product which has three lines. One in, one out, and one for vent.
Bill Ascheman
Fiberfab Ford
Modified 5.0, 5sp., 4:11
Autocross & Hillclimb
"Drive Happy"April 2, 2012 at 11:39 pm #244789Anonymous
Inactive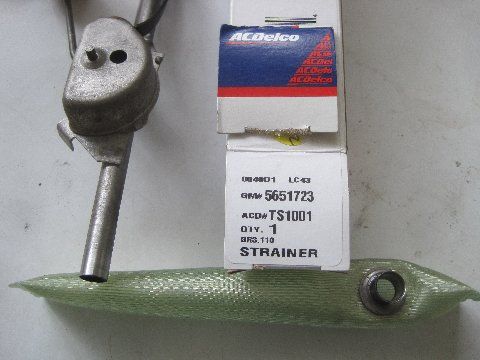
Fuel filter is now accounted for. Held on by a press fit. Something easy once it got here.
April 2, 2012 at 11:58 pm #244790Anonymous
Inactive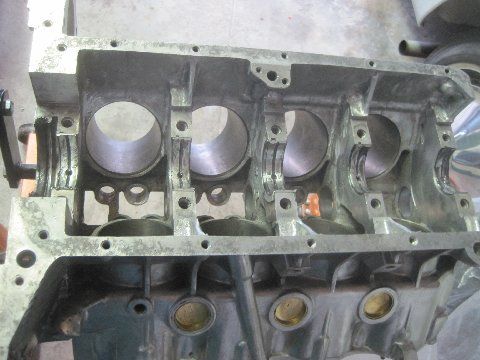 Lets build an engine! After spending all that time on a the brake connections its time to do something easy. Yah right. The block has been sitting on the stand for quite awhile, patiently awaiting assembly.How to build the bottom end of a Rover V8 Engine – YouTube show how its done. Well almost.The Buick engine uses a rope seal (1960 technology) instead of the neoprene one shown in the video. And there is another little indescribable seal with metal pin expanders which uses directions like top and bottom. The engine is upside down when you install the seal, so is the top the bottom etc. So the cam bearings and main bearings are in along with the rope seal.April 3, 2012 at 12:01 am #244791
Anonymous
Inactive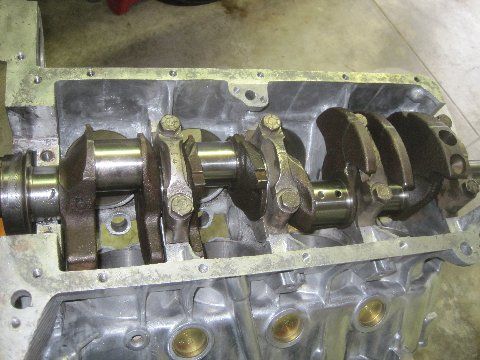
The crank fell into place. The last bearing cap awaitning the rope seal adjustment.
-
AuthorPosts
- You must be logged in to reply to this topic.
