Home › Forums › MGTD Kit Cars › VW Based Kits › bracket – main rear bumper
- This topic has 18 replies, 8 voices, and was last updated 12 years, 5 months ago by
newkitman.
-
AuthorPosts
-
May 12, 2013 at 1:30 pm #234677
I purchased the CMC/FF kit on ebay Dec 2012. Fairly complete after 25 years of neglect but part missing that I need now is main rear bumper braket. Can somebody send me precise measurements and angle iron size. I have copy of metal box list that makes me think top of U legs have fittings? Thank you, kinda stuck at the moment, really don’t want to guess! Mike
May 12, 2013 at 1:50 pm #255800Hi Mike,
Hope you don’t mind, I deleted the duplicate post.
Which bracket are you referring to?
The “spring steel”, curved pieces described in the CMC manual as the “outer brackets”? Those are reproduction MG TD pieces. It might be easeir to buy ’em than make ’em.
Or are you asking about the subframe that is under the rear splash pan?
Paul Mossberg
Former Owner of a 1981 Classic Roadsters Ltd. Duchess (VW)
2005 Intermeccanica RoadsterIf you own a TDr and are not in the Registry, please go to https://tdreplica.com/forums/topic/mg-td-replica-registry/ and register (you need to copy and paste the link)
May 12, 2013 at 1:59 pm #255801Thanks for deleting duplicate. Got msg that it didn’t post. Definitely looking for large u shaped main rear bracket, have the. ? Shaped brackets thanks
May 12, 2013 at 3:30 pm #255802Anonymous
Inactivethere are two brackets for the rear bumper. Are you looking for the support for the rear bracket? Or the bracket that the bumper brackets bolt to? I have both in my garage and could dig them out and measure them for you. Could send a picture with camera phone. Would need cell phone number to send. Or could get daughter to post pictures here. She is out of town due home tomorrow. Let me know.
May 12, 2013 at 7:57 pm #255803Think he’s wanting the main supports, not the bumper bracket. Those are question mark shaped, yes?
May 12, 2013 at 10:00 pm #255804Anonymous
InactiveED, Juneybug has the question shaped brackets. There are two different main support brackets used on the fiberfab kits. One is a two piece bracket open in the rear with supports to the frame. The other one I believe was a cmc bracket is a one piece u shape . It has a one piece u shaped bracket to support the main bumper bracket The bumper support bracket is one piece u shaped conectting both sides. It is not open in the rear..
I have an early fiberfab kit that I bought assembled and am rebuilding it the other one is a later kit that I bought for parts, It is different than the early one. Fenders bolt togeather in front, old one had seperate piece between fenders and other differences. Front bumper mounting brackets and rear bumper mounting brackets are different between the cars. Looks like a production change to make later one more simple.If juneybug wants pictures and measurements of them will dig out later bracket from garage and remove brackets from assembled car To show differences. Will also post measurmentsof both. As posted earlier, Daughter out of town and posting would be after her return.If JuneMay 13, 2013 at 12:06 am #255805“juneybug” signed his name folks.
Mike
Paul Mossberg
Former Owner of a 1981 Classic Roadsters Ltd. Duchess (VW)
2005 Intermeccanica RoadsterIf you own a TDr and are not in the Registry, please go to https://tdreplica.com/forums/topic/mg-td-replica-registry/ and register (you need to copy and paste the link)
May 21, 2013 at 9:06 pm #255806sorry to be so long getting back. My mobile is 289 439 5322. I have the smaller U bracket that comes up from the wishbone. to meet the larger missing one, that is fastened just ahead of the shocks. The parts list I have shows 2 angles that extend from this to the rear. Your earlier measurements, and the fact that the two pieces extending rearward must meet the vertical pieces of the smaller U help but a photo would be very useful. It seems this will carry a lot of weight with minimum contact. Thanks very much for your help.
MikeMay 21, 2013 at 9:08 pm #255807yes it is the large piece that goes from Shock mount rearward to bumper.
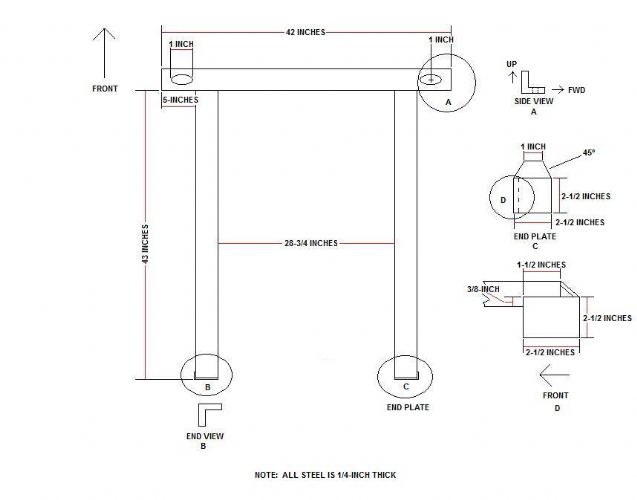
May 21, 2013 at 9:12 pm #255808Mike. Is this what you’re looking for?

Allen Caron
VW based 53MGTD - "MoneyPenny"
"If one thing matters, everything matters" - from the book The ShackMay 22, 2013 at 9:53 am #255809Allen,
people that know me are surprised that I would take on a project that requires some mechanical skill. They don’t know the depth of my resources. Thank you for the detail in your drawing and for the progress photos of Moneypenny in fotki. Although I’m not there yet I am already thinking about cutting fiberglass. I have downloaded or read the manuals but with the tech advances since they were written I wonder if this community has a preferred method. Does a dremel circular saw leave a clean edge? I am unable to see any score lines in my hood so I wonder what the length should be at the center line, gotta hate it when you cut an inch short.
MikeMay 22, 2013 at 10:05 am #255810A Dremel with the cutting/grinding head works very, very well to cut and shape fiberglass. You can cut with the edge and grind/file with the flat part.
I wouldn’t recommend a “toothed” saw as it might splinter edges of the gelcoat if it binds, like when making a turn.Slow, cautious and easy is the key… Measure many times, not just twice, then cut once…Early FF TDr on 69 VW pan
Slowly coming back from the ashes...May 22, 2013 at 12:20 pm #255811Check out those new oscillating tools with a cutting blade. I started using that on my last tear down/rebuild. Cuts nice and can get into tight places.
Bill Ascheman
Fiberfab Ford
Modified 5.0, 5sp., 4:11
Autocross & Hillclimb
"Drive Happy"May 22, 2013 at 2:19 pm #255812I used my small angle grinder with a cutting wheel. Put painter’ tape along the scribe line and stayed about 1/8-inch from the tape and cut on the jelcoat side. Then used a flat sander with 100 grit sandppaper to bring it down to the tape. That was after measuring about 10 times. Wish the PO would have fit, measured, and marked the side cowls BEFORE cutting. My side cowls are about 3/4-inch short, causing me a lot of extra work. As with anything we do, measure a dozen times, ask questions, remeasure another dozen times and then cut once.
Allen Caron
VW based 53MGTD - "MoneyPenny"
"If one thing matters, everything matters" - from the book The ShackAugust 19, 2013 at 12:05 pm #255813Mike,
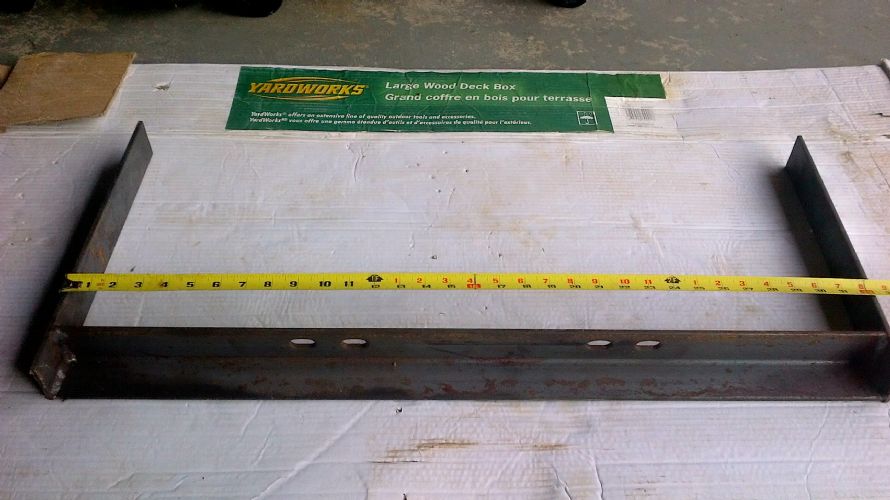
I’m having the same problem, missing the brackets entirely. I’m a little confused, the lower bracket from trans tubes with 2 U-bolts makes sense which I’ve attached. What is the cross bracket width 32 inches or 42 inches? So it appears the 2 support brackets (43 inch) from front to back end with the bumper mounts go to the lower support. Now, what is the purpose of the cross bracket (main) that bolts to the lower mount holes on the cast mount just back from the oval plate covering the shift rod connector (shown in the FiberFab manual)? Is there an upper bracket that connects to the bracket illustrated by “newkitman”. Is the “newkitman” bracket the lower or upper? A photo would be nice.Thanx,John (Prisoner#6)August 19, 2013 at 7:34 pm #255814Here is a picture of the rear bracket. Later in the build the lower bracket is pulled up and bolted to this main bracket.

If that doesn’t work you can go to this link to see my build photos to date.
http://www.fotki.com/Allen1209
PMOSSBERG2013-08-19 23:55:20
Allen Caron
VW based 53MGTD - "MoneyPenny"
"If one thing matters, everything matters" - from the book The ShackAugust 20, 2013 at 9:05 am #255815the bracket that comes up from the frame wishbone is a 32 inch angle iron 2″ by 2″ by 1/4 thick and the 2 vertical pieces are 14″ flat also 2″ and 1/4″ thick. hopefully you can see in the photo the slots to accommodate the u-bolts that attach to the wishbone. My vertical pieces have no slots so it may be the expectation is to weld to the larger rear support that Allen (newkitman) detailed. Mike
 juneybug2013-08-20 09:08:35August 20, 2013 at 9:21 am #255816
And now that I’ve read your post carefully, in Allen’s photo the extensions at the top of the support bracket go to bolt holes at the ends of the torsion tube. To the best of my knowledge the side to side piece does not attach at the center. You should know mine is in pieces in my garage. Have the pedals and shifter out, and the VW seat rails off. So I “think” the large frame is bolted to the torsion tube and welded to the smaller lower frame, which is U-bolted to the wishbone. juneybug2013-08-20 09:34:02
August 20, 2013 at 9:47 am #255817According to the CMC/Fiberfab assembly manual, the lower bracket that is U-bolted to the wishbone gets bolted to the larger main bracket. You attach the splash plate and bumpers to the main bracket and then all that gets lifted to the proper height and the vertical pieces of the lower bracket get marked. Then you drill and bolt the main bracket to the holes just drilled in the vertical pieces. Then the wheel well covers get bolted in. I’d show a picture but I’m not there yet. I have to finish building my engine. Anyway, check the procedures in the download manuals tab on the left. It explains it pretty clearly even for an old Geezer like me.
 Here’s the link. Look on page 19: https://tdreplica.com/Manuals/CMC/CMC(FiberFab)_VW_p1-45.pdf
newkitman2013-08-20 09:54:10
Allen Caron
VW based 53MGTD - "MoneyPenny"
"If one thing matters, everything matters" - from the book The Shack -
AuthorPosts
- You must be logged in to reply to this topic.
