Home › Forums › MGTD Kit Cars › My Project › Building Alfred
- This topic has 228 replies, 23 voices, and was last updated 12 years, 1 month ago by
Steve Struchen.
-
AuthorPosts
-
February 13, 2013 at 12:51 pm #253104
Veddy nice.
February 14, 2013 at 7:24 pm #253105The drive train has been installed and the body dropped on to check clearances. The 2.8 V6 looks like a natural. There may be enough room for a small alternator on lower right and also looks like there will be enough room for steering shaft on the left. Next will be to finish fabricating the front and rear bumper mount areas. This is another reason the body had to be put onboard.

Fit at rear of engine is a pleasant surprise… February 14, 2013 at 7:32 pm #253106
That is going to be one sweet ride.
Bill Ascheman
Fiberfab Ford
Modified 5.0, 5sp., 4:11
Autocross & Hillclimb
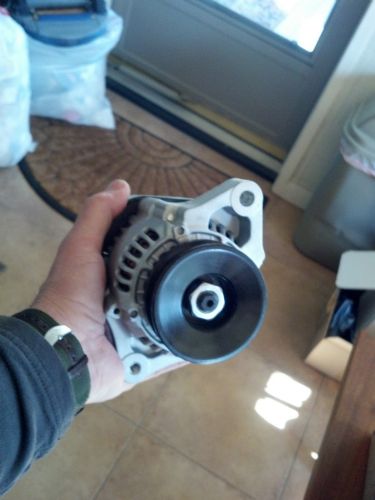
"Drive Happy"February 24, 2013 at 7:10 pm #253107One of my problems was to get the alternator inside of the bonnet side panels, since the stock mounts stuck the alternator outside about 8 inches. Also there was no room on either side to put in a full size alternator. I found this 40 amp hot rod alternator online. Perfect.

Also bought a flip top fuel cap along with the hose and a neck tube that will be welded onto a custom made tank. February 24, 2013 at 7:34 pm #253108
Holy Mackerel! Where did you find that gas cap and the connections? I’ve been looking for one, but have limited space to install. The base has to be 2 3/4″ x 3″.
February 24, 2013 at 7:47 pm #253109gas cap and hose was from here
http://shopping.rexmar.com/Merchant2/merchant.mvc?Screen=PROD&Product_Code=263103&Category_Code=fuelfillsfliptop
The tube was from the Speedway Race cataloghttp://www.speedwaymotors.com/Straight-Aluminum-Hose-Connectors,8936.html
Alternator from herehttp://www.rareelectrical.com/p-1733-new-chevy-mini-alternator-denso-street-rod-race-1-wire-new-40-amp-8162.aspx
PMOSSBERG2013-02-25 11:42:30February 25, 2013 at 5:55 am #253110AAAHH!
That’s the same gas cap that started my tear down.
It’s a nice addition. You might consider a section of fuel fill hose that is not wire reinforced. It’d be easier to seal.Bill Ascheman
Fiberfab Ford
Modified 5.0, 5sp., 4:11
Autocross & Hillclimb
"Drive Happy"February 25, 2013 at 12:10 pm #253111Ordered the gas cap and hose. The measurements are right and it should fit.
Many thanks.February 25, 2013 at 12:34 pm #253112Looks similar to the one CB Performance has.
Allen Caron
VW based 53MGTD - "MoneyPenny"
"If one thing matters, everything matters" - from the book The ShackFebruary 27, 2013 at 6:27 pm #253113Made outriggers today to hold up the running boards. I previously fiberglassed a teak 1X2 on the bottom of the running boards to give them strength.
I want it strong enough to stand on and also to use as jack points in case of a flat. The welding is just tacked on for now. Only have three three more items to fabricate for the frame: Body mounts, roll bar mount and some kind of way to support the grille. I also want to put a brace on the inside of the front fenders to firmly hold them up and also to give the headlight mounting bar a really firm foundation. Once these items are don, then I can totally dismantle down to bare frame and do the final welding on all the tacks. Put it together, take it apart. Probably several more times to go.
 February 27, 2013 at 6:53 pm #253114
glassed-in teakwood? You’re not taking any chances, eh? But–since it’s invisible and yet expensive– why not 1×2 aluminum square tubing?
February 27, 2013 at 7:16 pm #2531151. The teak was left over from an old headboard I cut down. Price=free
2. It won’t ever rot
3. 1X2 Aluminum is pretty thin and will eventually strip the threadsMarch 2, 2013 at 8:53 pm #253116Tack welding of frame done enough to lift the body back off. Came off in one piece….

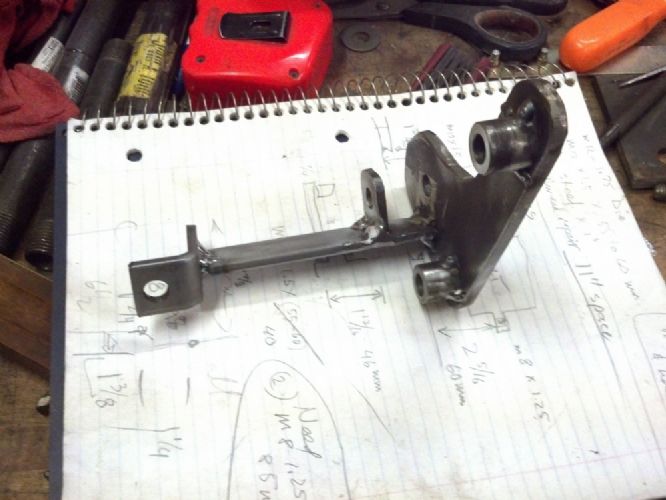
Today I made a bracket for my handy little alternator. March 2, 2013 at 9:07 pm #253117
Wow. You are so far ahead of me, skills-wise, that I am becoming embarrassed to post.
That bracket looks like work.
March 2, 2013 at 10:26 pm #253118March 2, 2013 at 10:28 pm #253119The welds are still pretty ugly, but it will definitely hold the alternator in place with no flexing or vibration. Tomorrow I’ll figure out how to make a belt tensioner form a turnbuckle. This site has a simple one that I’ll copy.
http://www.thewedgeshopstore.com/products/Turnbuckle-Alternator-Adjuster-TR8.html
PMOSSBERG2013-03-08 23:44:08
March 8, 2013 at 6:35 pm #253120Frame is 99% complete, painted and ready to start mounting the suspension. Final weight, including Mustang crossmember is 200 pounds. Much less than the Chevette frame which was way over 300 without the Chevette crossmember.


The frame has mounting plates welded to it that allows a rollbar to be bolted in place (or removed at any time) March 8, 2013 at 6:40 pm #253121
That’s whole project is just friggin’ amazing. I got to go out and buy myself a welder and start learning how to do that.
March 8, 2013 at 8:58 pm #253122Very impressive, Gabor! You are a craftsman.
March 8, 2013 at 10:15 pm #253123Wow, very impressive! Love the rollbar provisions! I’d like to have one…
Early FF TDr on 69 VW pan
Slowly coming back from the ashes...March 8, 2013 at 11:45 pm #253124Your craftsmanship is amazing!
Nice work!Paul Mossberg
Former Owner of a 1981 Classic Roadsters Ltd. Duchess (VW)
2005 Intermeccanica RoadsterIf you own a TDr and are not in the Registry, please go to https://tdreplica.com/forums/topic/mg-td-replica-registry/ and register (you need to copy and paste the link)
March 9, 2013 at 3:35 am #253125Green with envy on the quality of your work. This is going to be one sweet ride.
Bill Ascheman
Fiberfab Ford
Modified 5.0, 5sp., 4:11
Autocross & Hillclimb
"Drive Happy"March 9, 2013 at 7:20 am #253126I have welded small stuff before, but this is first time for a whole car frame. As far as all the other stuff that gets bolted to the frame, I’ve found the conversations that go on in this forum to be truly useful. I don’t think Alfred will be roadable by Carlisle, but I will be there anyway.
March 9, 2013 at 8:31 am #253127Really looking nice.
March 19, 2013 at 9:53 pm #253128A while ago I pulled the oil pan to swap it with one that had a rear sump. When I did so, a woodruff key fell out. I guessed that it was from the harmonic balancer, so I pulled the balancer which came apart. The previous owner must have seperated the balancer from the hub, probably in the act of prying it off. Since there was no key the whole assembly had spun on the crank nose and galled both the crank and the inside of the balancer hub. I had to disassemble the front of the engine to get at the crank nose so ZI could file it smooth again. It finally slipped on fine again. Whole assembly is back together and lined up fine on the timing mark. Does not look like much progress happened, but it was nasty work. Finally got whole front of engine together and also mounted the turnbuckle spreader for the mini-alternator. Also used POR-15 exhaust paint on the manifolds and stripped and painted the valve covers. That POR-15 is expensive but looks good. I like a clean engine.


-
AuthorPosts
- You must be logged in to reply to this topic.
