
Home › Forums › MGTD Kit Cars › Chevy/Ford Kits › Dashboard
- This topic has 8 replies, 8 voices, and was last updated 15 years, 5 months ago by
tops off.
-
AuthorPosts
-
December 30, 2010 at 8:54 pm #233292
Just pulled the dash out of my Ford- Daytona migi. It is going to see a transformation from delaminated plywood to a Kentucky Coffee tree solid wood dash. Actually, this forces me to get out in the garage and get it ready for the Carlysle show. Wish me luck, lots of woodworking necessary here. I hope that my skills are up to it
December 30, 2010 at 10:04 pm #243300Dennis , that will look great mine is done in clear maple the only thing I should have done is glass the back side for the water proofing . Dan
December 31, 2010 at 10:04 am #243301Thanks for the advice. I had planned to use a marine polyurethane on both sides. Do you think that would work?
December 31, 2010 at 10:31 am #243302dbrock,
I am also working my wood dash. I have to add a hole for a switch, the 12V power supply (cigarette lighter) and a hole for the high beam indicator. I want to move it to between the speedometer and tach.
Also just as a reminder…measure twice and cut once. Great times working the TD.
Hope you have a Happy New Year and the TD too.
Allen Caron
VW based 53MGTD - "MoneyPenny"
"If one thing matters, everything matters" - from the book The ShackDecember 31, 2010 at 2:13 pm #243303I’m thinking marine stuff should be good, generally, as it too spends its life out in the sun, wind and rain. But just guessing as my dash project is coming after my front beam job is done (see other posts for that) and after I get my e-brake handle moved to between the seats, where it belongs.
After that, dashboard. Figure I’ll have it all apart and unlabeled right about the week before Carlisle.
 January 5, 2011 at 3:01 pm #243304
Gang, remember one thing about polyurethane or epoxy finishes, if they get scratched, which is highly likely, you can’t repair them without redoing the whole dash .Spot repairs on solid finishes always show in the sun . Older classics used oil finishes since they can be spot repaired without any of the repairs showing. You can get a pretty good shine with oil finish, and it will last forever with little care. Most solid finishes have a life of only approx 5 years before they start to crack, blister, or shrink, Something to think about before you put that final finish on your hard work.
January 5, 2011 at 3:42 pm #243305Ringo, You said it real good. Those shinny dashboards do catch the eye but I chose the oil finish for my dash to allow me to easily repair any scratches or chips. To each his own opinion . I saw a FiberFab car that belonged to the owner of a body shop . He had used some combination of paints where he took a brush and created a woodgrain effect directly on the fiberglass dash and then used clear coat for the final gloss.Looked great but I don’t know how well it will hold up .
This guy even block sanded the entire car even under the fenders and hood.He had it in a show beside his 34 Chev street rod ,which was just about perfect but the TD got the most attention.
January 6, 2011 at 12:30 am #243306Ringo X 2… you said it bro. My first dash was polyvarithane (spelling?) and it was showing fogged spots and scratches when I got it.
So when I re-did the dash I went with a tung oil finish and have been happy. A buff with furniture polish and SHINY!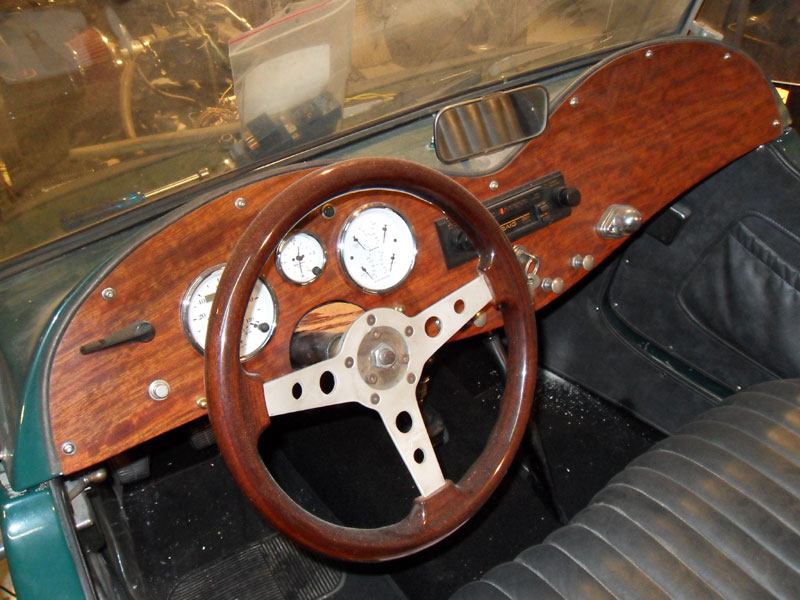
No trees were injured in the making of this message, but some electrons were inconvenienced.
January 29, 2011 at 2:04 pm #243307u probably are past this point by now but maybe someone else can use it.Every time I make something with curves or has a lot of detail I make a template out of mdf then attach to real wood and router.In other words. u will need a router & strait cutter router bit with guide wheel & a jig saw. # 1 purchase 2ftx4ftx3/4″mdf sheet or bigger @ local building supply. #2 screw old dash on top.cut off extra waste with jig saw leaving 1/4″ then router remainder.Drill cut router what ever holes u can want from old template.remove old dash.now change what ever u want till u get what u want.Sand smooth any edges the router wheel will follow. #3 clamp or u could use 2 or more screw holes that u would need anyway to fasten template to finished piece. now repeat cut & router.As well love the tung oil several coats & polish.suites the era.
-
AuthorPosts
- You must be logged in to reply to this topic.