
Home › Forums › MGTD Kit Cars › VW Based Kits › Dashboard layout and controls
- This topic has 18 replies, 6 voices, and was last updated 6 years, 12 months ago by
 Gregg Strain.
-
AuthorPosts
-
May 22, 2017 at 3:24 pm #303606
As I’m hopeful to have my TDr back on the road this summer, I’m already starting to think about tearing out the dashboard and doing something more “interesting” with it. My tendency is to make it a bit more tech-y, but I’m putting that thought on hold for the moment. And also thought, I never post anything, I’m always just lurking in the background reading everything here! Time to post something!
There’s a number of dashboard threads (Dash: flush or proud, 3-gauge main cluster and others) but not a lot of discussion about what’s on your dash and what layouts work.
Here’s my dashboard:
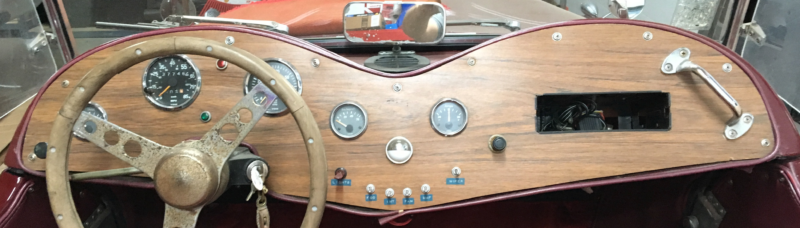
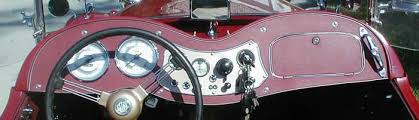
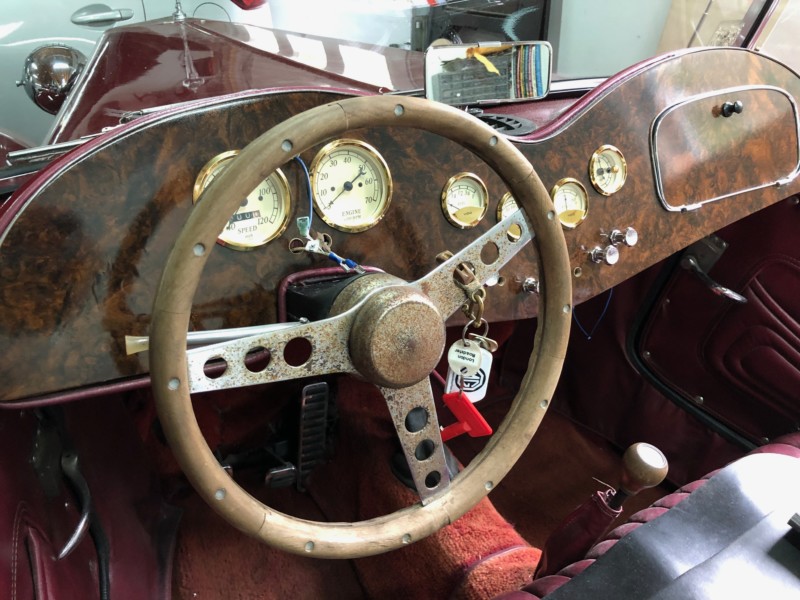
And here’s an original TD’s:
Here’s the must have’s:
- speedometer
- tachometer
- oil pressure gauge
- amps/charge gauge
- fuel gauge
- Lights & parking lights
- Fog lights
- wiper power (one speed?)
- wiper fluid (push to squirt — need a source for a nice looking one)
- heat/defroster (o.k. no real heat in the TDr)
- turn signals (green on my car)
- high beam indicator (red on my car)
- map light/lighter
What am I missing, what would you add?
- 4-way flashers?
- I like the “Pull to start” (Pull switch
- I also like the look of the metal panel in the center on the originals.
- I’m most likely going to remove the radio and figure out how to add an amplifier and “port” for a phone (all my tunes come from my phone these days) — maybe in the glove box or perhaps change the “12v” port on the original to a USB port.
- Moving the key to the dashboard and covering up the one on the steering column?
- Something different for the turn signals — I need to replace the lever anyhow.
Anyway, it’s a bit of thinking out loud (in writing). What are your collective thoughts?
-
This topic was modified 9 years ago by
Stephen Houser.
Buxton, Maine
1982 London Roadster - "Kit Kat"May 22, 2017 at 8:41 pm #303612Dash board is where you really make the car your own. And you’ll be staring at it forevermore so it’s best to design something you can live with the first time.
I am partial to the original TD layout with the speedo/tach in front of the driver on big gauges, and the rest off to the right. If you’ve been lurking here long you have probably already examined my gauge replacement thread of 2011 and my dashboard saga of 2013.
Other than (if feasible), moving the parking brake lever to its proper home between the seat bottoms, getting the instrumentation right is about the most satisfying thing you can do with one of these cars. And most of them need it, if it’s not already been done: they’re 35 years old by now!
As I’ve explained, I am partial to the original Bug speedometer, since it’s cheap and reliable—and includes a viable gas gauge and all the accessory lights you could want: turn indicator, high beam (in proper blue), oil and gen lights, etc. These ports can be repurposed for whatever you like, and the dial is close to the correct TD size. It’s hard to get a tach exactly the same though, so if that’ll bother you, consider the neater look of a set of Dolphin or Speedhut gauges.
Your thinking on the controls is just right. I have a VW 4-way flasher on mine. It’s basically the stock rig, as are the pull swith for the lights and the turn knob for the wipers. I’ve got an original key switch–which isn’t hooked up at all—which could conceivably control the lights and ignition. My repro TD horn switch includes the original TD high-beam “dipper,” which I have controling my one Lucas driving light. I also have a push-to-start button that I’ve not got around to wiring up for five years running.
Like you, I’d like to move the start key to the dash, but I’m a little intimidated by the VW column (and it’s one of the only bits of wiring on the car that hasn’t ever fritzed-out on me). If/when you do that job, please post prolifically about it, with pictures.
May 22, 2017 at 10:19 pm #303613I have purchased Porsche 914 speedo and tach for mine. The porsche speedo runs off the left front wheel like a VW does. Thay come with a cone type plastic “glass” in them so I carefully pryed them open and put flat plastic in them. I have not installed them yet but it looks pretty staight-forward. they have high beam and turn signal indicators in them
May 22, 2017 at 10:21 pm #303614Also, they are about 5″ so a lot easier to see with these old eyes and “fill” the dash better too!
May 22, 2017 at 10:38 pm #303615Correction… my speedo and tach are from a 924
May 22, 2017 at 11:31 pm #303617Some original MGTD dash parts for sale on ebay http://www.ebay.ca/sch/4886cliff/m.html?item=302324813121&autorefresh=true&rt=nc&_trksid=p2047675.l2562
May 23, 2017 at 8:20 am #303618@edsnova Yes, I meant to link to your site and thread about your dashboard. It is a work of art. Being a long-time woodworker myself, I appreciate how tricky it is to get the pattern you made. I really liked the burl dashboards (Another Pricy…, and Dash project finished).
I’m unlikely to move the parking brake lever anytime soon. I have a bench seat. Though it does need a recovering.
@eddy I have to agree, needing my reading glasses to see how fast I’m going is not entirely satisfying.I’ll have to look at the 924 and larger bug speedo’s. There’s a few tempting thoughts in there.
Why 3/4″ and not 1/2″ thick, I would think 1/2″ would stand less proud of the body/cowl. Was 1/2″ not stiff enough?
-
This reply was modified 9 years ago by
-
This reply was modified 9 years ago by
Buxton, Maine
1982 London Roadster - "Kit Kat"May 23, 2017 at 8:44 am #303620Ringo’s dash was my inspiration, and that real TD dash on the ‘bay looks very usable as-is. I’d try to grab that for $100-$200 if I were you. My un-patented “bead cheat” will finish it off for like $20 more.
The 924 gauges are just about 4.25 in diameter, I think–a little smaller than the TD gauges, so if you went with that dash you’d have to fill the holes with like a 3/8-inch trim ring or something.
Yes, make the wood 1/2 inch, 7/16, even thinner if you can get away with it. The BCW has 1/4 inch, but the dash was solid glass al the way across, so there was no need to worry about the strength of the wood piece. Most guys go 3/4 because that’s what CMC and FiberFab supplied with their kits. And BTW, MG Magic may have some of those dashboards left. Bill put one in his car and it looks awesome.
-
This reply was modified 9 years ago by
 edward ericson.
July 18, 2018 at 4:18 pm #305242Reviving my own thread from over a year ago. I’ve started building a new dashboard. Why I’m doing this during Maine’s short “driving season” is beyond me, so I’m just going with it. What follows are a series of pictures along the way. Enjoy.
First off… Oh my, what have I done! Look at all those wires.

Always handy to keep your reading glasses nearby on such a project. This is the original dashboard from a 1982 London Roadster. A good template to work from.

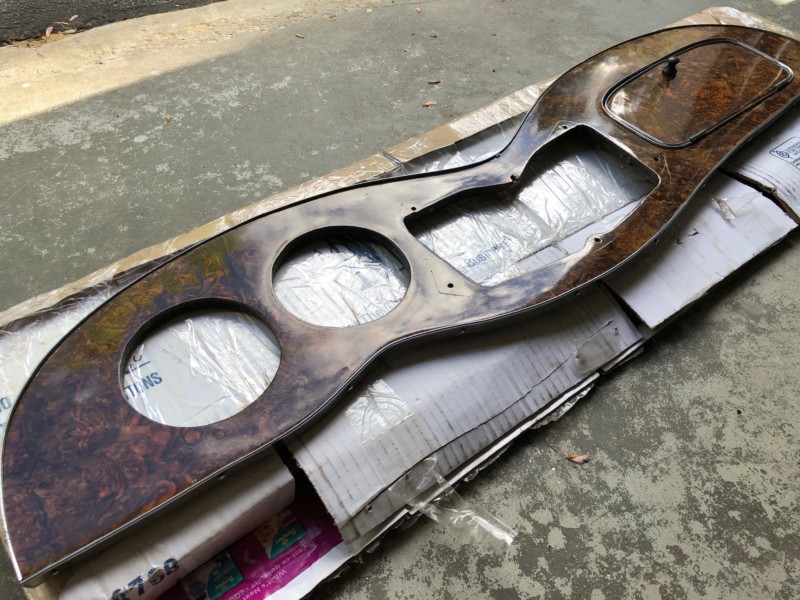
I did get this nice oak burl veneer, original, MG TD dashboard off e-bay from the great white north (Canada) but it does not fit my speedometer/tachometer and I don’t have the center panel (still looking for one for this project).
The MG dash and the London Roadster dash both combined to make my initial cutout. It’s backwards in this photo as I try to figure out where the indicators and dials are going to go.

Looking at all three, my original, the MG original, and the new working one with a bit more layout. Not the final layout I’m going with though. Yes, I’m thinking of adding some digital readouts. I think it would look kind of retro-cool if that’s even a thing.

Time to add some oak burl veneer… and a lot of glue and clamps!

And then, I tried a layer of acrylic resin to (a) add a gloss coat and (b) waterproof it a bit. This completely failed and I’ve since planed, scraped, and heat-removed the acrylic to go with a simpler polyurethane finish.

You can see the orange peel on the acrylic. That plus I put about 24oz where I should have only put 6-8oz to get the look I wanted 🙁 Regardless, I was able to save the current working version which is in the basement curing the first coat of poly at the moment, photos to follow. Soon comes the drilling… maybe this weekend.
Buxton, Maine
1982 London Roadster - "Kit Kat"July 18, 2018 at 9:38 pm #305244Ah now we’re having fun!
I had very good going with the Minwax Helmsman polyurethane over a product called Pelucid, which was spendy, but very strong and hard. The dash looks about as good today as when it was first done—and that’s saying quite a bit, especially if you look at how the rest of the car has weathered…
I let this long-term wood finish test (pdf) be my guide.
-
This reply was modified 7 years, 10 months ago by edward ericson.
July 19, 2018 at 12:51 pm #305249@edsnova ohh thanks for that link!
Buxton, Maine
1982 London Roadster - "Kit Kat"July 21, 2018 at 10:26 pm #305256Just my tow cents…
I never liked the look of the VW steering Column. I hated having the key on the column as opposed to the dash…I removed the VW column and replaced it with a steering shaft from SoCal Speed shop. I had my friend weld a release tip so I can easily remove the steering wheel when I want to. I also had him weld in the safety basket just in case I hit my chest on the steering wheel. I then installed a Forever Sharp steering wheel to give a little “Bling” to my project.
My switches are marine grade, from West marine…
I made my dash out of solid 3/4″ oak and used a router to go along the curved side so it wouldn’t stick out so much. I’ve been very pleased with the end reslults…
April 6, 2019 at 3:53 am #305979Hi… i am partial to the original Bug speedometer, since it’s cheap and reliable and includes a viable gas gauge and all the accessory lights you could want: turn indicator, high beam, oil and gen lights, etc. These ports can be repurposed for whatever you like, and the dial is close to the correct TD size.
April 9, 2019 at 11:58 pm #305988When I bought my FF TD 3 years ago, the only circuit that worked was the brake lights. The dashboard was some sort of fiberglass panel that about 15 previous owners managed to modify in some manner. It was just a mess and absolutely no relays which caused most of the switches to fail. I did find a manual for FiberFab and I had the original wire numbers that helped me figure out what was what. No actual wiring diagram, just what wire number showing what they hooked to. Only 6 fuses protected all the circuits. I also discovered that MG Magic and they had a wooden panel cut out for gauges. I did change the stain and finish on it as an improvement. At this point, you have to make a decision as to make the panel look like a real TD or something that works for you. I choose the latter. MG Magic also had the long marine push pull switches that work on the thick dash. The one regret that I have is that since some of my VDO gauges proved to work, I purchased matching VDO’s for additional things. Since I ended up in time replacing all the original ones, I wished I had bought the white faced ones with the classic fonts!
What I ended up doing was using a 24” shelf mounted under the dash that I mounted 9 relays, 12 blade fuse block, terminal strips, buzzers of all marine grade wiring and connectors. It’s all hidden behind a curtain of black vinyl cloth. My instruments are: speedometer, tachometer, amp, oil press, oil temp and fuel. I had a lot of trouble getting the electronic speedometer calibrated and working with the Vw cable. Constantly bouncing about 10 mph. I sucked it up and bought the VDO GPS sender and it works perfectly. Indicator Lights for turn signals (2), high beam, oil press coupled to oil temp with warning buzzer and finally, the charging light.
Push pull switches for headlights/park, fog lights, defroster and wipers. Headlight switch hooked to a alarm buzzer and I figured how to utilize the wipers to be 2 speed! Push buttons for emergency flasher and windshield washer. I did decide to never again use the washer switch with the top down! Installed a key switch into the panel and got rid of the VW column switch. I used a combination of a VW bus turn signal stalk that is straight with a turn signal and headlight dimmer. That was a little difficult to assemble because a lot of wires in a small space, but worth it. The bus stalk allowed me to shorten the steering wheel hub which got the wheel away from me. Installed a console with two each of 12 volt power sockets and usb sockets. Also installed the switches for the heated seats on it!
I did not install a radio. There is no way I could hear it with my exhaust noise. I tried several ways to label all these things and liked none of them. I found a shop that laser cut small “tags” of 1/8” wood that I stained and put words or symbols on them with a Brother labeler (clear tape with white type) and several coats of clear finish. The shop put a mylar adhesive tape on the back of them. I ended up with a good looking project and everything is working well. I did discover last week that my brake lights are staying on. Found that my pedal stop moved and I lost the play in the brake rod! It will never end.
This post is probably of little interest as I read it over, but it was nice to re-live an enjoyable project that requred a lot of thought and overcoming the frequent problems. Gregg
-
This reply was modified 7 years, 1 month ago by Gregg Strain.
April 10, 2019 at 12:20 am #305990There is a photo in my album of my dash before I added the labels. I’ll try to put a fresh one in this weekend.
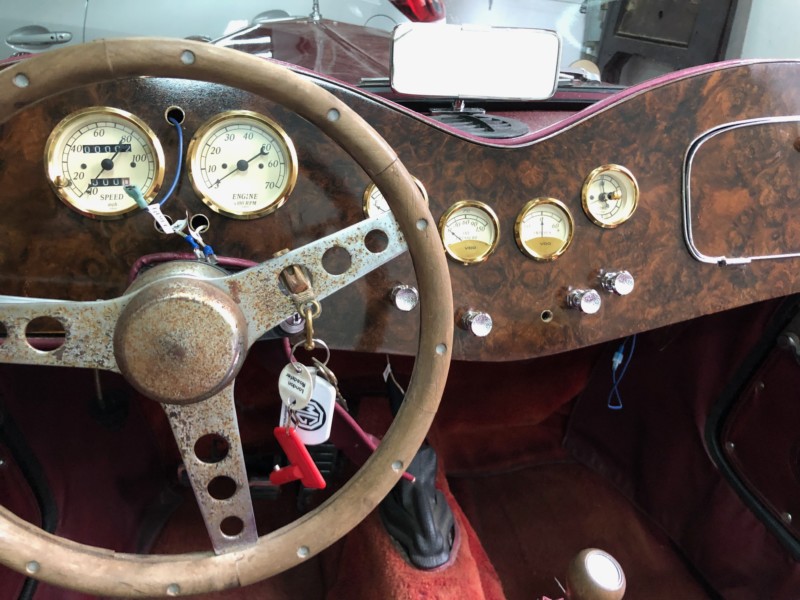
May 28, 2019 at 12:06 pm #306133I managed not to post any more progress on my dashboard project! Over the past long weekend I finally got it wired up and remembered to take a few photos.
These first two were where I left it last fall (before the Maine winter hit and my garage got way too cold to work in)
Then, I finally scored an original MG TD center dash panel (metal) off of ePay and took a saw to that nice laminated burl…


As an added bonus, I used my Christmas 2018 present, a cheap 40w laser cutter/engraver to add some labels to the previously un-labelled switches! Acrylic cut and etched, sanded on back-side to give frosted look and then the lettering painted in. Thinking about using a red to match the car color and then re-etch. Plus a bit of lathe work to turn down the 12V LEDs for my “ENGINE” and “POWER” lights, to get them to fit into the casing from the scavenged original incandescent bulb holders.
And, apologies for the mismatched gold/chrome. I got the gold instruments cheap off of ePay last year as well. Thinking about how to chrome them up without damaging them. Maybe some sort of cover. Never had luck with chrome paint. Any thoughts would be most appreciated.
Buxton, Maine
1982 London Roadster - "Kit Kat"May 28, 2019 at 2:28 pm #306136Very, very nice on the dash! It looks like you did a lot of work and redoing until you got it the way you wanted. (I like the gold!)
Just a question. I saw that you are changing the incandescent lights to led’s. Is one of the two to be used for the charging light? If you’re using a VW alternator, that bulb must be an incandescent bulb for the charging system to operate properly. There is a way to use a led, but it involves building a rectifier bridge circuit and I didn’t pursue it for a bulb that should be off when everything is working right!
I don’t know if the same applies to a generator type of charging system.
i had to do the opposite. Rebuild a led to take an incandescent bulb to make all my lights appear the same!
Gregg
May 28, 2019 at 7:54 pm #306137@greggs so… and this may be my long term (20yr) suspected charging problem. There’s never been an incandescent light or any light for a charging light. Yup. No light. No where. I’ve often thought about putting one there just to see, but never have gotten to it. I’ve got a generator not an alternator. Not sure if that makes a difference. I think the light is supposed to be there in either case. I’m likely going to give it a try as at the moment, neither the ENGINE or POWER lights are hooked to anything at the moment. I was thinking of having the POWER as the charging light (on when charging) and the ENGINE somehow as an oil temp and/or pressure alert. The rectifier doesn’t scare me. In fact I think I have all the parts in my bin somewhere from my last pondering of the problem.
I did replace all the bulbs in the instruments with LEDs but swapped them back. The bulbs had a much warmer feel to them. Said another way, they looked better. The High beams and turn signals are LEDs. I was also thinking about putting some under-dash lights (LEDs) for a bit more light in the cabin. Not the one in the photo 🙂 and not sure where I’m going to put the switch.
Thanks for the compliment.
Buxton, Maine
1982 London Roadster - "Kit Kat"May 28, 2019 at 11:10 pm #306138The VW instrument panel had a charging warning light, but with a generator charging system, it’s presence was not critical for the system to charge. Some generator cars did not have a warning light as they were equipped with an amp gauge as an upgrade. On an alternator equipped VW, the light must be working as it signals the alternator to charge.
Having said that, a warning light for a generator or alternator equipped VW is very important as it could warn of a broken or loose fan belt. You can run the engine for a long time on the battery, but without a cooling fan, your engine becomes toast very quickly. I added a warning buzzer that comes on whenever there is a loss of oil pressure, a charging problem or the headlights left on.
Below are two links which I think you’ll find helpful. Speedy Jim’s has been very helpful in understanding VW’s electrical issues.
http://www.vw-resource.com/alternator_generator.html
http://www.speedyjim.net/htm/elec.htm
-
AuthorPosts
- You must be logged in to reply to this topic.