
Home › Forums › General Discussion › My FiberFab TD project.
- This topic has 12 replies, 3 voices, and was last updated 3 years, 3 months ago by
 billnparts.
-
AuthorPosts
-
February 24, 2023 at 5:23 pm #308387
I’ll start by calling out @billnparts for the reminder to get some pictures going. Thanks Bill! Last fall I purchased a FiberFab MGTD (VW platform) about 5 hours south of where we live. Made the deal and I asked the person to check the air and oil as I was driving it home! “You’re driving it home? How far is that?”, he said. “About 5 hours”, I replied. About all he could say was “oh”. I told him the wife and I were going to get some lunch and be back after a bit. He wished me luck and off we went. Ran into a little bit of rain on the way back and to my surprise, no drips like my MG TD and MG Midget have when it raining. The trip was a blast and all went well. Made it home safe and sound. It was fun, as I got a lot of looks, thumbs ups, and smiles as the people noticed the car. And of course these are a conversation piece. I’ll start with some pictures last fall and I’ll try to get some content posted on the car as I have progressed over winter. When our convertible season ended up here in Minnesota, I wanted to do some small things on the car. The front end was not sitting level (not the VW frame, that was fine) so I suspected an assembly error. I also wanted to try and make the engine noise a little quieter with some audio sound deadening material. Fix the heater, fix the wind leaks and etc. But I soon found out there were lots of little things that needed to be corrected as I dug deeper into the car. Go figure! LOL
Let me know if you have trouble accessing the picture links.
https://photos.app.goo.gl/UGf5HTFoHRms7GKu5
https://photos.app.goo.gl/qiSStY3bMkUxvxrq6
https://photos.app.goo.gl/o2qJxxseXVNNkMdf6
-
This topic was modified 3 years, 4 months ago by
 Mike Peterson.
-
This topic was modified 3 years, 4 months ago by Mike Peterson. Reason: Fixing photo links
February 25, 2023 at 9:43 am #308391Your car looks great. Enjoy.
-
This reply was modified 3 years, 4 months ago by billnparts.
Bill Ascheman
Fiberfab Ford
Modified 5.0, 5sp., 4:11
Autocross & Hillclimb
"Drive Happy"February 25, 2023 at 9:49 am #308393Instructions from Ed Ericson on posting photos in this forum. Unfortunately you cannot simply copy and paste, but this works…
First you go to your own thing. Upper right corner it should say something like “Howdy, Happy Jack.” Click on that and you get a drop-down menu. At the bottom it says “media.” Hover over that with your curser and you should see another drop-down menu with “albums,” “photos” “videos.” Click on “photos.”
That should bring you to a new page. If you have previously uploaded pictures, you will see some of them. Under “All Photos” near the top left of the page you will see “options” and “upload.”
Click on “upload.”
That opens another drop down box. You can actually drag and drop pictures into this from a folder on your computer screen, or you can navigate to the folder on your computer with the pics. Double click on them and the upload begins. You should see them appear in your photo album.
To get one into a post you have to click on it.
It should open up big. Then RIGHT-click on it, and you should see a box open up on it with options like “copy,” “save image as,” etc. Click on “copy image address.”
Now close the pic and find your way back to the post you want to put this photo in. (I often use two browser windows for this, keeping the “new post” box open in a separate tab or window).
(Hang on, we’re getting close now)</span></span></span>
Above the window where you want to make the picture go, there’s a line of little symbols. The second from the left is like a jagged little mountain with a little moon over it. That’s your “insert pic” button. Click it.
That opens a new box with a prompt that says “Source.” PASTE (control or command V) the “image address” you copied about six steps ago. Then press OK.
The photo should appear now as if by high-tech magic. So simple even a computer science Ph.D. could do it, sometimes, maybe, if he’d had enough Red B.
Hope this helps.
Bill Ascheman
Fiberfab Ford
Modified 5.0, 5sp., 4:11
Autocross & Hillclimb
"Drive Happy"February 25, 2023 at 12:19 pm #308394Thanks Bill, and appreciate the additional instructions. I’ll have to give it a try. I messed with it a little bit last night, but did not have much luck. I hope to post some info on my winter project. Take care.
February 25, 2023 at 1:13 pm #308403Well, I promised you some details on my winter project on our TD. I like bringing the car to work as my co-workers also have some collector vehicles. So, I wanted to only address a few issues. First, try and get the cab a little quieter from the engine noise. Second was replace the poor quality stereo that was installed, and last was to get the heat working better. It is not unusual for me to leave to work when it’s 40 degrees at 5am in the morning and then it will warm up a nice 70 degree day. It blew some heat, but I could feel a draft down by my feet when driving down the road.
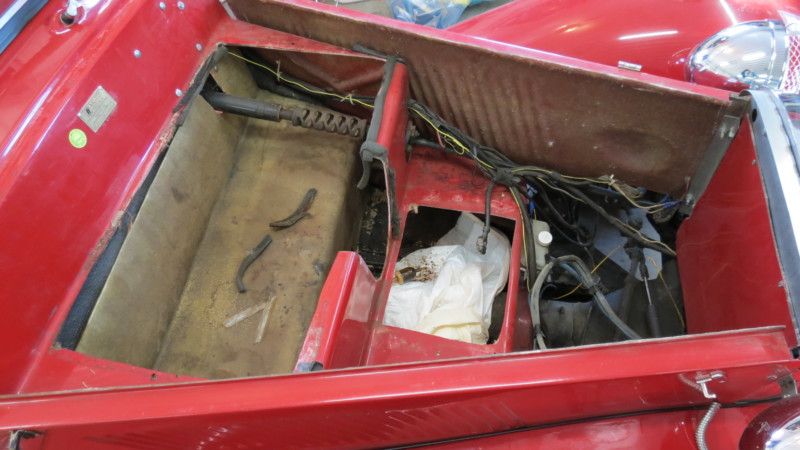
Pulling the seats made me wonder how much heat loss is happening in the system. I’m shaking my head at this, and not a good spot for speakers either. But nothing that can’t be fixed.

The poor cutting of the front fiberglass “fire wall” showed how large the gaps were that the original fabricator did. Plenty of room for air to come in and make my feet cold! I’ll tend to this later in the project.
Next was to pull the old carpet. Unfortunately it looks like they used Liquid Nails or PL200 construction adhesive to attach the carpet kit. So, this was a bit of work to pull.

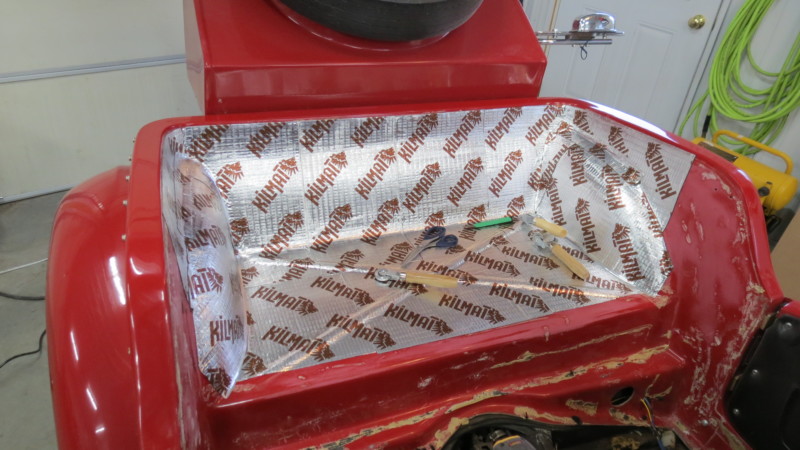
I decided to go with Kilmat as a sound deadener as it got good reviews and a box took care of the entire car. It’s easy to put in and will conform very well to the uneven surfaces.
More to come when I get a chance on this project. Thanks @billnparts Bill for the help on the pictures. I think this is working for me now.
-
This reply was modified 3 years, 4 months ago by Mike Peterson. Reason: Wording
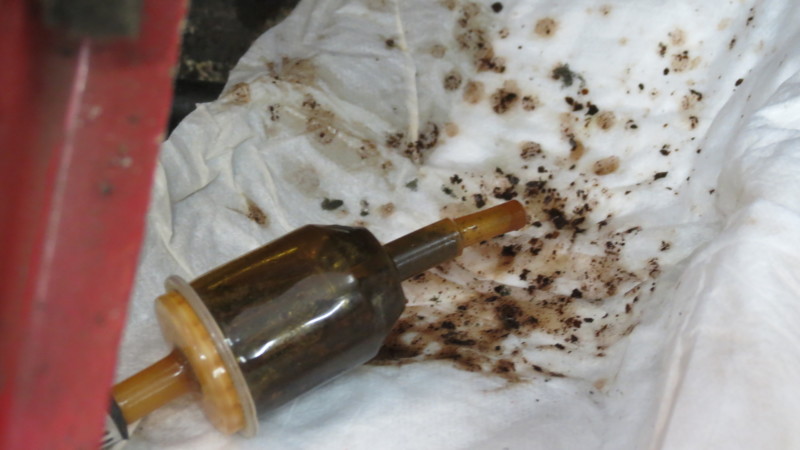
February 26, 2023 at 9:45 am #308414While tearing down the car, I found a fuel filter near the bottom of the fuel tank. The car had a nice clean one back by the carb, but it looks like this one was here since day 1 of the original build. Makes sense, as you need to pull the battery tray in order to see this one.
When I emptied the gas tank there was a lot of rust flakes in bottom of the gas and left over in the tank. I had seen how someone did some brazing on the bottom to fix some leaks so I decided that a replacement was best. Ordered one from JBugs when they had a sale going on so it wasn’t a bad price. I cut the original neck down per the assembly manual, welded with no leaks. I am going to give it a coat of 24 hour JB Weld and sand it down. Then prime and paint the filler area. I still have wash the new tank out with some MEK.

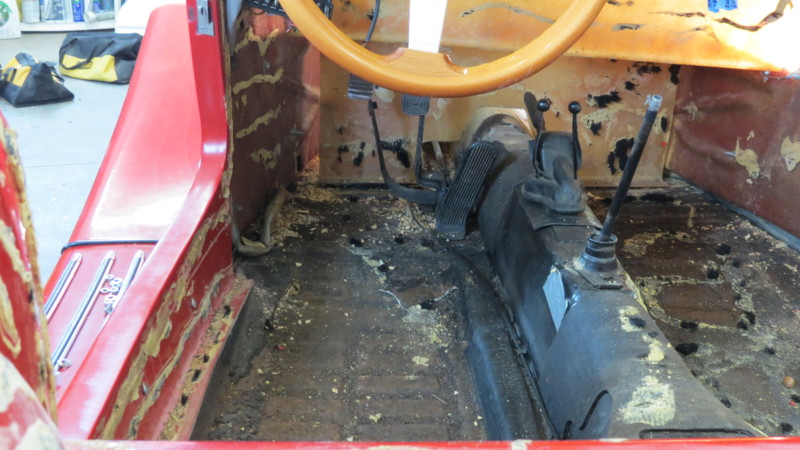
Lots of things going on in the next picture. One thing again that came to light before pulling the carpet was the fire wall area. You see there is a large gap at the top and they used gluing the carpet to hold the fiberglass up. Again, a really nice air leak to cool my legs in the morning! If you look close, there is an old gray “jumper cable” that was used for the positive lead heading back to the solenoid. Later this was removed and I had some 1AWG wire on hand so ran that back for my cable to the solenoid. One very interesting thing was they replaced the fuel line. They punched thru the floor with a grommet and ran a soft copper line from the front to the back on the underside of the car. Could be an issue if I run over something. But on top of that, there was a blue 10AWG wire that was hooked to the positive lead of the battery (not fused) and it was taped to and followed under the car to the back of the vehicle. This was there power source for the switch in the driver’s seat box for the fog lights. Imagine if this unfused wire managed to chafe and come in contact with the grounded fuel line! So that stuff was pulled out and addressed later in this re-build. The rest of the wiring is kind of a mess too as you can see. And look at the dressing of the chrome wire loom from the headlight in the lower right corner of the picture. It just meets up to the outside of the side of the hood fiberglass. More to do later I guess.
 February 26, 2023 at 8:18 pm #308415
There’s always more to do, Mike.
While the tank’s out, make sure you inspect the steering column crush cage minutely. These are great safety items but after 50-60 years they tend to crack from metal fatigue—particularly if they’re not perfectly in line with the rag joint and the steering box…which they almost never are.
You never see it. At least one Speedster replica owner experienced failure of this part while on a field trip to the Smokey Mountains for some spirited driving. Didn’t wreck, but did count his lucky stars.
If your crush cage is shot you’ll probably want to just sleeve and weld in an oversized bit of metal tubing. Any front-end crash that would engage the crush cage is going to end us anyway.
February 26, 2023 at 8:26 pm #308416Thanks for the info Edward. The crush cage has some surface rust on it, but I don’t see any cracking. But maybe I should sleeve it anyway. As you will see in some of my future posting on this project, I actually shortened the steering wheel shaft (after the crush bushing) so I could have a little more “belly room” by having the steering wheel more forward and closer to the dash. I ended up gaining about an inch and half by doing this. And yea, when I saw the crush cage, I was thinking there is not much here for a car protecting us anyway! 🙁
Take care.
February 26, 2023 at 8:44 pm #308420Another thing I had to address was the car looked like it was lower on the passenger side when looking head on at the front. The chassis measured level so I know it was not the suspension. I suspect the original builder did not pay much attention or maybe built it on an un-even surface. There was about a 2 inch difference on fender to tire gaps for the passenger and drivers side tires up front. I pulled all the fasteners on the passenger side that would bolt the fiberglass to the VW frame. I ended up re-making some new front clamps too so the angle matched up and mated perpendicular to the fiberglass/bumper mount. I then leveled the body with the help of the floor jack. Did a quick few clamps with some vise grips and relieved the jack to double check level (and tire to fender spacing). Did some new drilling and bolting and I was good to go. So, after getting the body level, now the bumper was off! I noticed they re-drilled a new hole to make the bumper look level with the un-level body. I moved the bumper back to the original hole and son of a gun… it was now level. LOL


 April 2, 2023 at 6:26 pm #308471
Sorry folks, it’s been a while since I added to my post. Work seems to always get in the way with the hobbies. 😉
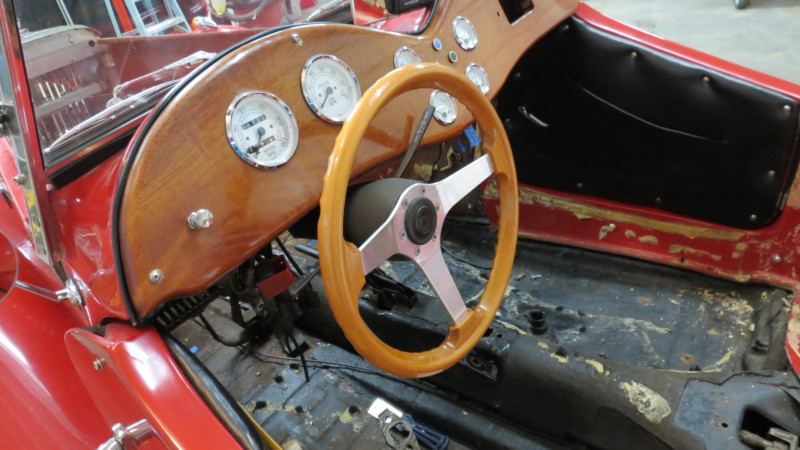
One of the projects on this car was to move the steering wheel forward as much as permitted. The steering wheel felt a little too much into “my space”. OK, it wanted to rub slightly on my belly. Looking at the original position, it appears I could gain some space.
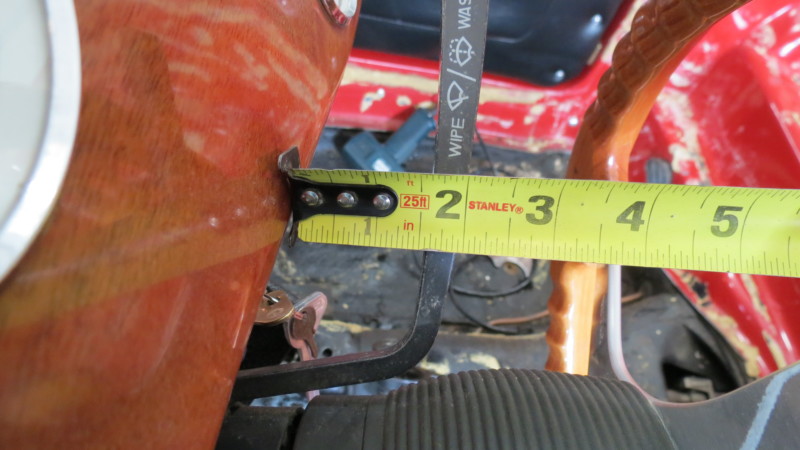
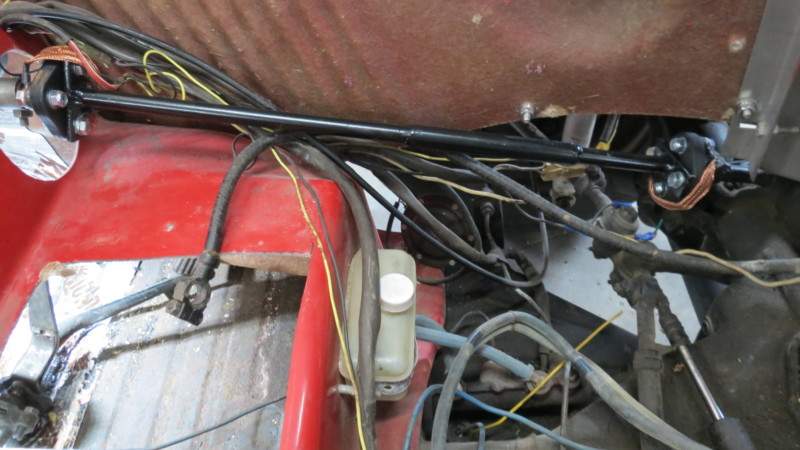
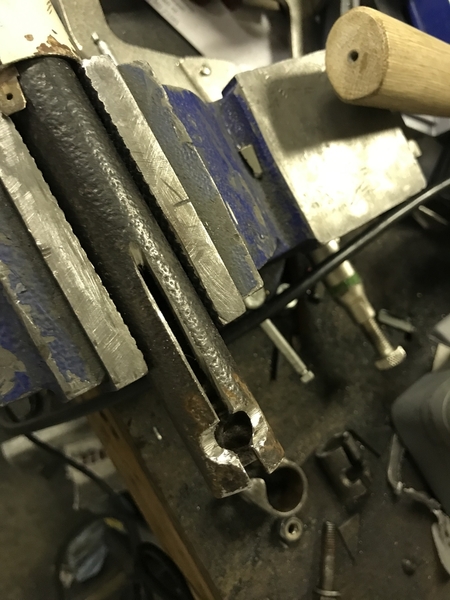
The concept looked pretty simple. If I shorten the lower steering wheel shaft (the one between the rubber steering pads on the shaft), I can loosen up the steering column U-bolts and slide it forward. So, I did some measurements and found a piece of pipe to weld the two steering rods together after I cut a piece out, at the correct shortened distance. Gave it a coat of primer and paint and she looked good to go.

Leaving the U-bolt assembly loose for the steering column, I installed the shortened shaft with new rubber pads and also new ground braids to carry continuity thru the shaft assy. Paint was removed where the ring terminals were installed on the metal so electrical continuity carried through the shaft.
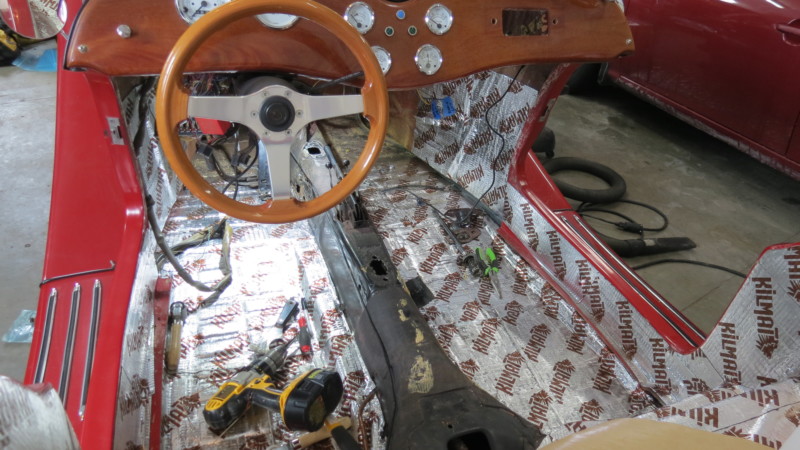
And back in the cab, here is the finished location. Plenty of room for the controls and probably gained another inch plus.
 April 2, 2023 at 8:23 pm #308472
Yep. They can be shortened, as you discovered. Couple years ago as I finalized my Spyder build I discovered the same issue—the shaft length that had looked perfect in mock-up was, in reality, not quite perfect,
That kit uses a stock Beetle assy. so it was down to cutting the slotted end and re-slotting it for the stock D clamp. Pushed it in about 1.25 inch and that was very close to perfect.

 April 2, 2023 at 11:52 pm #308473
“very close to perfect”…. words of encouragement for when I get done with this project!
April 4, 2023 at 6:16 am #308475Very close to perfect…and…Good enough for who it’s for…Words to live by.
Bill Ascheman
Fiberfab Ford
Modified 5.0, 5sp., 4:11
Autocross & Hillclimb
"Drive Happy" -
This topic was modified 3 years, 4 months ago by
-
AuthorPosts
- You must be logged in to reply to this topic.