Home › Forums › MGTD Kit Cars › My Project › New dashboard project
- This topic has 105 replies, 13 voices, and was last updated 11 years, 9 months ago by
 ray10.
-
AuthorPosts
-
February 3, 2013 at 11:07 pm #253679
If you want a mirror flat finish with a brush you will have to use the method many a fine furniture and table craftsman have been doing for ages. Seal first with either shellac, tung oil, or lacquer. The switch to your final product. Lightly block sand with 220, 400 or 1000 between coats, thin the final few coats about 50%. After the final coat you can block sand using a flexible block or stiff foam rubber. I wet sand after the final coat with 1000 grit followed by 2500 grit. Cleanliness is very important at this stage. After that a little automobile rubbing compound gets the mirror finish. Don’t hurry any of the steps and it will turn out fine. Also be super careful near any of the edges so you don’t fall through the finish. I don’t even get close to the edges when I sand.
February 4, 2013 at 7:40 am #253680Thanks, Gabor. I think that’s about how it’s going to go down. I didn’t thin the Pelucid at all and probably should have for the last coats. It should knock down with a bit of sand paper. I’ll tape off the edges when it comes down to the sponge block and rubbing compound.
Was hoping it would somehow be easier….
February 4, 2013 at 8:03 am #253681Ed, it’s easy but it isn’t quick. Gabor outlined what my shop teacher taught me in my 1956 wood shop class except we used pumice instead of rubbing compound. To my knowledge nobody has discovered a short cut to a fine piano like finish on wood. ..and your project is made doubly difficult by the varying pieces with the grain going every which way. I’m sure that I will be jealous when we get to see it at Carlisle.
February 4, 2013 at 10:04 pm #253682OK so here’s my good news today, and some of you-all might want to copy this. The long story is here, at my blog.
The Reader’s Digest abridged version: The chrome bead that goes on top of the dash was a bit pitted (the original, 60-year-old-one, I mean).
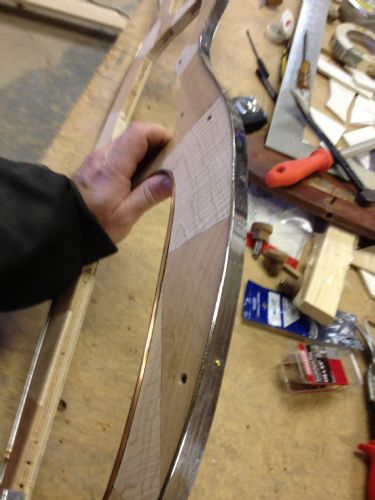
Moss has the whole bead kit for a measly $223. But I like cheap.
So I got this for $13.95 ($20.90 shipped)
The 1/8 inch bead is just a hair bigger than the original. But! Not! Pitted! Tested it on the old dash: Added a bit of stainless tape to the top and then stuck the Auto Barn bead to the front, like so:
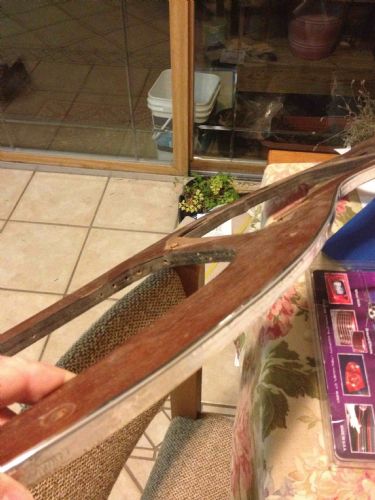
Once the welt is on there it’ll look perfect.
February 5, 2013 at 3:25 am #253683Ed, I love discoveries like this one.
February 5, 2013 at 10:13 am #253684me too thx
February 7, 2013 at 10:06 pm #253685First coat of Spar Urethane applied. Blocked the board with 220 and then rubbed in the low spots lightly with a sheet of 400 grit to make sure everything was hatched so the new stuff would adhere. Thinned it 20 percent and used a brush. Looks like it’s leveling nice and filling a the brush mark valleys that were left. Fingers crossed.
After this (assuming it goes well) another blocking, another 20 percent thinned coat, another blocking and two or three rub-on coats 50 percent thinned. Then probably some polishing.
February 8, 2013 at 7:41 am #253686Come on dude…are we ever going to see the front?
How about a soft “out-of-focus” teaser shot?PMOSSBERG2013-02-08 07:41:35
Paul Mossberg
Former Owner of a 1981 Classic Roadsters Ltd. Duchess (VW)
2005 Intermeccanica RoadsterIf you own a TDr and are not in the Registry, please go to https://tdreplica.com/forums/topic/mg-td-replica-registry/ and register (you need to copy and paste the link)
February 8, 2013 at 7:45 am #253687A general teaser shot would be good. How about a PM with a good photo to those of us already committed to Carlisle? Anybody else who wants to see it can show up to see it.
Bill Ascheman
Fiberfab Ford
Modified 5.0, 5sp., 4:11
Autocross & Hillclimb
"Drive Happy"February 8, 2013 at 8:42 am #253688second coat. this is gonna take a few more…
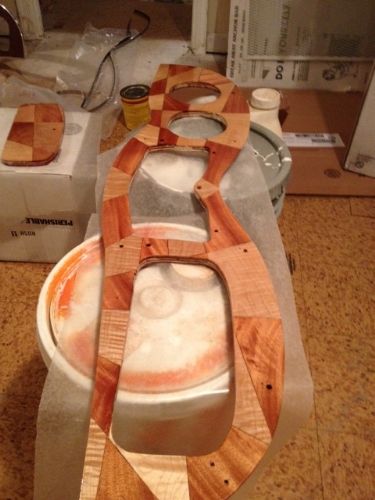
edsnova2013-02-08 08:42:58February 8, 2013 at 11:51 am #253689Very cool!
Nice craftsmenship Ed!Paul Mossberg
Former Owner of a 1981 Classic Roadsters Ltd. Duchess (VW)
2005 Intermeccanica RoadsterIf you own a TDr and are not in the Registry, please go to https://tdreplica.com/forums/topic/mg-td-replica-registry/ and register (you need to copy and paste the link)
February 8, 2013 at 2:19 pm #253690Ed very nice…
February 8, 2013 at 4:09 pm #253691I am beginning to believe I might not have to start over on this.
February 8, 2013 at 4:11 pm #253692ED do you take custom orders ?

TDREPLICA Map
http://www.arcgis.com/home/webmap/viewer.html?webmap=7f9174ad614e43b680deba085b0abf48
February 8, 2013 at 7:34 pm #253693I think it’s says a LOT about our friend Ed that this project started with, and I quote:
“I’ve always wanted a glovebox in Bridget.”

Paul Mossberg
Former Owner of a 1981 Classic Roadsters Ltd. Duchess (VW)
2005 Intermeccanica RoadsterIf you own a TDr and are not in the Registry, please go to https://tdreplica.com/forums/topic/mg-td-replica-registry/ and register (you need to copy and paste the link)
February 8, 2013 at 8:51 pm #253694Ed BTW- thx fo r the lead on the beading . I can use that beading for my glove box door ..with the old original(i guess) TD glove box door.
 February 9, 2013 at 10:46 am #253695
More complications.
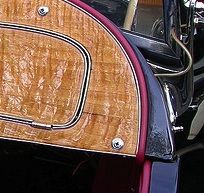
Bridget’s old dashboard was wider than the new. This is pretty typical
in replicas, as it seems logical to cover the scuttle front end to end
with maybe a slight and even “reveal” all around. But it’s not as
original. TD dashes left more metal exposed on each end, matching it to
the width of the doors. This was so that the the vinyl (Rexine) windlass
that surrounded the dash could be folded under and end just inside the
similar bit of piping on the door top. It wasn’t really “weather tight,”
but it did look neat. And it was pretty important that the dash piece be
even with, or just inboard of, the door pieces, so that opening and closing the doors could
be accomplished without undue wear on the vinyl piping.Here’s a detail shot of what I mean:
Now, as I trimmed my dash and I tried to get that shape right, I noticed I had rust on that to-be-revealed edge:
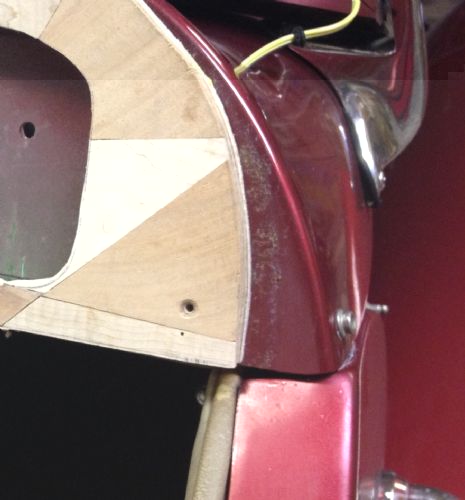
Well, OK, not rust. But looks like it. I figured it was leftover glue of some sort or maybe some old shellack that came off from under the dash piece, and set about peeling it away.
Tried my fingernail. Then a paint scraper, gently. Used a rag soaked in “Goof off” to loosen it. Then tried paint thinner, turpentine, etc. Went a little harder with the scraper. Finally the “rust” started chipping away. It brought the paint with it.
Oh well. A little work with some steel wool and now we have:

Need for a paint job.
I’ve got a can of Duplicolor in the right code (Ford Toreador Red from the late 1990s). This should be loads of fun.
edsnova2013-02-09 10:50:17
February 9, 2013 at 3:30 pm #253696For want of a glove box…. 😉
Paul Mossberg
Former Owner of a 1981 Classic Roadsters Ltd. Duchess (VW)
2005 Intermeccanica RoadsterIf you own a TDr and are not in the Registry, please go to https://tdreplica.com/forums/topic/mg-td-replica-registry/ and register (you need to copy and paste the link)
February 9, 2013 at 3:45 pm #253697That’s like washing a small spot off the kitchen wall, then you have to keep going and going until you’ve scrubbed down the whole kitchen. No such thing as a little project, sometimes better to leave it alone. But it’ll be well worth it when you’re done.
February 9, 2013 at 8:03 pm #253698I’m not so worried. At some point I plan to grind off the old wiper nubs in the scuttle top in front of the windshield and fill them. So the scuttle’s going to need paint.
I figured I’d have a body shop spray it when the time comes. Now I’ll see how well the rattle can matches. If it’s terrible–and I expect it to be–then it’s just a little more work/$ for the body shop job later.
February 10, 2013 at 10:47 am #253699If it won’t match when you’re done, try a contrasting color for the exposed ends. Black?
Bill Ascheman
Fiberfab Ford
Modified 5.0, 5sp., 4:11
Autocross & Hillclimb
"Drive Happy"February 17, 2013 at 6:38 pm #253700Black wouldn’t look right and there’s no reasonable “right” place to put a tape line. I’ll get to to match, one way or another.
Meanwhile, in the home stretch now on the dash. I block-sanded with 400 a couple weeks back. Did the thing with the rags dipped in 50% thinned Spar Urethane. Did about 8 coats on the various surfaces. Did not sand between them.
Let it dry for many days and then hit with 1000-1500-2000-2500 and 3000 grit held in a wet sponge. That took the gloss off about 20 percent, along with almost all the little dust nibs. It looked pretty good, but I want better than good, so I rubbed it with polishing compound.
I started this process on the back side of the glove box–not the door, the actual back of the glove box. No one will ever see it. I got it pretty good after three or four polishes. So moved to the front of the back of the glove compartment. Even better. Then I did the floor of the glovebox. Also pretty good.
But not quite perfect.
So I took the parts back into the paint booth and wiped them down with thinner again, and did a final, final thin coat of thinned spar varnish.
Now the gloss is back and the dust nibs are gone.
I moved on to the main dashboard–same thing with the sandpaper . . .
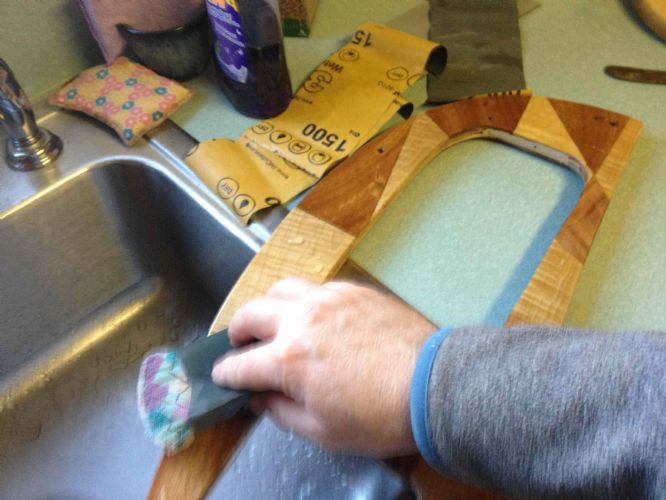
and the three-times polish before wiping on what I hope will be the final top coat of spar urethane.Of course I’ll still have to put all the chrome/brass stuff back on it and test fit the glovebox door again to make sure my clear coats haven’t fouled up the fit.
Bet they have.
edsnova2013-02-17 18:40:53
February 18, 2013 at 3:30 am #253701Love the location of your paint booth. Convenient.
Bill Ascheman
Fiberfab Ford
Modified 5.0, 5sp., 4:11
Autocross & Hillclimb
"Drive Happy"February 18, 2013 at 11:15 am #253702Paint booth is in the basement, Bill. The wet sanding station is the kitchen sink (so long as my wife is preoccupied).
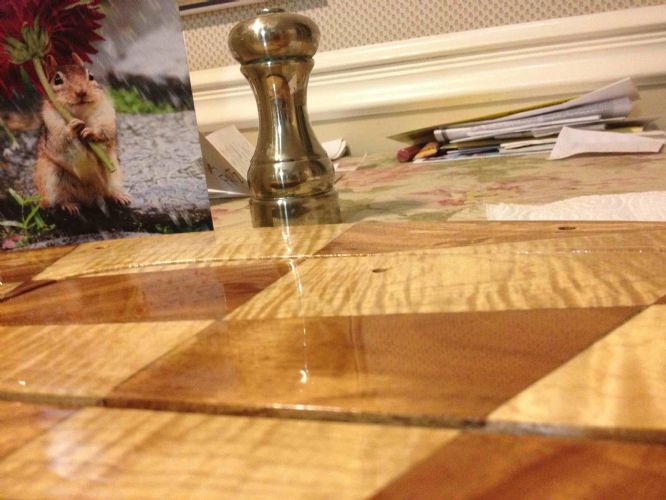
February 19, 2013 at 8:24 am #253703Shiny.
-
AuthorPosts
- You must be logged in to reply to this topic.
