Home › Forums › General Discussion › Rear end advice
- This topic has 7 replies, 3 voices, and was last updated 8 years, 1 month ago by
 edward ericson.
-
AuthorPosts
-
December 10, 2017 at 9:34 am #304434
Hi everyone,
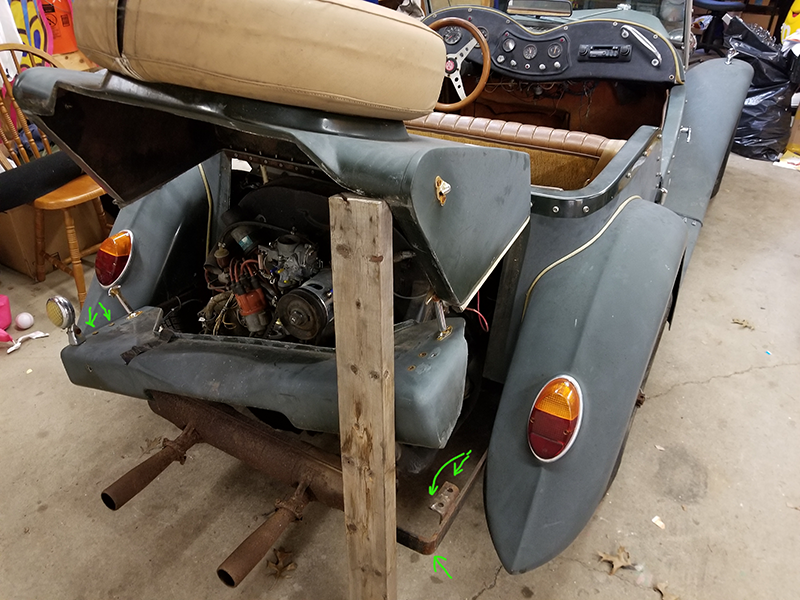
I have a situation with my fiberfab Migi’s rear end being what appear to be two pieces of 1″x 1/4″ flat iron strips with no braces between them. Is this supposed to be held by the rear bumper? The rear bumper doesn’t line up right because the iron strips aren’t straight. I want to put some brackets to see if I can strengthen the rear end and level it out a bit. Would this cause any unforeseen issues with reattaching the bumper? Would this interfere with the rear engine tin? Incidently, this interference is why the rear isn’t fully bolted down. So yeah, advise me 😆 😀

-
This topic was modified 8 years, 1 month ago by
Adam Al-Ahmary.
1952 fiberfab mg td replica, 1966 volkswagen donor, dark green/tan - Jeeves
December 11, 2017 at 7:50 am #304445The two strips you are referring to attach the splash pan to the frame. The splash pan sets the width for the two “L” shaped brackets to attach the bumper brackets that hold the bumper. If you are missing the bumper brackets you can source them from MgMagic
I have the same model of TDR and I had to weld three more strips to the top of the existing ones to increase the clearance when I replaced the muffler. The heat from the muffler was bubbling the paint/gelcoat on the splash pan.David B Dixon
Port Perry ON CA
SabineDecember 11, 2017 at 6:27 pm #304447Should work. I’d dry-fit as much as I could before doing anything rash.
When I put the Soob in Bridget, the muffler tucked up under that splash pan a bit tighter than the previous exhaust. I lined the underside with reflective insulation made just for that purpose, and it worked beautifully. Key was prepping the unfinished glass underneath and painting that first, I think. I used high-heat header paint and then covered it with the insulation stuff. Neem there for years now and not peeling off.
December 12, 2017 at 3:43 pm #304457Thanks for the advice you guys. I understand how it fits together. After having wrestled with it a bit I find that I need some safe way to force the right side frame strip over a bit so it will allow the bumper bolt to fit in the hole. A big C clamp?
1952 fiberfab mg td replica, 1966 volkswagen donor, dark green/tan - Jeeves
December 12, 2017 at 8:53 pm #304458Adam! text me! Maybe I can come over and <strike>break it </strike> help you fix it.
December 13, 2017 at 8:02 am #304461I had a similar problem first time I removed the splash pan where the frame strips “L” shaped metal that provided mounts for splash pan and bumper brackets were splayed out so that holes could not be aligned. I used a 4’ bar clamp to pull the frame strips in the 1-2” to align the holes for mounting the splash pan. Once splash pan was mounted the bumper holes lined up on the pan and allowed remounting of the bumper brackets. I also found that the bolts in the wheel wells that held the frame strips were loose, something you may want to check. I followed Ed’s advice with using the foil covered insulation and high temperature paint on the underside of the splash pan to protect the pan from heat damage. Something to consider if you are changing the muffler
David B Dixon
Port Perry ON CA
SabineDecember 13, 2017 at 11:21 am #304463Oh no Ed. I am holding your favor in reserve. Next step is getting the dashboard back to working order. Are you good with electricity? I did manage to get the bumpers back on. Once my floor pan arrives, that is when I am going to need your help. We need a play date.
1952 fiberfab mg td replica, 1966 volkswagen donor, dark green/tan - Jeeves
December 13, 2017 at 5:47 pm #304464Hit me up. I’m not really good with electrics but I am slowly improving. As with the welder, which might could be employed to get those new pans properly affixed.
No reserve, man. I’m free all day on most days, these days.
-
This topic was modified 8 years, 1 month ago by
-
AuthorPosts
- You must be logged in to reply to this topic.
