
Home › Forums › General Discussion › Shift bushing change??
- This topic has 20 replies, 5 voices, and was last updated 5 years, 6 months ago by
 Michael Junge.
-
AuthorPosts
-
August 26, 2020 at 1:08 pm #307181
ok so I have a mgtdr vw chasis. Pulled the shift rod out to replace bushing and coupler.
How in the world do I get the shaft back in there far enough to reach it thru shifter hole to use needle nose to feed thru bushing since it’s only like 2.5 ft long?????
August 26, 2020 at 9:05 pm #307183you have to disconnect the coupler on the other end of the rod & slide it forward till it is out of the bushing (or where the bushing was ) put the bushing in the hole do not forget the little ring then slide the rod back in . I used a string around the rod to lift it back up to slide back in . check out the samba website lots of good info
August 26, 2020 at 9:31 pm #307185How did you get the rod out? If you removed it through the front port, you’ll have to fish it back through that way. Feed a wire through and tie it off then pull it very gently (there’s a lot of stuff in the tunnel to get hung up on).
If the rod is laying on the floor of the tunnel you have to loop something under it and lift it up. A coat hanger should do. Maybe even a magnet?
And, yes, this is a total PITA. There is no real easy way.
However…
Next time (and there’ll be a next time) remember all this fun, and, before you move the shift rod out of the bushing hole, put a loop in the tunnel to catch it. Then slide the new shift bushing into place on the handle of a big ratchet. Don’t even worry about the wire retainer clip.
Condolences and congratulations! You’re gonna like the way your car shifts.
-
This reply was modified 5 years, 8 months ago by
 edward ericson.
August 27, 2020 at 3:48 am #307188Yeah I managed to find a video showing tie fishing like or something to the shaft after out of coupler then pull it out. So when you pull it back in it goes thru bushing. Wow wish I’d found that a day earlier 😂
im goin to put a loop in shifter hole to lift rod and also took my long reach needle nose and made them fit around the shaft to grab better
fighting Arizona summer so when it’s 90 by 9am I have to wait til 3am to start work lol
thanks for the help guys.
Its gotta be better before I couldn’t go from 1st to 2nd without finesse so it wouldn’t grind tryin to go in reverse
August 27, 2020 at 9:59 am #307189I’m living this pain as well…part coming tomorrow from JBugs so this weekend will be the reinstall attempt…
Pippa the War Pig
Dayton MiGi riding on a 1968 VW Bug bodyAugust 27, 2020 at 9:43 pm #307190It’s a right of passage.
August 28, 2020 at 9:35 am #307191Hopefully just once…small spaces and arthritis aren’t helping things…
As I continue looking for videos…is there any way of installing the bushing without entirely removing the rod? If not, where will I find the inspection port?
Pippa the War Pig
Dayton MiGi riding on a 1968 VW Bug bodyAugust 28, 2020 at 11:14 am #307197Updating as I take a break…
Found the inspection port…and…well…I’ll let the pics speak for themselves.
And PEX tubing was my friend.


Since the shift rod wouldn’t move past the obstructions in the tunnel, I ran PEX in from the front, fished it through the shifter hole then back out with parachute cord attached. Attached that to the end of the shifter rod and pulled on through.
Since I am by myself I used the parachute cord on a loop so I could wiggle the rod back and forth and up and down. Worked well. Now to wire brush things…then lunch…then reassembly.
Pippa the War Pig
Dayton MiGi riding on a 1968 VW Bug bodyAugust 28, 2020 at 1:22 pm #307198The MiGi assembly manual (in the library) explains how the gear shift was relocated behind the e-brake handle when the car was built. The rod was removed and shortened, a hole was cut in the top of the tunnel, and a new bracket and bushing were installed. If the builder could weld, the new bracket is tacked in the tunnel, making bushing replacement pretty much the same as what’s shown in several of the how-to videos, except the rod is shorter. Here’s a link to my favorite: https://www.youtube.com/watch?v=un4V6OHXNik Depending on body fitment, you may have difficulty getting the rod out of the access hatch between the torsion tubes in the front of Napoleon’s hat. On mine, it looks like I might have to remove the front fenders if I can’t get enough down angle on the shortened rod.
The builder may have used the “no weld” method, which complicates the job in some ways, yet makes it easier in others. This method uses the bolts which secure the gear shift mechanism to hold the bracket in place inside the tunnel. That’s not a big deal, just remove the gear shift, reinstall the bolts, then proceed as normal. The complicated part is what may have happened at the coupler end of the rod. To avoid welding, the manual recommends compressing the end of the rod slightly in the vertical plane so it engages the coupler, then boring a horizontal hole for the coupler attachment bolt. Because the end is out-of-round, the rod won’t fit through your new bushing. You may struggle getting it through the bracket. You’ll have to form it round to get it to fit, then squeeze it flat again before installing the coupler. This is how mine is. If I ever have to replace the bushing, I’ll buy a new rod, then shorten to spec and weld the coupler end back on. The original rod end is much more sturdy and likely to wear far better than holes drilled in the walls of a hollow rod.
The other thing the “no weld” method makes easy is bushing installation. After extracting the rod, unbolt the bracket and extract it out through the hole in the tunnel. install the new bushing, reinsert in the tunnel, then re-secure. Much easier than installing the bushing through the hole in the tunnel, especially if the edges are jagged.
I sincerely hopes this helps,
Eric1952 MG TD FiberFab MiGi, incomplete. 1974 Beetle tub, 1969 1500 cc single port.
August 28, 2020 at 6:15 pm #307199@nauticalinfidel what is that gunk? Looks like a mouse nest.
Eric
1952 MG TD FiberFab MiGi, incomplete. 1974 Beetle tub, 1969 1500 cc single port.
August 28, 2020 at 7:07 pm #307200@mcgruff – definitely mouse nest. Already replaced the seat foam and plywood base…thought that was it. Got a ton out but will need to get the rest some other day…with a good shop vac.
My rod was welded – and thank you for the great explanation because I saw the weld when I cleaned the rod up but had no clear understanding of why.
Feeding the rod through the bushing was a piece of cake…once I got the connector section through. That took some doing but fortunately there were two holes on each side, just forward of the bushing and I could get long allen wrenches in and use them as levers.
All put together now…tomorrow or Sunday wire up the turn signal switch I’m replacing because…seemed like a good time…and then see if I put the shifter back together correctly…
Speaking of…should the plate – reverse lockout and the piece that holds the shifter arm in…should that move?
Pippa the War Pig
Dayton MiGi riding on a 1968 VW Bug bodyAugust 28, 2020 at 7:25 pm #307201@nauticalinfidel – Assuming you have a stock VW gear shift lever assembly and the bracket inside the tunnel is not welded, the reverse lockout plate installs atop the tunnel first, long side to the right and up. The shift lever bolts on top of the lockout plate. Make sure the transmission is in neutral, then lightly snug the bolts. Align the shift lever so it’s straight up and down on both the X and Y axes, then tighten the bolts to about 7 ft/lb. <span style=”text-decoration: underline;”>The reverse lockout plate and gear shift base should not move when the bolts are tight.</span> Depress the clutch and row through all four gears, then try depressing the lever and shifting into reverse. Loosen the bolts and adjust if needed, then re-tighten, The lockout plate can move a bit independently for fine tuning. Once everything feels right, apply final torque of 13 ft/lb, then test drive. Expect another round of adjustments, it’s hard to get perfect on the first try. Tint movements are best. I tend to tap things around with a small mallet and drift, with the bolts fairly snug to limit movement.
Eric
1952 MG TD FiberFab MiGi, incomplete. 1974 Beetle tub, 1969 1500 cc single port.
August 28, 2020 at 10:13 pm #307202@mcgruff – thanks!
Pippa the War Pig
Dayton MiGi riding on a 1968 VW Bug bodyAugust 30, 2020 at 1:26 pm #307204…so bushing swapped out, all reinstalled. Changed out the turn signal switch and refinished the steering wheel since I wouldn’t be driving waiting for parts.
And while getting in the car, steering wheel still removed, my pants caught the turn signal lever and broke it. 😳 👿
And, the problem I was hoping to correct – grinding gears while shifting – is still there.
But, at least I learned a lot?
Pippa the War Pig
Dayton MiGi riding on a 1968 VW Bug bodyAugust 31, 2020 at 12:55 pm #307206@nauticalinfidel – There are a couple of possible causes for grinding gears. First is the clutch, is the cable properly adjusted? You should have about 1/2″ of light pedal travel before you feel heavier resistance as the throwout bearing engages the fingers. If you’ve got too much play the clutch may not be disengaging fully, this can cause the gears to grind. Suspect this if the grinding occurs in all gears, accompanied with heavy resistance on the shift lever before it grinds into the forward gears. What you’re feeling is the brass synchronizer rings giving way before the shaft speeds are matched. Adjust the clutch cable ASAP, driving it like this will wear the synchronizers excessively.
If the clutch is properly adjusted and grinding occurs in other than all gears, the synchronizer rings are probably worn. Time to rebuild the transmission. That’s a job best left to a pro.
Eric
1952 MG TD FiberFab MiGi, incomplete. 1974 Beetle tub, 1969 1500 cc single port.
August 31, 2020 at 3:00 pm #307208You should have about 1/2″ of light pedal travel before you feel heavier resistance as the throwout bearing engages
This is my next step – sorting out how tight to make the clutch cable. I already know it should be replaced down the line – it has a repair with a couple of wire clips.
Anyway…looking to see it I can tighten the clutch cable much more than the extra inch I already did on the cable…if that doesn’t do it, time to call some local shops.
Pippa the War Pig
Dayton MiGi riding on a 1968 VW Bug bodyAugust 31, 2020 at 3:06 pm #307209Local shops for what? Parts I hope.
Clutch pp and bearing kit ain’t bad thru Sachs
Cable is easy as long as no one bogered up the tube Easy peazy
August 31, 2020 at 5:24 pm #307210Here’s a link to a thread on TheSamba with lots of good info. The one thing people forget to mention is the clutch mechanism has slack in it, but the clutch cable arm is pre-loaded with a spring. Take up the slack when measuring by using pliers to turn the clutch cable arm CCW until you encounter stiff resistance.
1952 MG TD FiberFab MiGi, incomplete. 1974 Beetle tub, 1969 1500 cc single port.
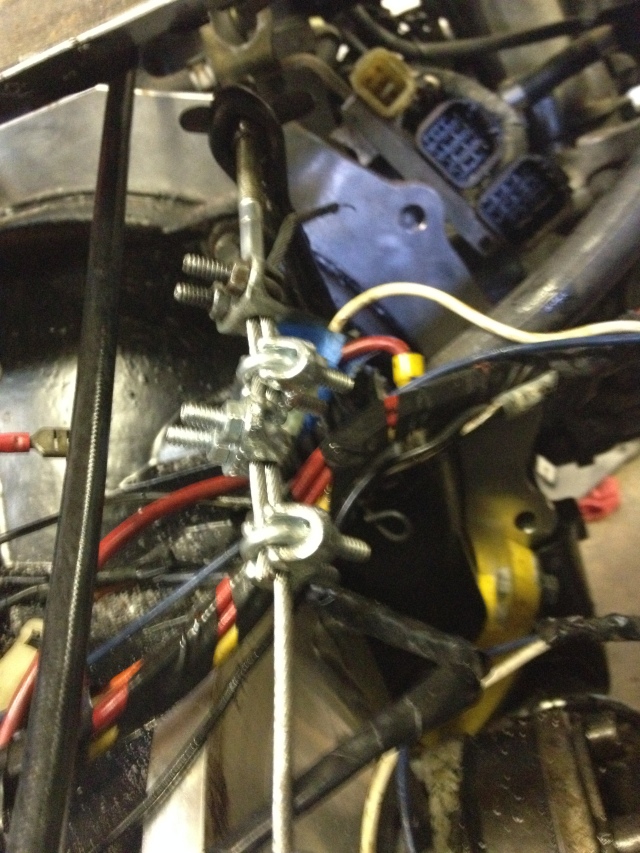
August 31, 2020 at 6:12 pm #307211A word on “clips” being on your clutch cable:
Nearly all these cars all use a shortened clutch cable, owing to the pedal set having been moved rearward a foot or 14 inches. On my car, the PO made a loop in the cable over the transaxle and then clamped that with a U-shaped cable clamp. It worked perfectly well like that for probably 25 years.
When I did replace the cable along with the engine and tranny, I cut mine and used four clamps to connect the overlapped ends. Not as pretty but works just as well.
 September 11, 2020 at 7:58 pm #307232
I found an access panel on the right side of the tunnel right where they welded the bushing plate so I could’ve removed the rod right there instead of making an access hole underneath I had to weld back up 🤦♂️
Its all together and will outlive me least I’m hoping lol
October 15, 2020 at 7:15 pm #307292Closing some loops here…
Turned out to be a stuck pressure plate or disk (according to the experienced gentlemen who did the repair)
They also adjusted the cable and added some transaxle fluid
Now I need to go back and redo the adjustments that Eric mentioned above – was having difficulty finding first and second today. But, at least I am driving again!
Now to do some searching on electrical before I post a new question.Pippa the War Pig
Dayton MiGi riding on a 1968 VW Bug body -
This reply was modified 5 years, 8 months ago by
-
AuthorPosts
- You must be logged in to reply to this topic.