
Home › Forums › MGTD Kit Cars › VW Based Kits › shift rod bushing, again
- This topic has 14 replies, 6 voices, and was last updated 9 years, 7 months ago by
scubasteve.
-
AuthorPosts
-
September 21, 2016 at 8:54 pm #301828
So this is the culprit to why I was losing my mind Saturday on Vicenc’s PA country tour.
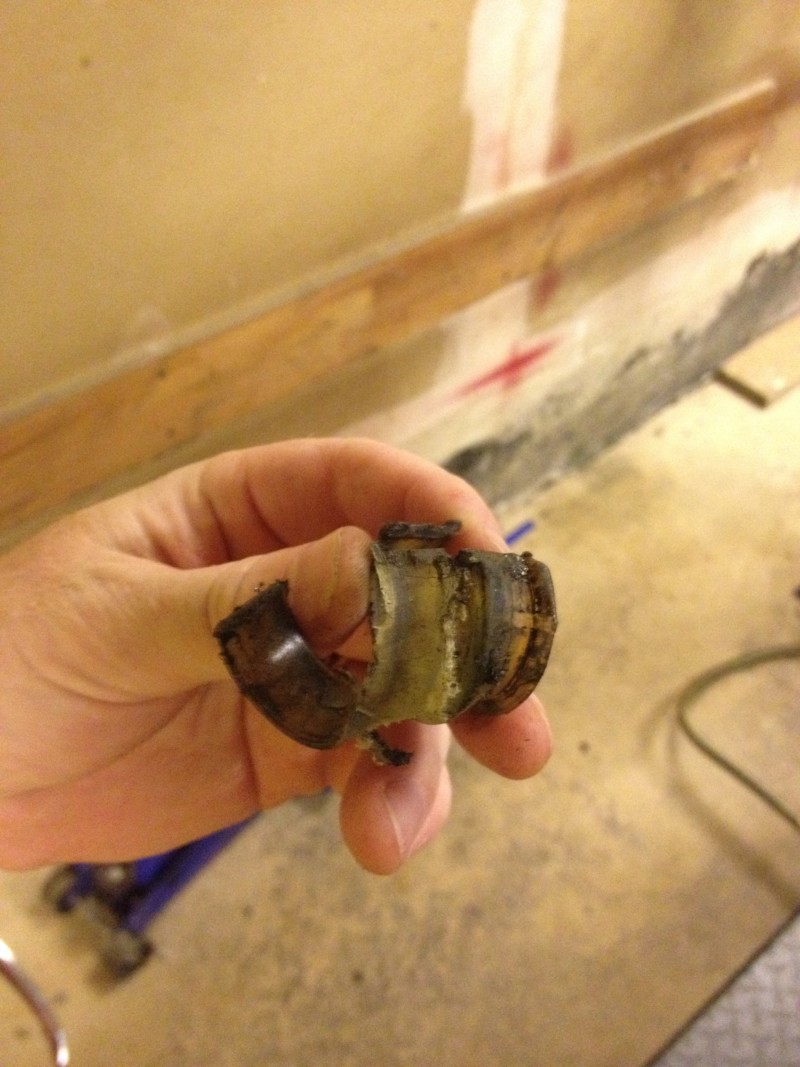
Nothing exotic, I know, but that one was new 2 years ago when i put the Soob and new transmission in. And the one I pulled out then was 4 years old and looking just as ratty.
New one’s in. Trying to get the shift rod fed through… More and more grease, I guess.
-
This topic was modified 9 years, 7 months ago by
 edward ericson.
-
This topic was modified 9 years, 7 months ago by edward ericson.
September 22, 2016 at 10:19 am #301834Hammer down Ed! Those bushings should be lasting more than two years.
You already replaced it…but two years from now, maybe you want to consider one of these:
http://www.ev4unow.com/VWShiftRodBushing.html

Paul Mossberg
Former Owner of a 1981 Classic Roadsters Ltd. Duchess (VW)
2005 Intermeccanica RoadsterIf you own a TDr and are not in the Registry, please go to https://tdreplica.com/forums/topic/mg-td-replica-registry/ and register (you need to copy and paste the link)
September 22, 2016 at 10:20 am #301835Hammer down Ed! Those bushings should be lasting more than two years.
You already replaced it…but two years from now, maybe you want to consider one of these:
http://www.ev4unow.com/VWShiftRodBushing.html
Paul Mossberg
Former Owner of a 1981 Classic Roadsters Ltd. Duchess (VW)
2005 Intermeccanica RoadsterIf you own a TDr and are not in the Registry, please go to https://tdreplica.com/forums/topic/mg-td-replica-registry/ and register (you need to copy and paste the link)
September 22, 2016 at 7:08 pm #301836Hammer down Ed! Those bushings should be lasting more than two years. You already replaced it…but two years from now, maybe you want to consider one of these: http://www.ev4unow.com/VWShiftRodBushing.html
Paul, do you have this replacement in your car? Seems like a good idea for replacement, if, like you say, the nylon bushing lasts only a year or so.
I may look in to one, since mine has gone out and I’m replacing it anyway.The bushing I took out of mine had split in to three pieces and I doubt brass would poop out.
Amor Conquista Todo
September 22, 2016 at 9:16 pm #301837I thought about that brass one. Apparently the same part is available via McMaster Carr. If this one fails again soon I’ll go the brass route. Current theory is that when the motor/trans mounts were loose I wrecked the bushing. There was a lot of lateral motion for the first year or so after the engine swap. I had the stock VW shifter in and I’d lose 3rd, or 4th gear from time to time. Then rev the engine (or get off it) and the gear would magically return to its proper place.
I bought the Vintage Speed shifter in part because I thought the old shifter might be the problem. Put it in without changing the old bushing out, and the problem continued.
It stopped when I tightened up like five or six bolts and nuts under the car.
I checked them all before starting this project. They were good. So with luck I won’t wreck this new bushing for a while.
September 23, 2016 at 12:42 pm #301838Steve, I do not. I have the standard nylon bushing.
Sounds like Dr Ed has diagnosed the reason his bushing went south so quickly. I’m betting he gets more than two years out of the new one.
Paul Mossberg
Former Owner of a 1981 Classic Roadsters Ltd. Duchess (VW)
2005 Intermeccanica RoadsterIf you own a TDr and are not in the Registry, please go to https://tdreplica.com/forums/topic/mg-td-replica-registry/ and register (you need to copy and paste the link)
September 24, 2016 at 12:47 pm #301840Hey Ed,
Great picture of what can happen to a shift bushing — and I know from the “fun” experience of replacing that bushing on both Emma and Abby over the past few years…not something I would want to do every 2 years….
On another note, I’ve “taken stupid” and can’t figure out how to post pictures within the text of a post….maybe because I’m using Safari on a Macbook Pro?
Can you enlighten me either on a post or PM me — I just replaced a rotted out front beam and ball joints and have some pretty good pictures that show the process…another project I’d like to NEVER have to repeat…
Happy Jack
September 24, 2016 at 8:01 pm #301848Jack, it’s more convoluted than even the old site. First you go to your own thing. Upper right corner it should say something like “Howdy, Happy Jack.” Click on that and you get a drop-down menu. At the bottom it says “media.” Hover over that with your curser and you should see another drop-down menu with “albums,” “photos” “videos.” Click on “photos.”
That should bring you to a new page. If you have previously uploaded pictures, you will see some of them. Under “All Photos” near the top left of the page you will see “options” and “upload.”
Click on “upload.”
That opens another drop down box. You can actually drag and drop pictures into this from a folder on your computer screen, or you can navigate to the folder on your computer with the pics. Double click on them and the upload begins. You should see them appear in your photo album.
To get one into a post you have to click on it.
It should open up big. Then RIGHT-click on it, and you should see a box open up on it with options like “copy,” “save image as,” etc. Click on “copy image address.”
Now close the pic and find your way back to the post you want to put this photo in. (I often use two browser windows for this, keeping the “new post” box open in a separate tab or window).
(Hang on, we’re getting close now)</span></span></span>
Above the window where you want to make the picture go, there’s a line of little symbols. The second from the left is like a jagged little mountain with a little moon over it. That’s your “insert pic” button. Click it.
That opens a new box with a prompt that says “Source.” PASTE (control or command V) the “image address” you copied about six steps ago. Then press OK.
The photo should appear now as if by high-tech magic. So simple even a computer science Ph.D. could do it, sometimes, maybe, if he’d had enough Red Bull.
-
This reply was modified 9 years, 7 months ago by edward ericson.
September 25, 2016 at 5:36 am #301912
Test, test, test Vicenç - (bee sense)
Pembroke Pines, FL
1986 Aston - BCW Model 52 - "Montse II"(1983 FiberFab MiGi II - "Montse")
September 25, 2016 at 11:01 am #301917Nice shot.
September 25, 2016 at 1:09 pm #301919Hey THANKS Ed !!
I guess with a little practice inserting pictures will become second nature (or not???). Now I need to practice a bit. Once I get the hang of it I’ll post the front beam replacement “saga.”
Happy Jack
September 25, 2016 at 4:50 pm #301922Thanks, Ed! But I can’t take credit, Charlene took that. Knew you and Karen would enjoy it. 😀
Vicenç - (bee sense)
Pembroke Pines, FL
1986 Aston - BCW Model 52 - "Montse II"(1983 FiberFab MiGi II - "Montse")
September 25, 2016 at 8:01 pm #301926Shift bushing update:
SUCCESS!
Finally got round to adjusting the shift plate and test driving this afternoon. But not before I took a wild swing at fixing the leak from my oil pressure gauge exclusively onto the right leg on only work or dress pants (and never garage or shop pants). Crawled under the dash and loosened the nuts on the gauge bracket, pulled the gauge out three inches to see the hell leak around the teflon tape I’d put there, unscrewed the brass compression fitting, peeled off the soggy white tape, and cleaned it all.
Then I put some Locktite Red thread sealant on the coupler, screwed it all back together and waited.
I wanted the Locktite to set up before testing it with hot oil.
So like three hours later I started the car, with the gauge still hanging out the dash, to see what was what.
No oil pressure.*
Tapped the gauge (it’s British). Nothing.
So I figured my Locktite had sealed up the capillary tube.
Took it apart. Pulled the fitting out, stuck a rag under the tube and started the engine. No oil.
Got a bit of wire to poke in the cap tube. It went in a half inch and stopped.
So I got a little drill bit and drilled it out. Then tried again starting the engine with the open tube. Excellent. Looked like a scene from a Charlie Chaplain movie. Oil gushing out everywhere. Me chasing it with a rag.
Back together half way, then a lesser drop of Locktite Red on the male thread only. Then tight, the started it right away. Let it run until hot with a clean paper towel rapped around the joint. No leak.
I climb under the dash and replace the gauge in its hole, tightening the nuts in back, making sure the cap tubes for the oil and coolant sender are not kinked or shorting any of the spaghetti mess I’ve got under there.
Now for the test drive to check the shift bushing. Feels good; first, second, third, forth, all good….. But NOPE. When downshifting from third, second turns into reverse. Not good. I no like.
Back to the garage. Pull the carpet, get out the 14mm socket and the hammer and the blunt screwdriver. The expert says to tap the stop plate RIGHTWARD with the shifter in reverse. I do that for 15 minutes and the problem quickly worsens.
So I start tapping LEFTWARD and, in the fullness of time, along with several grunts and impolite epithets, the thing comes correct. Test drives, high fives.
Then to get the carpet back, the shift knob, etc. and yadda. Nothing but pure fun, I tell ya.
++
* And a side hassle: No tach. No fuel gauge. No signal lights. “Fuse,” I diagnosed, and fixed. Replaced the white (8 amp) one, which had a black mark on it indicating it was wrongly-sized, with a red (15), which I think is what belongs there….
September 26, 2016 at 6:48 pm #301927I’m glad that there are other cars out there that fight and squirm and make repairs difficult. I thought it was just me.
Good job, Ed. See you in a few weeks.
Bill Ascheman
Fiberfab Ford
Modified 5.0, 5sp., 4:11
Autocross & Hillclimb
"Drive Happy"September 26, 2016 at 7:55 pm #301928I’m glad that there are other cars out there that fight and squirm and make repairs difficult. I thought it was just me. Good job, Ed. See you in a few weeks.
CAN I GET AN “AMEN!” FROM THE CHOIR?!
I just spent the whole day getting the steering coupler (20 min’s.) and the shift rod bushing and shift coupler (4hrs) replaced. The actual work replacing the shift parts took only about 1 1/2 hrs (even WITH watching the JBug video) but three times that dinking around with the adjustments. Never DID get it quite right. Quitting while I’m ahead. Will try again tomorrow.
Amor Conquista Todo
-
This topic was modified 9 years, 7 months ago by
-
AuthorPosts
- You must be logged in to reply to this topic.