Home › Forums › MGTD Kit Cars › VW Based Kits › Soob swap
- This topic has 340 replies, 20 voices, and was last updated 11 years, 5 months ago by
 HappyJack.
-
AuthorPosts
-
April 29, 2014 at 6:27 pm #258216
Thanks, Steve.
I’ve asked the supplier to just give me the part I ordered (and that he advertised) but while awaiting his response I’ll ask some hacker types I know how to solve this.Still P.O.’d though. I mean: send the bloody part you sold me!April 29, 2014 at 6:54 pm #258217I’m with you, why confuse the issue by sending something other than what you pictured and advertised for sale.
Here is a good video explaining how the sensor works.Learned something new today. April 29, 2014 at 7:18 pm #258218
So by now I’m thinking
This is a ???sinking??? sensor. so the load= the wire on the harness and the wire from the sensor should complete its path to ground.
Which means blue to ground and brown to the wire from the harness. But weird, because there’s no independent way to see the led light and tell me it’s actually doing it.
Gonna get a 9v battery to test.
…and tested. No light no how. There is one at the back of it. Blue – and brown + ought to get it. But no.
edsnova2014-04-29 19:24:48
April 29, 2014 at 10:05 pm #258219Went out and took the engine out again to see if I had fouled something up last time I put it on or time before that when I used the wrong throwout bearing thingie.
No damage to anything. I removed the pressure plate and reinstalled with the clutch guide tool just for good measure. Everything looks right. So I reinstalled the engine yet again.I seem to have plateaued on that activity. Putting the engine back in has not gotten easier–especially the last half inch or so. But it went in this time, finally, without me having to tighten the bolts and “pull’ it home.Pondering now whether I want to rise extra early tomorrow a.m. and clean her up and reinstall the top so i can tow her to the muffler shop for pipes. 50/50 chance, maybe.April 30, 2014 at 3:41 am #258220It’s always the little thing that drive you crazy. Damn you, Murphy!
Bill Ascheman
Fiberfab Ford
Modified 5.0, 5sp., 4:11
Autocross & Hillclimb
"Drive Happy"May 3, 2014 at 12:44 pm #258221So The sensor seller asked for pics of the part and a description, and when I sent that he sent me another sensor–this one with three wires. Appears the missing wire on the original one was a defect. The new one just came and tested good.
Meanwhile, Shiels sent back my wiring harness with instructions. That looks righteous as well. So today I’m installing my fuel lines and maybe hooking up wires. The goal is maybe a test start by tomorrow afternoon, then to the muffler shop for the needed pipes and welds next week.May 4, 2014 at 10:02 pm #258222May 5, 2014 at 8:38 am #258223Ed, have you considered a hydraulic clutch pedal? That might most easily solve your Bowden tube issues…
Early FF TDr on 69 VW pan
Slowly coming back from the ashes...May 5, 2014 at 9:52 am #258224Hell no.
Lane Anderson in the Speedster group has been my guide to the joys of hydraulic clutch conversions. This cable job will have to get a lot hairier before that set of troubles starts to look appealing.May 5, 2014 at 2:40 pm #258225Ed,
I’m using the same radiator that you used. I looked, blog and here, but did not see how you mounted it.
If you will please describe, mostly interested in the bottom isolators.
Regards
Mel
May 5, 2014 at 3:02 pm #258226I have not mounted it yet.
I took the rubber donut bits from the soob. I plan to make an L-frame from some sheet metal for the bottom mount and bolt it from the front. The isolators will sit on that.On top there are two bolts holding the fiberglass side panels to the grill shell. Another L bracket there facing down should reach the top bungs. Then I gotta add other mount points for the main Soob fan.It’s next on my list of things to do–watch the blog this coming weekend.May 5, 2014 at 3:08 pm #258227Thanks Ed looking forward to seeing it.
Mel
May 5, 2014 at 9:42 pm #258228Buttoned up for towing–maybe tomorrow a.m. she’ll head to the muffler shop. There I hope I’ll get
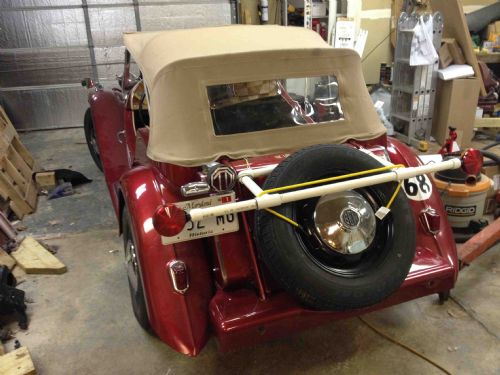
1. coolant hard lines, front to back–plus a tricky J-bend on the driver’s side to meet the top hose from the engine.2. Full exhaust–there’s a 2 1/4-in ID glass pack in the car now and the old Suby pipes as well. I need the new rig to be shorter by about two inches to match my pan’s ground clearance. Don’t know yet about the cat. I think I want at least one. The Soob apparently has 2 but I doubt they’d fit.3. Final welds on my trans mount.4. Maybe some air intake piping.I’m hoping to get the car back later this week but who the heck knows. So, this is the first time the spare tire carrier has been on the car since the fall.May 5, 2014 at 10:27 pm #258229
I like the light bar for towing you have rigged up. Where is the bumper?
May 6, 2014 at 6:47 am #258230Thanks. PVC has many uses around the home & office. I left the bumpers off. I might put on the rear one though just as insurance. It’d be no good in a rear-end crash, but it does catch the spare tire if the clips holding it come loose.
May 6, 2014 at 8:49 am #258231Annnnd . . . .
back homeMy guy Mike’s out with shoulder surgery. Steve told me to try again next Monday: “He might man-up and come in.”This just about guarantees there’ll be no Bridget at Carlisle. Ah well. Sooo close.May 6, 2014 at 9:14 am #258232Bummer 😕
May 8, 2014 at 9:22 pm #258233I knew when I said unkind things about the prospect of going to a hydraulic clutch I was tempting fate. So now I buggered up the clutch.:x
Basically, the old clutch cable is jammed inside the tube. I have no idea how this is even possible. Figured I would have trouble pushing the new one in. But no. Or not yet. because I can’t pull the old one out.Of course I realize now that I should have just cut the SOB apart where she had begun to fray. But really. Jeez.So the arm end is inside the tube about five, maybe six inches. Just a bit too far to get to. On the pedal side there’s no way to get her to come out any further, and trying to wiggle it back the way she came is proving fruitless as well.The tube itself feels pretty solid–all the welds were good & etc.I can’t even find anyone with this dumb-ass problem on the web.May 11, 2014 at 7:15 am #258234Anonymous
InactivePost on samba about stuck clutch cable. Remedy was to remove boden tube apply vice grips to cable and use hammer to drive cable out. I never had to remove stuck cable but remedy might work. Good luck.
May 11, 2014 at 1:12 pm #258235Thanks, George. I got it out–the vicegrips and hammer didn’t get it but the 1/4 socket extension and a hammer (from the back) did.
The new one would not go in with the threaded end, so I just cut it off. There’s about 16-18 inches of slack in the cable from moving the pedals back, so the old one was looped and held with a clamp. The new one will simply omit the loop.Moved on the the throttle cable. I was able to combine the old VW cable sheath with part of the Suby sheath to get the length I needed. I also had to drill the pedal arm about an inch above the existing hole to get another 3/4-inch of “pull” so I could get to something close to full throttle.The Suby cable is a precision piece; length must be within about an inch. I cut it perfectly the first try but then cut it again because I’d forgotten what the held I was doing. I’ll post that story on the blog later.edsnova2014-05-11 21:44:10
May 13, 2014 at 8:20 pm #258236May 14, 2014 at 10:38 am #258237Sounds like you have had your issues to deal with, but you have overcome the difficulties. Thanks for posting the radiator mounts, that does help. You may want to isolate the bolts that go in the radiator sides to help prevent the aluminum corroding. Also that is the location for the fan shroud mounting. No reason it can’t serve as both.
Thanks again
Melvin
May 14, 2014 at 3:24 pm #258238The fan bolt holes are a little off from the rad bolt holes. The shroud will probably line up with the fan bolts. I’ll post pics.
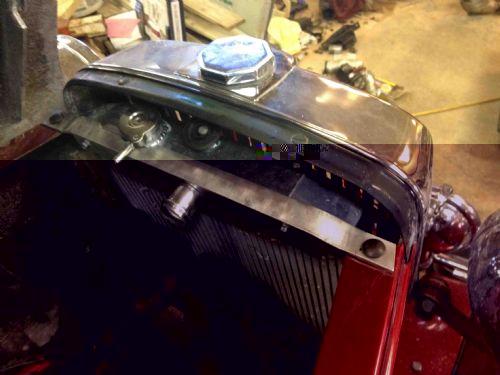
May 24, 2014 at 12:05 pm #258239 Upper radiator bracket is done.It’s aluminum angle, trimmed, bent and drilled. I only bent it a little, but I did heat it up with a torch first because I am that paranoid.Now just gotta get some captivated nuts on it for the fan, make a couple angle brackets low down for the fan, and then it’s on to the shroud.I think I’ll stop here and start the wires.May 25, 2014 at 8:49 pm #258240
Turned the engine over with the starter today. Still messing with wiring…
-
AuthorPosts
- You must be logged in to reply to this topic.

