
Home › Forums › MGTD Kit Cars › VW Based Kits › More build progress
- This topic has 17 replies, 8 voices, and was last updated 15 years, 2 months ago by
charlie.
-
AuthorPosts
-
October 3, 2009 at 8:24 am #232754
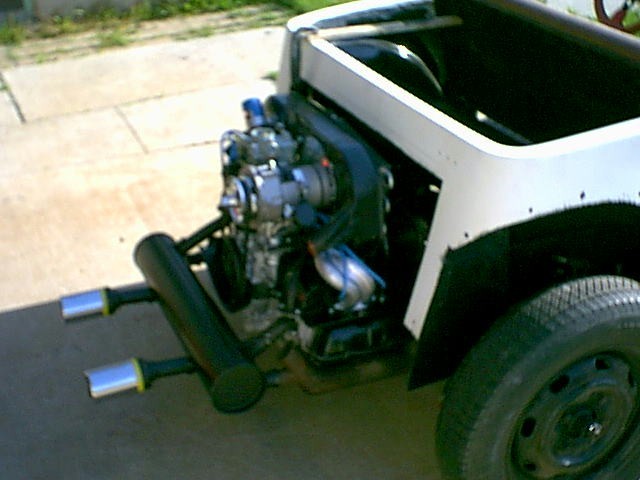
Well I have a few more items worked out on my build.All front,and rear,bumper bracketry has been welded,shifter in place,A nice solid steering column mount,pedals worked out,master cylinder bracket in place.I made mods to the rear bumper frame brackets to ease in future engine removal.This kit also came with a swing away spare tire carrier,took a little work to fab a stop so the full weight of the tire does not rest on the engine cover.I have a few more pics in my album.
On a side note you will notice that my engine cover has a big hole where the spare goes.Does anyone elses have this feature.Also the cover seem to be to small in my opinion as it barley clears the cooling tin and the carb pokes out the opening.
 October 3, 2009 at 10:55 am #239824
Hi,
Looks like some nice work and progress!
Looking at the photos, that gas tank cover sure looks like the one on my “ford” kit. It has a round disk with a raised area in the center to mount the spare. That disk bolts to through holes around the large openingn shown in your photo. Just wondering if you might have a Ford or Chevy based cover. I think the VW based ones would have been deeper to accommodate the tall engine.
Rich
October 3, 2009 at 3:45 pm #239825Rich,Thanks for the info.I had been looking at all the posted photo’s,but nothing showed detail of the rear cover.There may have been a mix up when crated back in 85,as the cover for the most part does not clear the fan shroud or the carb on the VW engine.All parts as far as I know are original to this kit,It was purchased origanaly in 85,all the prev. owner did was bolt on the fenders,and poorly at that.It is a VW based kit as it fit the VW pan well.I know there are a few items missing in action from the kit,but I will work around this delema.
October 3, 2009 at 5:27 pm #239826Scott,
It’s very hard to believe the factory would have missed parts in one box. It’s not like they were producing hundreds of kits and when they were ready to ship, would go to the warehouse and pull various body parts off a shelf to pack into a shipping crate. More typically, they were making the parts for a full kit at a time. That said, I guess anything is possible. and who knows what happened to the kit and its parts since it was delivered.
To answer one of your other questions, many, not all, but many of the VW based kits leave an opening behind the spare. Classic Roadsters Duchess is that way. Some of the other manufacturers too.
Re the fit of the engine cover…are you sure the rear subframe is mounted correctly to the chassis? Even a slight misalignment would be enough to drop the engine cover too low.
Paul Mossberg
Former Owner of a 1981 Classic Roadsters Ltd. Duchess (VW)
2005 Intermeccanica RoadsterIf you own a TDr and are not in the Registry, please go to https://tdreplica.com/forums/topic/mg-td-replica-registry/ and register (you need to copy and paste the link)
October 3, 2009 at 10:36 pm #239827Hi, That is some good looking fabrication with attention to detail and strength.My London Roadster has the hole in the engine cover and uses the spare tire and wheel to cover it.Are you going to attach the spare tire support to the engine cover and use it as the hinge or do you plan to hinge the cover to the body just below the point where the top fits? It’s hard to tell from your pics but it looks like the cover is slightly lower then some I have seen.I don’t think all the covers sit directly on the splash pan so you could raise yours perhaps enough to clear the carb or maybe space the splash pan slightly higher.From looking at several cars in the gallery it looks to me that all the Fiber Fab kits used the same engine cover regardless of whether they were front or rear engine.Hope this helps .
October 4, 2009 at 7:17 am #239828Thanks guys for the tips and info.I did not realize that most of these kits have the hole in the rear cover.My thoughts were that when on display at shows this is going to look terible.I will however figure a way to cover the hole and still have venting for the engine. My plans are to have the spare fold away and hinge the cover to the body.I have the spare bracket in place with removable pins so it can be removed easily for engine work.I know I may have things out of place,but most of this is test fit and mock up for photo’s.I also have added rear body support bracing off the vw frame horns,that does not show in the pics.My problem is I have been working on cars for over 36 years and the design of these kits well? I just want to make it safer.
May 12, 2010 at 6:55 am #239829Well I have been hard at final assembly of my MG.Some slight change of plans in the engine department,going with a fresh rebuilt 1600 with 2 hours run time on it.Picked it up for what I thought was a good price;$700 as a long block.So this past weekend I was busy getting the engine top end assembled and installed in the car.Also been busy bolting body panels on and trying to get it on the road this year,hoping for the middle of June.
 May 12, 2010 at 9:48 am #239830
You go, Buzz! Looking good.
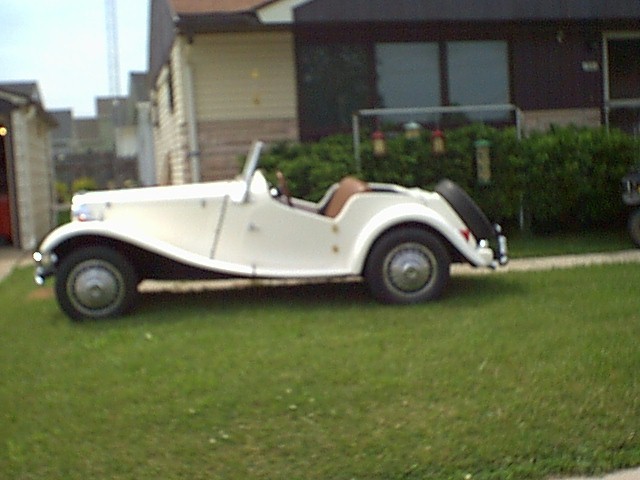
June 5, 2010 at 4:13 pm #239831Well guys and gals,I finished up for the most part TODAY!I was going to take her out on the road early this morning,But unfortunatly there was heavy fog when I looked out the window,so no road test.For the most part she’s ready for the road,Just waiting on the State of Wisconsin to come and do an Inspection for title.Called on Friday And Today still no call back.
For those that have been following my progress I had to take a few short cuts/such as body work and paint(I been out of work for a year and a half now)As I wanted to get this little car on the road this year/and she’s ready.She’s also going to be like riding a motorcycle,if it rains your goona get wet,no top.25 years of shrinkage with the top makes it beyond getting it to fit.So she’s bare bones with no interior,Guess I’ll have to call her my little Rat Rod.
 June 5, 2010 at 8:51 pm #239832
Go man, Go! What do you mean, no interior? I can see the top of the seat in the pic. Good luck on the rattle run. You’re gonna have fun.
June 6, 2010 at 12:05 am #239833Great to see the progress Scott.
Hey, the first time I drove my Duchess I was sitting on a plastic milk crate. But she was mechanically and electrically ready to run, and I could not hold back any longer.

Paul Mossberg
Former Owner of a 1981 Classic Roadsters Ltd. Duchess (VW)
2005 Intermeccanica RoadsterIf you own a TDr and are not in the Registry, please go to https://tdreplica.com/forums/topic/mg-td-replica-registry/ and register (you need to copy and paste the link)
June 6, 2010 at 5:36 am #239834Well to clear up the interior.I have the seat and seat belts,however I can’t realy see what good seat belts will do in one of these glass cars.I have the carpet kit for the car but it’s got some real bad staining,some areas have turned orange,and then there’s the mouse holes chewed in it.The door panels were also in rough shape so I just cut new ones from some thin wood paneling,just to cover the opening on the inside of the door.At some point in the future when I have more funding $$ I will put in some indoor/outdoor carpet.
I have also added a few more photos to my album.
June 6, 2010 at 1:24 pm #239835If this is anything like a boat top a few hot days outside, 2 sawhouses, some bunges, weights and 3 brown bottles, the top willl strech right out. I’ve even been known to use Mrs Wobby’s blow drier to make the final pulls, than let it sit in the sun. Don’t give up on top. you’ll need it.
June 6, 2010 at 2:57 pm #239836Hi Buzz, The car is looking good, youv’e come a long way and done quality work.
I like Wobby’s idea of stretching the top with weights.If you have the top bows, why not mount them to 2×4 or most any old boards and position the top over them. Secure one end of the top to something solid and then hang the weights to the other end to stretch it out. I was about to suggest mounting the top on the car and stretch it toward the front,however if you do this be sure NOT to pull it by using the windshield you don’t want to break it or change the angle of the windshield toward the rear of the car.I guess the cheap side of me is just trying to keep from disgarding something you might use. This advice may or may not be worth much but it didn’t cost anything .
 June 6, 2010 at 11:11 pm #239837
When my top was shrinking and getting too tight, I lowered the pivot mount where the bows attach. I didn’t have to lower it much to make a tremendous difference. If I remember correctly, a quarter inch lower gave me close to an inch of play to the back snaps. I am not for sure how the physics of that played out, but it worked. After I bought a new top on ebay, I repositioned the pivot to the original position so I can lower it later when the new top shrinks.
Awesome job on your baby! Lookin’ great!
I recarpeted my car with 6 bucks of indoor/outdoor carpet that was on the end of a roll at Lowe’s, less than half price because it was an odd piece. I glued the carpet in and it is great, formed perfectly without visible seams, you can see it in my photos. I edge trimmed it with the flexible self stick chrome trim.
James
June 7, 2010 at 4:56 am #239838Thanks to everyone for the coments and advise.I have thought about laying the top out in the sun to help restreach it,and probably will in the near future.Just would like to get it titled and on the road for now.
March 27, 2011 at 12:16 pm #239839Buzz Im getting ready to make a spare tire carrier somthing like you have on your BCW and have a couple of questions. Does your carrier swing all the way to thr ground? Is that a plunger of some sort on the bottom to keep it from bouncing around? Thanks
April 9, 2011 at 1:36 pm #239840Buzz I got the pictures today. Those are great Thank you.
-
AuthorPosts
- You must be logged in to reply to this topic.