
Home › Forums › MGTD Kit Cars › VW Based Kits › newbie with a fuel tank question
- This topic has 27 replies, 9 voices, and was last updated 13 years, 2 months ago by
 KentT.
-
AuthorPosts
-
July 12, 2012 at 12:42 am #234217
Good
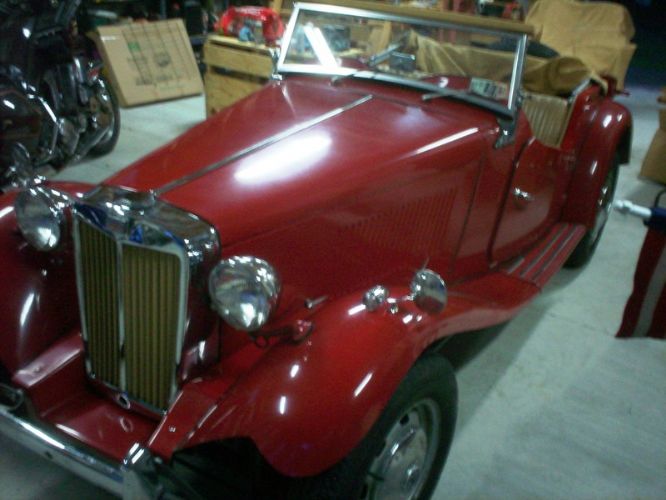
evening. I just picked p a 52 MGTD created by British Coach Work. It’s cleaning
up petty good. But I need some advice.The PO
removed the gas tank and it was lost over the years. I guess I need a 1968
beetle fuel tank? Right now It runs off a gas can. What do I need to do for the
fuel filler nozzle and cap ? If someone has some pictures of what they have and
what parts I need and a good source it would be appreciated.Looks
like the car has not been on the road since about 1987. It only has 3000 miles
on it since it was modified from a VW.The carpets are in pretty bad shape and will need to be
replaced.The motor runs but needs a shot of starter fluid to get
started. I think I???ll have to tear the carb down and clean it. I ran some Seafoam
through it this evening to see if that may help.If I can figure it out I???ll post a couple of pictures.
 July 12, 2012 at 6:10 am #251074
Welcome aboard. We love to help new owners. Your TDr looks and sounds like the one that a buddy of mine was bidding on through eBay 3 or so weeks ago. If so, my buddy wimped out and you got a nice car at a good buy. I know that there are a lot of BRG fans, but you gotta love the Red TD’s.
I’ll let Ed (edsnova) or one of our other BCW owners advise on the tank. These engines are simple and if your’s has been sitting that long, cleaning the carb may be in order. You’ll find tons of advice here on the forum as well as on the Samba (primarily a VW site).Be sure to register (see any post by our moderator, PMOSSBERG, and click the link at the end of his post) and get yourself on our spreadsheet of owners and locations around the country.July 12, 2012 at 7:12 am #251075Welcome aboard Van. Happy to have you join our band of TD lovers.
Like Roy said don’t forget to go to the registry and and get you and your TD logged in.
I’m not a BCW owner but I am building a CMC Fiberfab VW-based TD at the moment. I’ve been into VWs since the 80s. Cleaning the fuel system is not difficult. ED (edsnova) will know a lot about the BCW as far the gas tank is concerned. I think it depends on if your TD already has a fuel filler port on the body somewhere. Either in the grill or on the side of the front cowl. On my TD, it depends on if you want a remote filler location or if you want to open the hood to fill the tank. I prefer to open the tank to fill mine and I have a 63 gas tank.There are assembly manuals in the downlaod Manuals tab on the right that will be helpful. And for parts, a local marine/boat store may have the ssmall switches and fuse blocks etc. For actual kit parts there MC Magic out in San Diego that you can order from.Allen Caron
VW based 53MGTD - "MoneyPenny"
"If one thing matters, everything matters" - from the book The ShackJuly 12, 2012 at 9:59 am #251076Hi Van, Welcome to the forum.That’s a good looking BCW. The BCW’s are quality cars and use many authentic trim parts and have better than average fiberglass. To get one with very low miles on the clock is very special. The VW based BCW’s do not have an external gas filler .You simply open the hood and the tank and filler cap is in plain view. I’m not sure what year VW tank they used .You could check the diminsions of the space where the tank fits and compare that to the tanks available on the various VW sites to help determine what you need.
July 12, 2012 at 2:03 pm #251077Anonymous
InactiveGas tank recommended for fiberfab and CMC is 1961-1967 vw gas tank. Part #113201075AB. The filler neck must be shortened. CMC /Fiberfab manual has instructionson page 47.
Also check post on Gas Tank Mod by newkitman June 20,2012. Pictures of what he did. He did a real nice job of welding filler neck to tank.Be safe in modification to gas tank, empty tank and welding can be dangerous.Your car is nice looking. Tank will make for longer trips. I have a Fiberfab kit with a vw tank and and an alluminum, 8 gallon tank. Distance I can drive is about vw tank bad back and tired seat limits more travel. Extra tank is nice for emergency fuel.July 12, 2012 at 9:23 pm #251078Van, I have the instruction book somewhere. Sit tight and I’ll dig it out in the next day or two.
By memory I say the tank is from the donor, so should be a ’69 or above. But the filler neck was supposed to be moved from one corner to the one diagonally across because of the way the tank sits. So a bit of cutting and welding is in order.
Your hood should hinge on the driver’s side and open on the passenger side. When you’re done, if it’s like mine, your filler neck will be just inside the “trunk” opening, back toward the windshield.
Again, give me a minute to find the binder. I’ll take good pics of the pages and post them here.
July 12, 2012 at 9:53 pm #251079Yep. Found it.
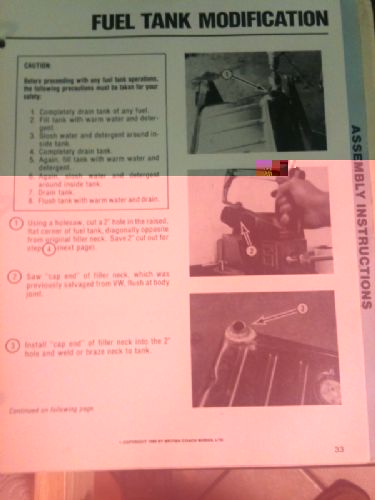

First page:
Caution: drain tank, slosh soapy water in it, rinse, repeat, etc. Usual weld-on-gas-tank prep.
1. Using a hole saw, cut a 2-inch diameter hole in the raised, flat corner of the fuel tank diagonally opposite from the original filler neck. Save the two-inch metal cutout.
2. Saw “cap end” of filler neck previously salvaged from a VW, flush at body joint.
3. Weld or braze cap end of filler neck to the two-inch hole you just cut.
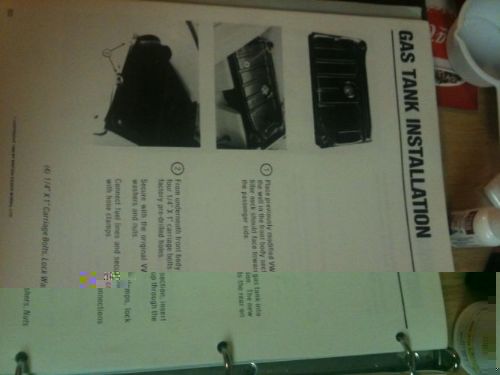
(next page)
4. Plug original filler neck with 2-inch cut-out saved from step 1. Weld or braze closed.
5. Plug smaller neck with carriage bolt and weld or braze. Plug and weld all other tank openings. Breather locations vary from year to year.
6. Bend corners of the front fuel tank flange upwards as shown in photo.
Check tank for leaks. MUST USE VENTED GAS CAP.
More info not in instructions:
(Mine’s a bit taller than the stubby, one-inch deal they show and includes the original vent tube. It fits fine under the hood. I assume the builder simply cut off the existing filler and reinstalled it in the BCW-compliant location. This business about salvaging another filler neck seems weird at best).
The installation of the tank is pretty straight forward. You simply install a couple bolts through the fiberglass cradle from underneath and spin washers and nuts on the tank straps that came with the VW.
The tank and straps are available from CIP1, Mid America, the usual suspects. Not super cheap ($150 & shipping?) but, if it were me I’d consider getting new stuff, since old salvaged gas tanks tend to have rust and crud inside, and you might run into rot you can’t overcome.
edsnova2012-07-12 22:18:49
July 12, 2012 at 10:16 pm #251080Thanks guy’s for the warn welcome.
Ed, I was about to order an older model tank 1961-67 that would have the filler nozzle on the passengers side near the firewall and figured I would have to shorten he nozzle. That would give me the connection for the gas cap too. I’ll hold off till you find the better information. Thanks.Are the bottoms of the two tanks different? If they are the same it would be a lot less cutting and welding.BTW, it looks like my carb is a weber W224051 and there doesn’t seem to be a rebiuld kit out there. The choke doesn’t seem to be acting correctly so I’ going to play around with it some. Also, if your has the same carb I have another question. There is an additional “plundger rod?” might be an accelerator pump that goes into the top of the float chamber. It hard to move and should be activated from a rod with a spring that is connected to the throttle. Right behind the choke. If you have the same thing does your move easily?Thanks again for the help.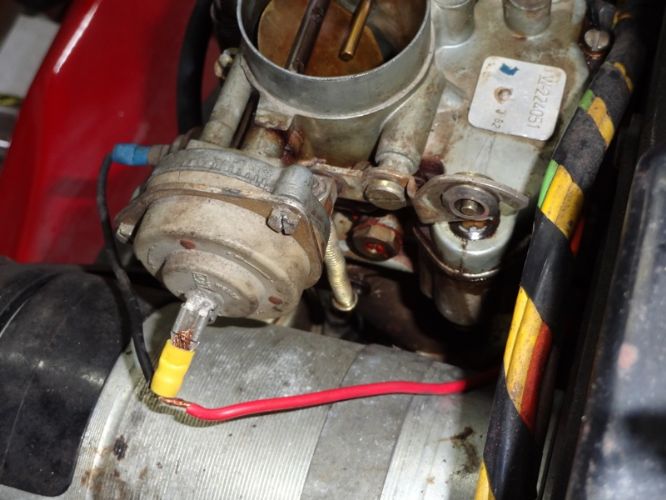 July 13, 2012 at 12:19 am #251081
Edsnova, Thanks again for the information and the typing out the instructions so they were readable.
After looking thing over I believe I’m going to purchase the 1967 tank since the filler nozzle is already in the correct place, it will need to be shortened but will be in the righht place and the tanks look to be the saame except the nozzle placement. the dimensions are 27.75 x 15 x 11.25 and 9.2 gal for both tanks. I found the best deal with Jbugs out of Califorina.I’m also buying the sending unit, that gasket, the bottom nozzle and the internal filter and gas cap.I agree that I might as well by new rather than fight with the crud and rust in the bottom of an old tank.Wish me luck.July 13, 2012 at 8:00 am #251082Luck.
Let us know how it goes.
By the way: fuel gauge sender for your gauge is different from the stock VW. I’m using a stock VW speedo/fuel gauge combo in my car & really like it compared to the Classic Instruments it came with.
Here’s some detail on that.
You might want to just go with a new sender for your existing fuel gauge, which Classic Instruments will probably be able to supply..
edsnova2012-07-13 08:07:35
July 13, 2012 at 7:52 pm #251083Thanks Ed,
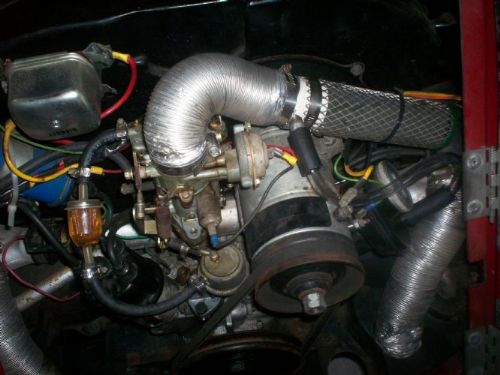
I’ll have to check that out on the sending unit I purchased one with the tank, might need to return it.Changed the oil today and adjusted the choke and put some screws and washers in the convertable top this afternoon, the original staples holding the top to the board that attaches to the windshield had all pulled out. Seems to run pretty good now. Had to tighten the set screws on the wipers.Raining here today so still can not take her out for a ride. Need to get safety inspection done so I can get registered and licenced.The paint is shining up nicely with some polishing compound.I need to get a intake air filter for her. What do you use? Will a 5 1/2 ” diameter paper filter fit? Looks pretty tight to the “trunk lid”.Thanks againJuly 13, 2012 at 9:30 pm #251084I’ve got a bit of cooler pipe clamped to the carb and a K&N type filter pulling air from the passenger wheel well. That’s working pretty well though it’s not very strong.
Before that there was some kind of home-made sheet metal right angle box on the carb, with some expanded metal coming off it which was wrapped with blue foam and zip-tied. That rig leaked, i found out later.
These cars do not have the right kind of room for a proper air cleaner.
July 18, 2012 at 1:20 am #251085I did a little jury rigging on the air intake filter today. The original system used a piece of flexible heater hose to the area in front of the engine to the right looking from the back of the vehicle. There was a pvc elbow through a hole and a wire mesh tube hanging down from that. Looks like there once was some type of filter over that wire mesh tube at one time.
Anyway I used a section of the heater hose that was still good and cut a piece of 1 ½ ??? pvc pipe and put a small nipple into the side of that section of pipe. I had a piece of ???breathable foam rubber??? that I put inside the wire mesh tube with a piece of hardware cloth at the top end to retain the foam. Then purchased some tubing /hose and a couple of radiator clamps and assembled the system and reconnected the oil crankcase vent into the intake. Much better than being open to the atmosphere.
I do have a couple more questions about access on the BCW car. The manuals in the system don???t cover the BCW cars.
1. Is there a way to access the sides of the motor ? I found one of the plug wires off and replaced it by feel. Don???t know as I could replace the plugs. Do the panels that make up the false tank come off some how easily?
2. My new fuel tank should be here shortly and in looking over the job I noticed that three of the 4 bolts that hold the four clamps at the ends of the gas tank have unscrewed and fell into the compartment below. There does not seem to be any access into that area. Is my best option to use toggle bolts?
July 18, 2012 at 11:33 am #251086InactiveFiberfab and others use self taping screws to hold gas tank retainers. Screw used is 1/4″ x 1″ self taping.
Side panels of gas tank do not come off on Fiberfab kits, they are hinged from the top. The position of hinge allows for removal of spark plugs. As an ex military aircraft mechanic sometimes you have to think how to bend your arm and hands into impossible positions to do the job.Bolts in area under tank might be able to be removed by a magnet or mechanical fingers.Hope you find an easy to do it.July 18, 2012 at 11:41 am #251087Any way you can get a wrench on the socket? I ask because the older sockets for spark plugs had the standard 3/8 drive and had wrench flats that you could use either a box end, open end, or crescent wrench on. Also the original VW tool kit uses a socket with a hole through the sides to slip in the metal bar to tighten and loosen the spark plug as the spark plug torque is very low. Just asking….I’m not that far along on my TD assembly yet.newkitman2012-07-18 11:42:45
Allen Caron
VW based 53MGTD - "MoneyPenny"
"If one thing matters, everything matters" - from the book The ShackJuly 18, 2012 at 3:22 pm #2510881. You can reach the spark plugs from the sides/wheel wells.
1.a. I think the “gas tank” bits can be removed, as can the metal tube frame, but I’ve never had cause to do that. PM me if you need more on that & I’ll dig out the assembly manual.
2. Toggle bolts! excellent idea. I’d use the kind the sell for pickup truck beds.
2.a. If you want access go under the driver’s front fender and cut a hole. I did that on my car to get easier access to the brake pedal rod. O screwed a plastic cover cut from a battery box over it and you’d hardly notice.
Short of that, look around. There may be other ways in down around where the tank is supposed to go.
3. Nice air cleaner. On mine the foam went on outside the expanded metal. That might work better for you too. The 90-degree bend was a metal box that seemed to be soldered together from sheet. Otherwise it was a similar rig.
My current rig extends the heater pipe across the top of the engine and down on the right, where one of those cone/arrowhead-shaped air filters is attached. (looks like these). It’s working but I do think it’s flimsy & I need to do a better job of securing everything.
July 18, 2012 at 5:16 pm #251089Not there yet but does anyone with a CMC TD with a stock 1600 have the same clearance issues? If noclearance issues then I’m good. If there are clearance issues I’ll have some time to plan some sort of design. Thanks.
Allen Caron
VW based 53MGTD - "MoneyPenny"
"If one thing matters, everything matters" - from the book The ShackJuly 18, 2012 at 7:14 pm #251090InactiveFiberfab build manual says “Replacement air cleanerlow profile must be usedfor clearance of the engine cover. Thisair cleaner is available through importedauto parts stores.”
Mg Magic lists one for $23.00 VW engine low profile chrome.If needed might have to cut air cleaner shorter. Paper type or foam one.VW has piping for a filter that goes to the side of engine compartment . Can’t remember the year or type model.July 18, 2012 at 7:51 pm #251091CMC, Fiberfab, Allison cars all have roomier engine bays and more clearance for air cleaners, whether you’re running a PICT single carb or duals. The BCWs weakness is in the tight engine bay, though it does give a slightly more “original TD”-like look.
July 21, 2012 at 12:08 am #251092Recieved the new tank yeasterday and had a welder firend shorten the neck and install a new vent connection. Installed the tank this morning. Made a blank plate for the fuel float and sender unit. Need to get with Classic Instruments as to which one to get so I have the correct Ohms for the guage. I have the Classic Instruments fuel gauge on the dash and would like to use it.
Does anyone know which model sender to purchase?Thanks for the suggestion to use self tapping screws on the hold downs it works great. I washed out the new tank several times before installation and installed additional fuel filter to catch anything I missed cleaning it.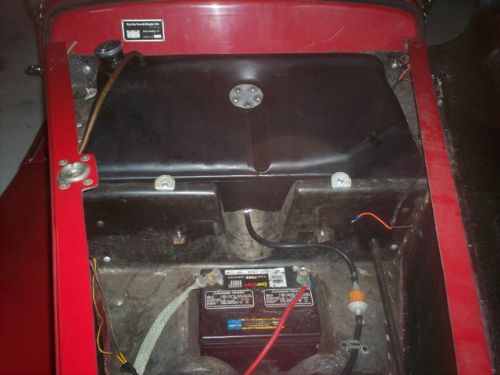 July 21, 2012 at 9:59 am #251093
It’s all about the ohms.
The VW uses an 75 ohm sending unit, 10 ohms full, 75 ohms empty.
If your Classic Instruments gauge matches, then a stock VW sending unit will work.
Lots of sending unit discussion in this thread:
https://tdreplica.com/forums/topic/fill-er-up/#post-245016
Paul Mossberg
Former Owner of a 1981 Classic Roadsters Ltd. Duchess (VW)
2005 Intermeccanica RoadsterIf you own a TDr and are not in the Registry, please go to https://tdreplica.com/forums/topic/mg-td-replica-registry/ and register (you need to copy and paste the link)
July 22, 2012 at 11:48 am #251094It’s not the same as a stock VW. Call Classic Instruments and ask them if they have one for you.
Here’s a link to their stock sender page.
If your gauge is from the original kit it will want much more ohms (resistance) that the VW gauge.
–in my case the original BCW/Classic Instruments sender was reading 63 ohms at about 3/4 full, as opposed to 10 ohms for the stock sender. You need one like the one I took out. I already gave it to another member though.
Classic Instruments should be able to advise you or, at worst, you’ll have to replace
it with a new gauge that looks the same, and get a matching sender for
that.
edsnova2012-07-22 11:49:00July 22, 2012 at 9:15 pm #251095I also send a note to Classic Instruments asking for help from them as to which sender to purchase. Like you stated I need to get the correct ohms sender to match the gauge. I was hoping someone from the site would happen to know which one I would need.
Thanks for the help.I replaced the hood piano hinge with a couple 3″ SS hinges. I like the look better and it feels better since I have to open it each time I gas the car up. Still have to put a deck under the hood and replace the carpeting throughout but its coming along, and its running nicely. March 1, 2013 at 2:27 pm #251096
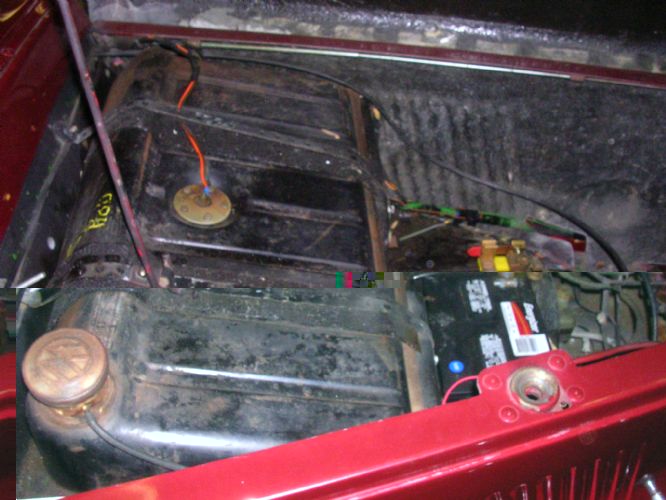
Ok..I think this pretty much explains the issue I see with my gas tank install by the PO. As it is now installed, as you look at the car from the front toward the wind shield, my gas tank is installed with the filler on the drivers side and on the corner of the tank nearest the front of the car and has a hoky rubber hose rig with a sharp angle and a cap on it. After looking at the manual on this website, it looks like he used the 1969 ot later tank and didn’t do the mod to it taht moves the filler neck. As I understand the manual, when either the pre 1968 or the mod 1969 or later tank is installed, the filler neck and cap should be on the passenger side and on the corner of the tank that is closest to the windshield….correct?
SamMarch 1, 2013 at 3:16 pm #251097Sam,
That is correct. I have a gas tank out of a 63 Beetle and after shortening the neck as instructed, it gets mounted with the filler neck on the passenger side nearest the windshield. You may have to trim just a smidge off the tank mounting flange on the front corners of the tank because the side cowl panels come inward just a bit as they go forward. I had to just round off the corners and it fit really well.Allen Caron
VW based 53MGTD - "MoneyPenny"
"If one thing matters, everything matters" - from the book The Shack -
AuthorPosts
- You must be logged in to reply to this topic.