
Home › Forums › MGTD Kit Cars › VW Based Kits › Relocate the Parking Brake and bigger footwells
- This topic has 12 replies, 8 voices, and was last updated 10 years, 6 months ago by
Anonymous.
-
AuthorPosts
-
May 17, 2015 at 8:36 pm #235733
Hi Guys.
This must be a common question. The oh so far away parking brake. So what is the answer? It looks like a lot of work, So my question is what are the alternatives?
The second question is also a common one I should imagine. How far, if at all; can you move the passenger footwell toward the front of the car. I would like 4″ or so to keep the good lady happy. What are the potential problems in doing this work? What are the limits?
Thanks in advance, John the Brit
May 17, 2015 at 9:17 pm #264555Know what you mean about the parking brake, mine is up front too, but does give me a space for the fire extinguisher between seats… and a cup holder.
I had thought it might be possible to put a smaller lever on the side, below dash, if pulleys and extended cable were used. Probably not something I would ever actually do though.For people without bench seats it must be easier to get it between the seats, or seems like it to me. Just haven’t checked into what all that involves.I know you have VW but don’t recall seeing a picture or how your front seat is.I don’t think mine, also VW, has a shorter passenger foot-well. Do know it has nothing in front of it other than maybe the sunken battery box (and gas tank above). There’s a considerable space between the outer wall, by wheels, and the passenger area. Probably 8 inches, give or take some. I couldn’t really measure that but found out about it from replacing the front fuel hose.So many variations of these kits, would be better knowing more about what yours is… for others to tell you more. I sure don’t know much at all, still learning about mine!LRH2015-05-17 21:18:02
May 17, 2015 at 9:29 pm #264556Moving the e-brake handle is not so bit a deal. Here is my step-by-step. This gets you something like what Abingdon intended, and you can mount your fire extinguisher on the tunnel where the e-brake came off. Weld a plate over the hold to keep the tunnel strong.
A slightly easier way to get a reachable parking brake lever is to cut a 90-degree notch in the existing lever, near the bottom/back of it, and bend it so it stands vertical. A couple tack welds and you’re good to go.PMOSSBERG2015-05-18 11:01:21
May 17, 2015 at 10:12 pm #264557edsnova wrote:easier way to get a reachable parking brake lever is to cut a 90-degree notch in the existing lever, near the bottom/back of it, and bend it so it stands vertical.I really like that idea!May 18, 2015 at 6:09 am #264558The “easy way” that Ed describes is exactly what I did….only different. With the notch and bend method, you lose the locking “parking” function. So, I got a second brake handle, cut it close to the pivot and welded it to the original handle straight up into the air (90 degrees). Then I bought a 1/2″ pvc cap at Lowe’s. Put the cap over the old brake release button as a nice tight friction fit. Now, if you want to use the brake as a emergency brake, just pull back. To use as a parking brake, pull the pvc cap off and use as before. (Paint the pvc flat black and it will disappear.)
May 18, 2015 at 9:45 am #264559I followed Ed’s step-by-step and it worked out quite well. I used my Dremel Tool with a cut-off wheel to remove the e-brake mechanism as well as to cut the slightly smaller hole for the mechanism at the new location. I just used sheet metal screws to mount the e-brake in its new position. I did make a cover plate and fire extinguisher holder as Ed suggested and it worked out GREAT!!
I also posted some pictures of my relocation on this site.I strongly suggest you invest a few hours and move the brake per Ed’s method. You will be really happy you did.If I can do it……..Happy JackMay 18, 2015 at 10:41 am #264560Hi Ed.
The step by step link didn’t work for me.? Where oh where can it be? Anxious minds need to know.
Thanks for the input.
John the Brit
May 18, 2015 at 11:02 am #264561John,
I fixed the link in Ed’s post. You should be able get to his blog now.Paul Mossberg
Former Owner of a 1981 Classic Roadsters Ltd. Duchess (VW)
2005 Intermeccanica RoadsterIf you own a TDr and are not in the Registry, please go to https://tdreplica.com/forums/topic/mg-td-replica-registry/ and register (you need to copy and paste the link)
May 18, 2015 at 11:53 am #264562Thanks Paul, I appreciate that.
John
October 4, 2015 at 1:07 pm #264563Realize that replying to a Post from May 15 may be dated but as I only acquired my TDR on Aug 30 wanted to share my experience with the relocation of the P brake. After driving the TDR with the P brake engaged on two occasions and wondering what the smell was and why I needed to up the RPMs the get it to move did the necessary research on what was involved with relocation from under the dash to where it should be between the seats south of the gear shifter. The link to the relocate by Edsnova was helpful but always one who looks for improvements I offer the following1, The P brake bracket was securely affixed with 8 spot welds and two bead welds, so I drilled out the spot welds and ground the two bead welds to remove the bracket and brake assembly2. Cut new hole in tunnel between the VIN # and the gear shifter with pneumatic cut off wheel, the Dremel tool just could not handle the load, also ran out of supply of the cut off disks3. Removed the two brake cables, very important to do this in advance as I kinked one of the brake tubes and had the adjustment bolt caught in the bend and had to use vise grips to pull it through the bend4. There is a bracket holding the two break tubes and two heater cable tubes inside the tunnel of my 68 VW donor vehicle that had to be cut with a cold chisel and drill bit to release the brake tubes from the original location5. Once tubes were freed was able to ascertain which of the 3 tubes on left side and 2 on right side of tunnel were the correct ones to cut at the new location6. Encountered another bracket in tunnel supporting 4 tubes in front of new location that required some more chiseling work. Did not want to make the hole larger than necessary7. Could not use hack saw as Edsnova used into tunnel to cut the tubes so used step drill with extension to drill through the tubes, which left a rough edge that could not be ground down with the tools I had available.8. Using some threaded pipe from a light fixture, which had a matching OD to the ID of the brake tube fashioned some flared bushing to slip into the tube and then with MIG welder secured the bushing9. Drilled and tapped some 10-32 holes in the tunnel using the former spot weld locations on the bracket to secure the bracket to the tunnel10. Modified some heater cable clamps to secure the brake cable and welded some 1/4 20 bolts to some washers that I fitted to the assembly11. Pulled the cables into the barrel clamps secured the cable and then adjusted the 1/4 20 bolts through the compensating lever12. After some minor adjustment was able to engage P brake with just two clicks of the brake handelIt is now in a location that is readily visible and I should never be caught driving with the P brake engaged again ( yea right). Have tried to upload some pics but suspect 2 mg images are too big so will change resolution and add to post in next replyToller2015-10-04 19:56:43
David B Dixon
Port Perry ON CA
SabineOctober 4, 2015 at 6:03 pm #264564Looking very much forward to seeing these pics!
October 4, 2015 at 7:43 pm #264565This time with the pics to show what I was explaining in the post
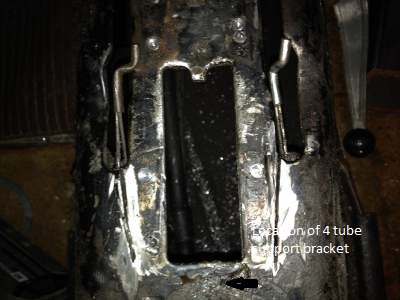 Refers to bullets 1 and 4 from original post
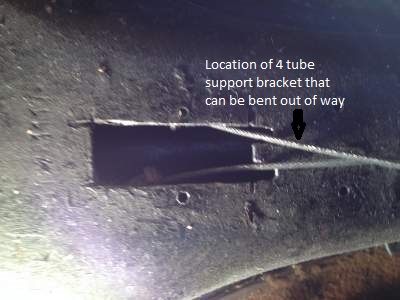 Refers to bullets 2 and 6
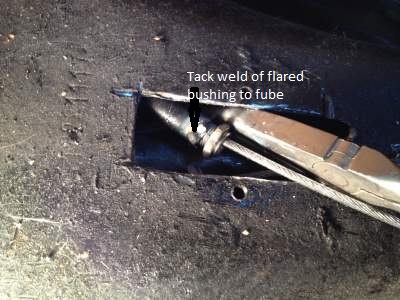 Refers to bullet 8
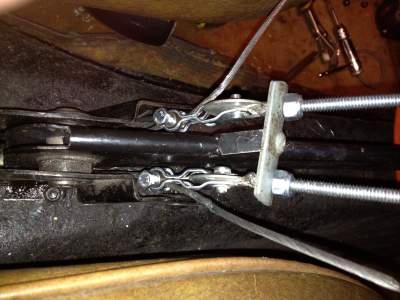
 Refers to bullet 10
 Refers to bullet #12
Toller2015-10-04 20:00:59
David B Dixon
Port Perry ON CA
SabineOctober 5, 2015 at 10:05 am #264566Anonymous
InactiveJohn :On my Fiber fab TDR previous owner made a storage area on passenger side. It is about 20 inches deep and about 12 inches high . There should be enough room to make room for princess’s feet.
-
AuthorPosts
- You must be logged in to reply to this topic.