
Forum Replies Created
-
AuthorPosts
-
August 25, 2022 at 12:30 pm #308213
I have literally given up on trying to post any pictures! lol
HOWEVER, if you go back and look at my post history, you will see a series of pictures I posted 7 years ago. Literally, I put the wheels back on after these pictures were posted, pushed it back to the back of the garage then went in for knee replacements. It has not moved at all since then.
Would make somebody a sweet / easy project to finish. Only asking $3,500, but I could be talked down slightly…
Doug
August 4, 2022 at 11:02 am #308203Facebook profile name: DOUGLAS WILLIS
Profile picture: Picture of me and my wife having a drink. 🙂
September 28, 2015 at 4:24 pm #261323
 September 28, 2015 at 3:55 pm #261322
Hi Everyone!
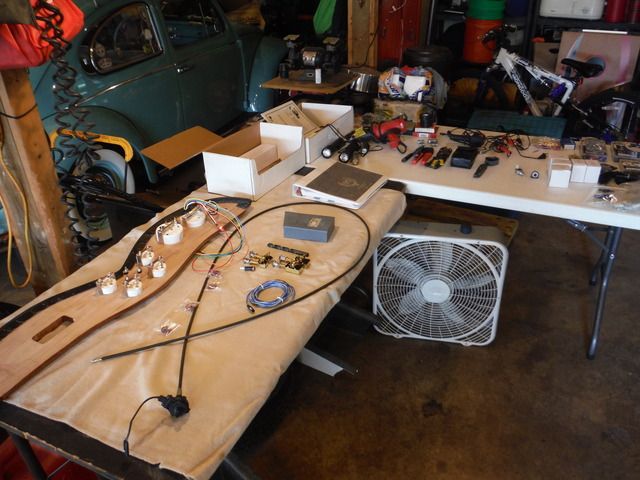
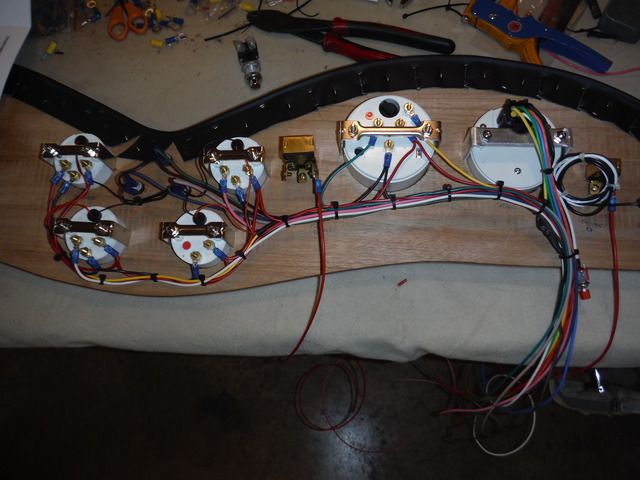
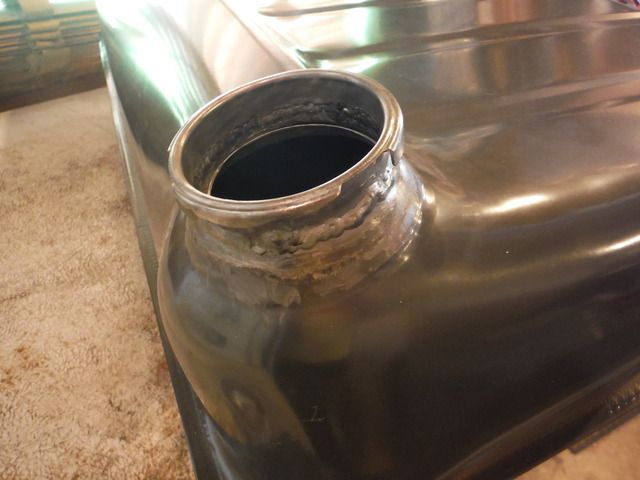
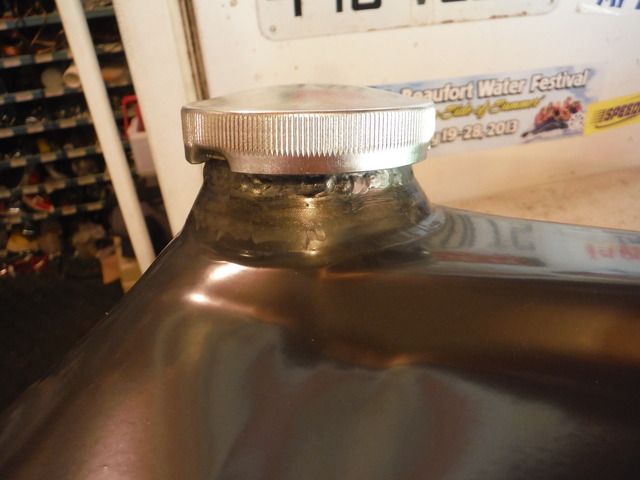
No, I did not fall off the face of the earth… I did, however, take a new position with my company that requires WAY more of my time than I ever expected! (though I do make more than I should) 😉I have been working on my project (hit and miss) but the wiring is almost complete and today I got my gas tank welding completed!As soon as I can get some pictures uploaded I will share them.For now… PEACE!DougSeptember 4, 2014 at 8:06 pm #261321Well… since the jellcoat on the car is perfect, I didn’t want to try to add an inch to both side panels then try to match the jellcoat and have something that did not look good. So, I tried as best I could to split the distance in multiple ways throughout the entire body.
I was able to gain almost 3/8 of an inch literately by pushing everything back the the rear and flexing the leading edge of the rear fenders. Running boards, fenders, removing and stock and re-welding front bumper brackets, etc.Next, I gained a 1/4 inch or so by adding rubber cowling to the firewall to push the side panels forward.Finally I was able to fill the gap at the radiator and front fenders with black “pinch-welting”.To look at it you would never know unless you really knew what to look for. I will take some pictures this weekend and post them.DougSeptember 3, 2014 at 2:16 pm #261315Thanks Allen! I have been @ a stand still since I got to the wiring. The harness I have did not match either diagram I have in my build manual (not even frigg’n close!) I bought a “Easy Wire” harness @ a friends suggestion, and I am trying to work my way through making it suitable for a rear engine application.
I still want to drop the rear suspension a click or two, but all-in-all it is coming along pretty well… save for the fact that the P.O. cut the side panels “way” too short which has resulted in the entire front end to be 3/4 inches shorter that it is supposed to be… lolFebruary 27, 2013 at 8:44 pm #253408I guess since this is my thread, I can step up on my soap box here and address a few things. Please do not take this the wrong way…
I try to never reverse engineer something that someone WAY smarter than me spent many months or years researching, testing, revising and implementing. If it works… leave it alone.Below are a few photos of the front suspension of the project I am working on. In the first photos you will see that the lower torsion arm has separated from the front end… The P.O. said “OH, the grub screw fell out” and I believed him…Here is the reason the torsion arm was separated. The small leaves were removed to relieve the lower torsion arms since the P.O. didn’t think the front was “soft” enough.The grub screw was tightened and in the stress of being towed back to the P.O.’s home, it broke all of the leaves beyond the grub location making the torsion arm separate. Imagine if this would have happened while driving at 50 mph…I think that in the locating area of the torsion arms, All of the plates are needed to support the stress of the grub screws in their locating surfaces.I did not mention the removal of these plates in my earlier post because I did not want to support the practice one way or another. But I have seen “first hand” what can happen if something that is supposed to be there is removed.Yes, I may not think that the ride is soft enough when I get this project on the road… and may in fact opt for a completely new (engineered) front end, but for now, I thing those Krauts did a pretty good job so far.Stepping down off my soap box… “hopefully not on any toes”DougSTG-inc.2013-02-28 11:21:14
February 27, 2013 at 4:07 pm #253400The upper torsion was cut and relieved about 17 degrees. Did’nt want to remove any of the torsion plates. I would have done the more modern adjustable front end if is had not already been done.
February 27, 2013 at 3:37 pm #253397Heat in the barn is fantastic… But com’on spring!!!
Front suspension complete! Have youever spent 3 hours replaceing the front torsion springs??? I did! New seals, ball joints, camber bolts….. Everything is quite dusty from the power “wire brushing”… But when it is warmer (outside) a fresh coat of paint is in order…

 On to the brakes next!!!
STG-inc.2013-02-27 15:42:02
February 27, 2013 at 7:50 am #253395Got the access holes welded closed yesterday.


 February 24, 2013 at 7:24 pm #254687
Pictures please…
 February 24, 2013 at 6:49 pm #254685
I was thinking exactly the same thing when looking @ your picture yesterday.
It looks from the plans that most of the support of the bumper mounting barcket iron comes from the vertical support clamped from beneith the transmission… I don’t think that the cross member would do much more than provide some additional lateral stability. If the body fits better without that cross member, just weld the horizontal irons (that bolt to the bumper brackets) to the chassis at the bolting location… just my .02February 24, 2013 at 11:10 am #254683Thanks for the info. I’m quite a ways away from these steps. Tons more chassis work than I had anticipated.
If you have extra body pan gasket, that might be worth a try with the floor gap…February 23, 2013 at 8:36 pm #253393I was just calling it a cowl strip because that is how it is refered to in all the manuals I have. There is also a picture in the Downloadable MiGi II manual.
Sorry for the confusion.. 😉February 23, 2013 at 8:31 pm #254681Allen,
I have yet to weld up the rear bumper support bracket (if that is what you are showing in the picture…)I should think that the body might have enough flex in it to make up a 1/2 in shortfall (if the front mounts properly, try to push the back into place… (just thinking “out loud” here) Never hurts to try.I have that same gap at the bottom of the firewall (kick wall). That is where I’m planning on the square tube stock.Certianly, we are not the only two with kits with these gaps… Anyone else have these? and what did you all do to fix them?February 23, 2013 at 4:04 pm #254677My firewall is the same way @ the pan. I’m going to use a thin gauge square stock to prevent a wood pc from holding water.
February 22, 2013 at 3:31 pm #254606You can easily get any part you need!
http://mgmagic.intuitwebsites.com/ Has any part you could ever need for these kits. Might be a bit pricey, but if you cannot find it anywhere else… it is worth it!February 22, 2013 at 3:26 pm #254605Exactly Allen.That’s why I showed the pictures of the two tone cars. It shows the color of the fenders and the color of the front cowling. On the later versions (80’s) the fenders met in the front of the grill. thus being the same color.
I remember a few of the cars I built having the exposed steering column… Quite unsightly…February 22, 2013 at 2:54 pm #254602Definitely a F/F MIGI! The grill badge tells that. I’m guessing, very early 80’s by the lower piece around the radiator in front. Earlier ones (late 70’s) exposed the steering column, later ones did not have a separate pc in the front and were just the fenders meeting in the front of the radiator.
Definitely a F/F kit though. But may have been sold under the CMC brand.Anyone else?Here are a few pictures of a few I built in 1982:
 Notice the similar front apron….
STG-inc.2013-02-22 15:04:44
February 22, 2013 at 1:51 pm #253390OK… So I thought I was going bonkers about the cowling strip… I remember vividly putting these in place back in the 80’s…
newkitman posted a link in an unrelated post…Several of the pictures show a black strip between the side cowling and the body…This is the rubber cowling strip I am talking about…Here is one I built back in 1982 showing the same black rubber cowling strip:I know that my instructions do not call for this strip, but I know it should be there. (and it is in the parts list as well)…Thoughts?STG-inc.2013-02-22 13:57:02
February 22, 2013 at 11:11 am #254664mustang_evets wrote:How did they get the the cars into the spots in the picture with the vertical parking?I’ve seen those before. An open elevator was used. That would NEVER pass safety standards today! lolBoy… I wish I could spend .25 for a gallon for petrol these days! 😉February 22, 2013 at 10:53 am #254597Exciting times! Keep us tuned in!
STG-inc.2013-02-22 11:11:35February 22, 2013 at 10:32 am #254666WOW!!!
What can you say… but WOW!!!February 22, 2013 at 10:28 am #254595I have a photo of the conversion kit somewhere in my files… I will look for it…
February 22, 2013 at 10:27 am #254594Hi Kent.
The owner of the car in Indy might be referring to the build year, or the year the car was originally titled as a kit car. Indiana is very screwy when it comes to titles. examine it (the title) very carefully. It may still be titled as a VW, or a built car, or a replica. in any case… ensure the VIN (on the chassis) matches the title. (i’m sure you already know this, but just a reminder)Good luck! -
AuthorPosts


