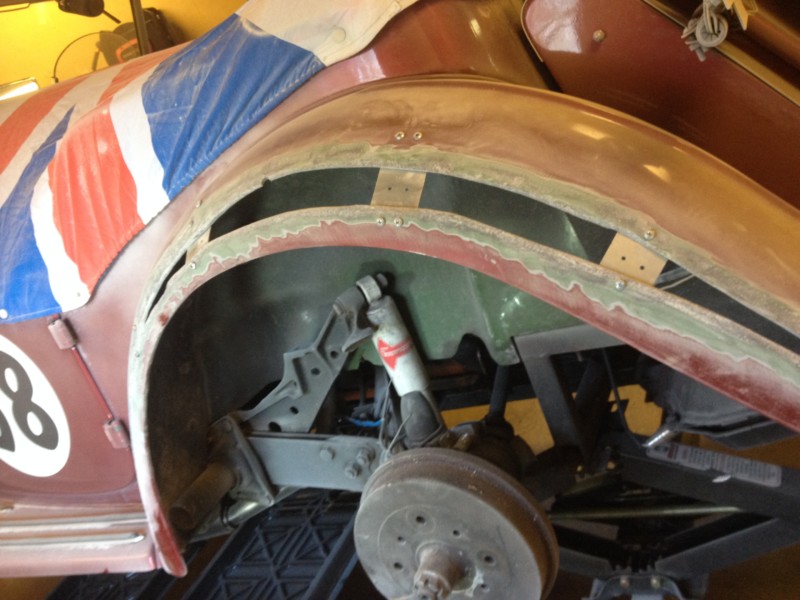
Tagged: fender stretch
- This topic has 85 replies, 9 voices, and was last updated 8 years, 9 months ago by
 edward ericson.
-
AuthorPosts
-
November 16, 2016 at 9:44 pm #302327November 17, 2016 at 8:29 pm #302332
You, sir, are a madman! XD
Vicenç - (bee sense)
Pembroke Pines, FL
1986 Aston - BCW Model 52 - "Montse II"(1983 FiberFab MiGi II - "Montse")
November 18, 2016 at 7:57 am #302338Ed
any concerns with changing the symmetry of the fenders and trying to get the profiles identical? Did you consider just cutting and stretching the fender where it is bolted to the body. You could have added spacers between the fender and body to determine how much additional material would be required and given the location if it was not perfect it would not be as visible as where you have chosen to insert the wedge of fiberglass Good luckDavid B Dixon
Port Perry ON CA
SabineNovember 18, 2016 at 8:51 am #302339Yeah, thought of that. Getting the fenders off is a bit of a project in itself, and adding the material at the right angle (innermost bit) would have complicated the tail light bezel more than I felt comfortable doing.
The symmetry is imperfect already. I intend to improve on what’s there now. The idea is to slice them both in the same spot and use the same temporary spacer to hold the pieces apart while I make and install steel tabs that I will glass in. Then it’s down to glassing and smoothing in a competent manner. I have confidence that I can make it strong and invisible—at least until it comes to paint.
You are right though about the concept: a slice at the highest point in the curve is best.
By the way, the front fenders are more amenable to a central slice, as the parking lights are installed on two small holes that are easily replicable. The great advantage of slicing at the peak of the curve is that the two sides will remain on or close to the same plane when separated, obviating the need to remove a wedge of material.
The rears are getting stretched about 7/8 inch. The fronts will be widened by 1 1/4 inch. The left front will also be reshaped slightly to correct an error in the original molds and make the care more symmetrical.
Also plan to shave the windshield wiper plinths on the scuttle, and take care of some stress cracks and chipping on the hood. Plus a little back-fill on the rear valance, which I cut up some to fit the Suby engine.
Thanks for the luck-wish. I need it!
November 18, 2016 at 9:11 am #302341Why?
Always thought you tires tucked under fine. Going with some wider wheels/tires?
I would have to add a bunch to get mine under – maybe a future project – want to push the passenger foot well area forward first.
Also the speedster project, the rolling kitchen remodel, the yard re-do, basement remodel – it never ends…
Looking forward to seeing how it works out – repaint when done or just try and blend the areas?
November 18, 2016 at 11:43 am #302343Check the blog, Schubie. The wire wheels push out about an inch.
November 18, 2016 at 5:35 pm #302345Good on ya, Ed —
Looking forward to seeing the end result at Carlisle in May. Please continue to keep us posted via your blog — It’s a great way for us to follow your progress.
Happy Jack
November 20, 2016 at 6:19 pm #302373Will do. Sorry I haven’t been posting.
November 25, 2016 at 7:53 pm #302436Spent a couple hours in a cloud of fiberglass dust today. Cut the other three fenders and got most of the steel stand-offs installed. Test-mounted the wires again for fit. They just about do.
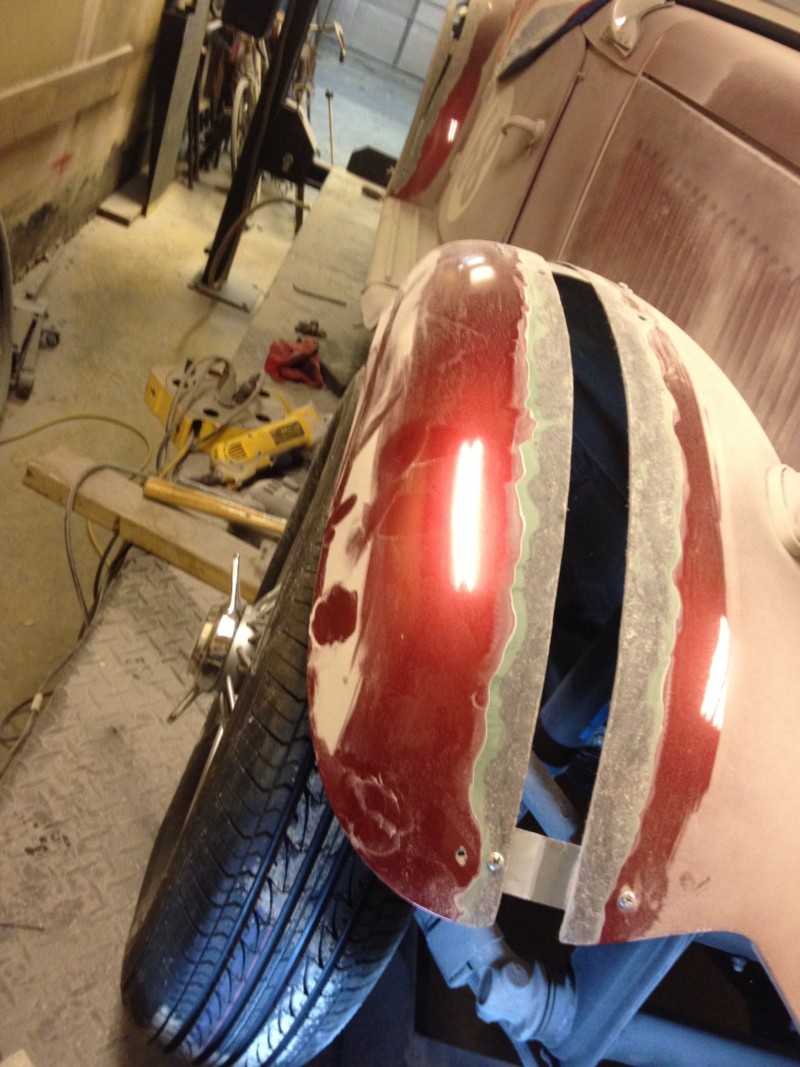
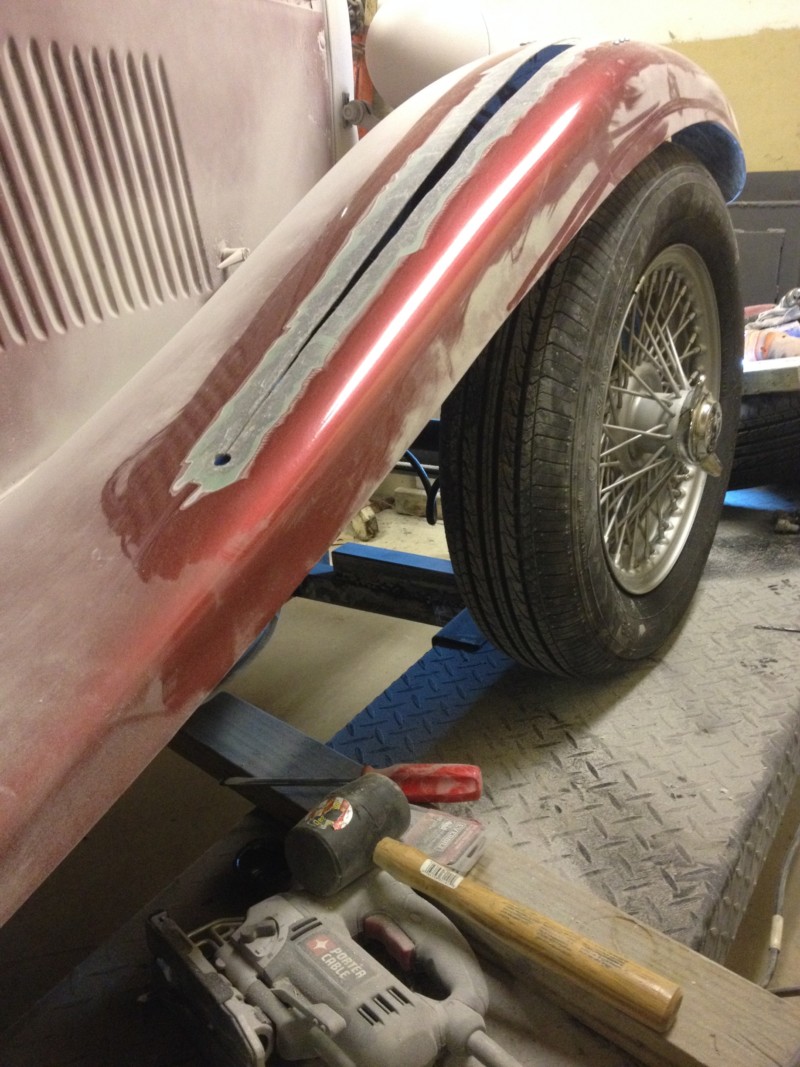

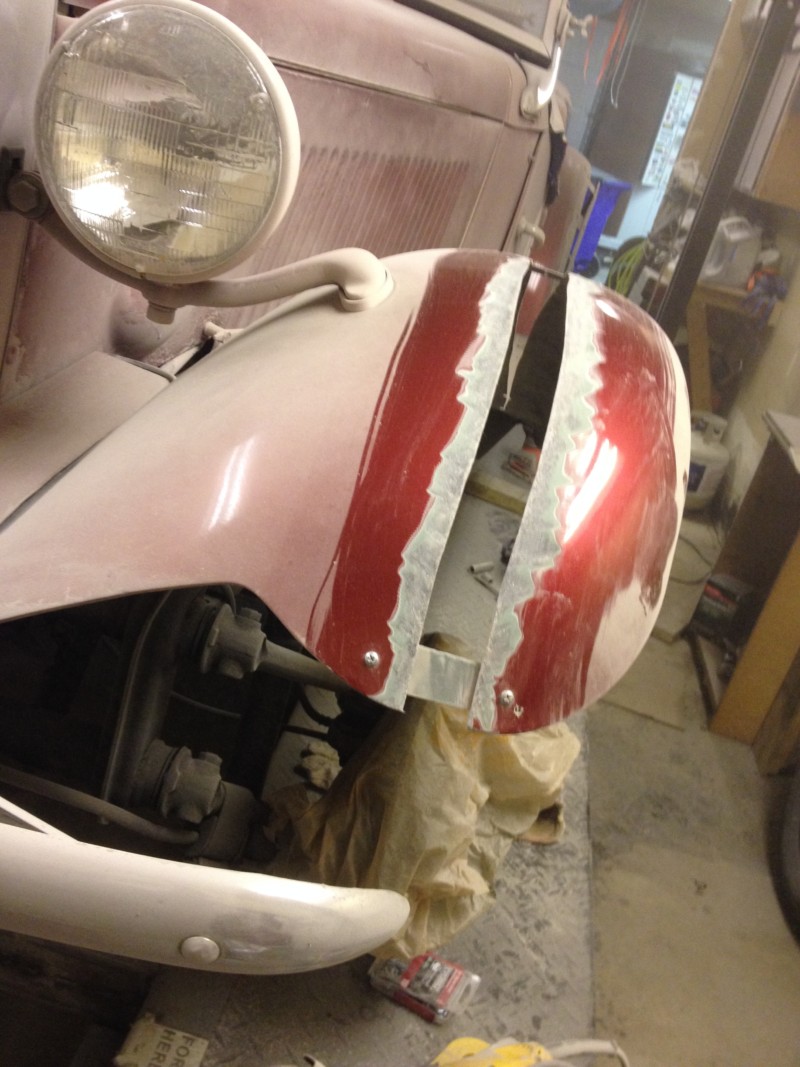
Now it’s down to glass. Hoping to have some warm days before the cold sets in. I’d like to get them glassed up, ground back and cured for a few weeks before skim-coating them and finishing. We shall see.
November 25, 2016 at 9:39 pm #302437Ed, are you going to leave the stand-offs? If you are, you could remove the phillips screws and put in countersunk aluminum or stainless pop rivets and then glass over them.
How are you planning to bridge the gap? It looks quite wide and may require a few layers of glass to get the right contour. They probably make something for the purpose but I haven’t used it (or even seen it). Maybe aluminum window screening? I suppose you could just use heavy cloth but the stuff never cooperates with me.
Very smart to drill stress relieving holes at the back of the front fenders. With this and all your other brave undertakings you could almost convince me that you came from the boondocks where I grew up. (Woulda been easier to put in a narrowed front axle.) 🙂
November 26, 2016 at 9:58 pm #302443Roy:
Plan is as follows:
- alumitape underneath
- glass from top, 2 or 3 or 4 layers.
- remove screws and tape (leave the steel inserts and glass them in).
- glass from bottom, 3 layers.
- rough shape top with 80 grit.
- glass from top, 1 layer.
- allow to cure 6 weeks
- fill holes, low spots from top with glass filler such as Fibral.
- 80-120-grit top and bottom
- fill low spots again as needed.
- 180-220-300 top.
- high-build primer
- glazing compound/spot putty.
- high-build primer.
- 300-400 block/wet.
- final primer
- paint.
Yeah, I thought of narrowing the beam but would need a 3-inch narrow—2 would not be enough. So that’s a custom job and money and time, etc. I still might get a 2-inch narrowed beam later.
November 27, 2016 at 6:58 am #302444Never will it be said that you didn’t have a plan. Does the resin you’re planning on using recommend 6 week cure?…or are you going on vacation for 6 weeks. (Seems like a long cure time.)
Did you get those MWS wheels from Rimmer Bros? I was looking at the MWS site and probably missed it but are they tubeless?
-
This reply was modified 9 years, 2 months ago by
 Royal.
November 27, 2016 at 9:36 am #302446I hear tell polyester fiberglass shrinks if it isn’t cured long enough. I want a nice long interval between the main layup and the final paint.
Yeah those are new MWS Triumph TR3 wheels and hubs. They are tubeless. They have held air for 8 months now so I guess that’ll do it. Probably will buy a couple tubes anyway & keep in the car, just in case.
November 27, 2016 at 10:10 am #302449Ed, I’m not trying to talk you out of polyester, but I have always used 2 part epoxy and had good results.
I have done quite a few fiberglass jobs but I haven’t for a few years but remember (I think) that hardening and curing in hours or perhaps a few days, depending on how much hardener and the ambient temperature. Maybe I need to do some reading and take a refresher course on fiberglass work.
I’m sure that you have done a lot of homework on this subject.
Good luck.
November 27, 2016 at 6:15 pm #302452Test.
Hey, errbody! I am going to try a new way to insert a photograph in this thread, by following, to the letter, instructions from Paul. Those instructions are as follows:
‘You do NOT have to go back to the “insert/edit image”
‘On the same screen where you uploaded to your heart’s content, select a photo by clicking once, that will make it appear on the right.
<u>’Then click “Insert Into Page” in lower right. </u>
<u>’Bingo, the image is inserted in your post.</u>
‘You may do that with ANY image in the library, not just those you uploaded.
‘And I learned something about the Upload Files and Library tabs. The software remembers where you were the last time in. If you were on the Upload Files tab, the focus will be on that tab when you return. Ditto for Library.’
Ready? Here goes:
November 27, 2016 at 6:22 pm #302454I just logged on and I see that I’m promised a photo.
I’ll wait patiently.
Bill Ascheman
Fiberfab Ford
Modified 5.0, 5sp., 4:11
Autocross & Hillclimb
"Drive Happy"November 27, 2016 at 6:37 pm #302455As you all may have noticed, no photo appeared in my “test” post. That is because Paul’s instructions, when applied to my computer, are bunkum.
Can any of you follow these instructions with success? If so, please chime in.
In my case, there simply is no “right”–as in “select a photo by clicking once, that will make it appear on the right.” If I select a photo I get this:
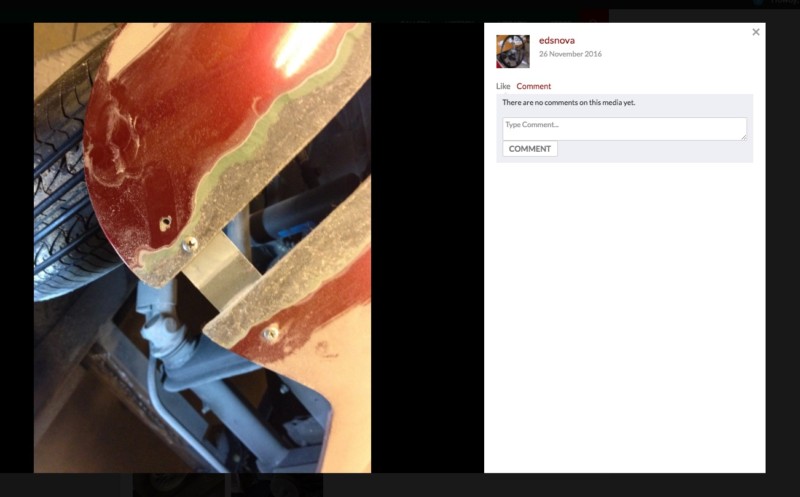
There is no way to “Insert Into Page” this image directly. A right click brings up the box of options I have previously described: Open image in new tab / save image /copy image / copy image address [which is what we have to do to get it to appear in a post] / search Google for image / and/or inspect.
Only (so far) by copying the image address and pasting that into the box prompted by the little photo thingie, second from right, above any post window, does one get an actual image to appear in an actual post. If you hit “inspect” you get a right frame with some really interesting code in it. Try it!
No, don’t.
Obviously, very few of us have any expertise or ability to make an actual photograph appear in an actual post. If we did, we’d do it, am I right?
So I am hijacking my own thread here for a purpose, which is to try to get some help in simplifying the new site. Several users have complained quietly and privately that it’s too hard to navigate, too hard to post a photo and lacks a few key features (such as the old “points” thing which seemed to, but did not, sum previous posts by the user so as to give readers a good idea about how much of a no-count time-waster—i.e., “expert”—the poster was).
None of these issues would appear insurmountable. Paul and our web guy, Stephen Houser, have taken up the cause, but there seems to be continuing miscommunication about what is actually happening on users’ screens. As I am a forum “moderator,” I may, in fact, have more options and powers than many of you.
So we need some more feedback.
Please chime in with your very specific experiences. I know it’s a PIA to get all specific and technical, but I fear that, unless we do it, we’ll continue to lose the usefulness and camaraderie TDReplica.com has developed over these many years, and the group (and hobby) will suffer.
OK let’s go!
November 27, 2016 at 9:57 pm #302456I have spent more than a few hours trying to get pictures posted. Nada. I am obviously not smart enough to figure it out myself. And if Paul or Ed’s instructions work, then I’m not smart enough to follow directions. Dell, Windows 10, IE.
Exit, stage left.
November 28, 2016 at 10:18 pm #302460Ed…awesome work as usual. Can’t wait to see the finished product.
As far as the pictures… I am befuddled. In our private correspondence, you said you were starting from the Insert/Edit Image icon in the tool bar (the little mountain icon). Are you still doing that? That approach only allows inserting pictures that are stored online, and yes, you need the URL
You extracted only a portion of the steps that I sent via email.
a. Click the ADD MEDIA button (above the tool bar) Resulting screen has Upload File and Library tabs.
b. Select the Upload Files tab, and you can browse to pictures, or drag and drop.
c. Either way, the most recent picture uploaded is automatically selected. And you may click the Insert Into Post.
Here is what the screen looks like. Does no one else see this?

-
This reply was modified 9 years, 2 months ago by
 Paul Mossberg.
-
This reply was modified 9 years, 2 months ago by
 Paul Mossberg.
Paul Mossberg
Former Owner of a 1981 Classic Roadsters Ltd. Duchess (VW)
2005 Intermeccanica RoadsterIf you own a TDr and are not in the Registry, please go to https://tdreplica.com/forums/topic/mg-td-replica-registry/ and register (you need to copy and paste the link)
November 28, 2016 at 10:31 pm #302463And I do want to second Ed’s comments about “details.”
Stephen and I are not sitting looking over your shoulder. To properly figure out what our members are experience, we need the step-by-step detail of what you are doing.
As I noted, the “instructions” that Ed said he got from me and posted above, are not complete. Details Ed. They matter. And you left out the most important step from the instructions I sent you, #1, ADD MEDIA. 🙂
I am not at home, and do not have access to the email I sent ED. So this might be slightly different Ed. But here are the four steps it takes me to add a picture form Windows 10, Firefox:
- Click ADD MEDIA
- Select Upload Files Tab
- Drag & drop images into the window; or click SELECT FILES and browse to the file.
- Click INSERT INTO POST
If the picture you want to add to the post is already in the Library, all I need to do is select it, and click Insert Into Post.
If you want to change the size,scroll down in the Library screen. I selected on of Ed’s pictures, and with one extra click, made it thumbnail size.
-
This reply was modified 9 years, 2 months ago by
 Paul Mossberg.
Paul Mossberg
Former Owner of a 1981 Classic Roadsters Ltd. Duchess (VW)
2005 Intermeccanica RoadsterIf you own a TDr and are not in the Registry, please go to https://tdreplica.com/forums/topic/mg-td-replica-registry/ and register (you need to copy and paste the link)
November 28, 2016 at 10:34 pm #302465One more note, I just tried the above from Windows 10, Chrome, with the same experience.
I know Ed is on a Mac. And maybe it id not valid to compare a Mac to an iPhone. But with the assumption that Apple is Apple, I did try doing this from my iPhone. And see the same types of screens, including the Insert Into Post button.
-
This reply was modified 9 years, 2 months ago by
 Paul Mossberg.
-
This reply was modified 9 years, 2 months ago by
 Paul Mossberg.
Paul Mossberg
Former Owner of a 1981 Classic Roadsters Ltd. Duchess (VW)
2005 Intermeccanica RoadsterIf you own a TDr and are not in the Registry, please go to https://tdreplica.com/forums/topic/mg-td-replica-registry/ and register (you need to copy and paste the link)
November 29, 2016 at 8:26 am #302469Hey Paul. Sorry if it seems I’m being obstinate or imprecise.
The screen I have has no “Add Media” button. It looks like this:
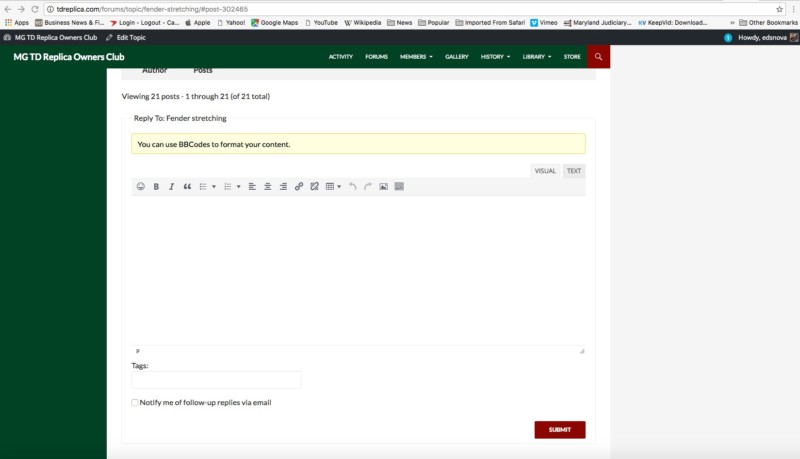
Up there where it says “Howdy, edsnova” I can get a drop-down menu, the bottom selection of which is “Media.” That is the thing which if I click it I go to the library and can upload media and copy the “address” and insert using the little mountain/sunset icon that says “insert/edit image” which is second from the right in the little post window.
I have until now thought that this “Media” drop-down was = to the “Add Media” button to which you refer. If it is not, then we may have zeroed-in on our issue. We just need to add the button in chrome for mac or whatever.
If it is—that is, if by “add media” you mean “select the ‘media’ tab from the drop-down menu under your ‘howdy, XXX’ top right”— then we’re still where I thought we were: loading media into a post from the library still requires me to take the several steps of clicking on it to open, right-clicking to get a menu, choosing “copy image address,” navigating back to the page to post on, selecting “insert/edit image” and pasting in the address.
Again, I want to emphasize: I can do this. Have done it, many times. But it is apparent to me that very, very few other club members can or will do this. It makes me believe that we have a system that is too complicated. I think it’s really key to confirm what everyone else is seeing on their screens, rather than just me and you.
-
This reply was modified 9 years, 2 months ago by
 edward ericson.
-
This reply was modified 9 years, 2 months ago by
 edward ericson.
November 29, 2016 at 10:20 am #302471I’ll chime in here as, like Ed, I have an Apple computer. Paul and Ed. I never thought of looking at a pulldown menu under “Howdy newkitman” and that is what has been giving me problems. Not complaining…just an elderly guy learning a new computer system (Apple) and a new club software. I’ll get it though. We’re a good club and we’ll figure all this out.
Just as a reminder, if I disappear for a bit its due to my upcoming surgery Friday. I’ll be away for about a week but (in my best Arnold accent) “I’ll be back!” 🙂
Allen Caron
VW based 53MGTD - "MoneyPenny"
"If one thing matters, everything matters" - from the book The ShackNovember 29, 2016 at 10:29 am #302472Good luck, Allen.
Just to be clear then, you, also, do not have an “Add Media” button—correct?
November 29, 2016 at 11:52 am #302474That is correct. Have to pull “Media” down from under Howdy newkitman and select either Albums, Photos or Videos.
Allen Caron
VW based 53MGTD - "MoneyPenny"
"If one thing matters, everything matters" - from the book The Shack -
AuthorPosts
- You must be logged in to reply to this topic.

