
Home › Forums › MGTD Kit Cars › My Project › Phoenix… my revival project
- This topic has 105 replies, 12 voices, and was last updated 10 years, 4 months ago by
 KentT.
-
AuthorPosts
-
February 2, 2016 at 9:27 pm #255971
 February 2, 2016 at 9:31 pm #255972
Kent, please tell me about your oil filter. I’ve been considering one.
February 2, 2016 at 9:41 pm #255973Royal wrote:Kent, please tell me about your oil filter. I’ve been considering one.It’s a CB Performance Maxi II, 26mm oil pump with spin-on filter.
https://www.cbperformance.com/ProductDetails.asp?ProductCode=1791
Be careful of the cheap Empi and other aftermarket filter pumps. Some are 30mm, and many/most have sloppy gear mesh.
This is a quality product. I’ve used several of them over the years.KentT2016-02-02 22:29:02
Early FF TDr on 69 VW pan
Slowly coming back from the ashes...February 3, 2016 at 5:57 am #255974Tks Kent. I’ve never felt comfortable with VW’s window screen filtering system and because of that I probably only average about 400 miles on each oil change. I’ve been putting it off because I was hoping to install a 4-1 merged header, but recently discovered that my engine cover won’t allow it.
February 11, 2016 at 12:40 am #255975KentT, your new garage has taken on a good lived-in look.
February 11, 2016 at 10:31 am #255976LRH wrote:KentT, your new garage has taken on a good lived-in look.Thanks! It’s still a work in progress, but at least I’m able to use it finally. Got the old engine yanked out, and am prepping the new one to go in. I found a leaking trans input shaft seal, and am now waiting on a parts order to come in.
Meanwhile the bargain used fluorescent ceiling lights (Craig’s List find that came out of an old church being torn down) were not liking these cold temps. Found out that I could convert them to LEDs as cheap or cheaper than I could replace the old failing ballasts, since they use two ballasts per 4 tube troffer. Just finished that…
Also have a few more “decorations” to hang on the walls, but it’s taking shape!KentT2016-02-11 10:32:45
Early FF TDr on 69 VW pan
Slowly coming back from the ashes...February 11, 2016 at 12:29 pm #255977Didn’t know there were LED replacements for that.
Going to suggest it to my 83 y.o. father for his house garage because he has had trouble recently with those fluorescent lights. The basement we finished ourselves over 25 years ago uses them in the drop ceiling, very uneven lighting from them.I was there last week changing out the dining room light to a new chandelier type with LEDs.February 11, 2016 at 4:39 pm #255978Joy hearing about the LED retrofit!
February 11, 2016 at 8:28 pm #255979These are the LED tubes I used. Comparable ones at HD are $16 and change, as I recall. Since mine were T12s (no shunts), I was able to use the original tombstones. These have all power one one end only, and polarity isn’t important. Half the leads go to hot, half to neutral. I simply snipped the wires aff the ballasts and off the end not used, and left the ballasts in place. Quick and easy, once I figured out the wiring. Note that there’s all different kinds of these replacement tubes Some use both end, these do not. Make sure you verify the wiring for the ones you use.
Earth LEDsKentT2016-02-11 20:30:43
Early FF TDr on 69 VW pan
Slowly coming back from the ashes...February 11, 2016 at 10:06 pm #255980Interesting. Sounds simple enough without actually having looked at the wiring yet.
I had already looked at that same web site after my message last time, and that’s all I got to see so far. Stopped looking real quick because all I saw there were $125+ LED setups. (was a ‘net search page, 2X4 troffer, now that I’ve looked again)So a big thanks for redirecting me to the cost-effective light!LRH2016-02-11 22:09:51
February 14, 2016 at 1:12 pm #255981Been too cold to spend much time in the garage, without running the smelly kerosene heater. As long as daytime temps are in the 40s, it can be comfortable since it’s insulated to R-16, but those temps won’t return until mid-week. So, I have continued a bit of decorating, in short bursts. First a cheap 3×5′ MG flag from eBay.
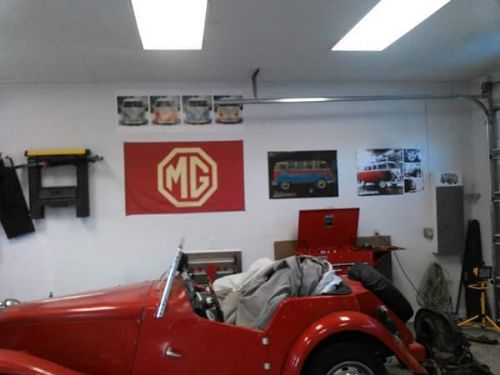
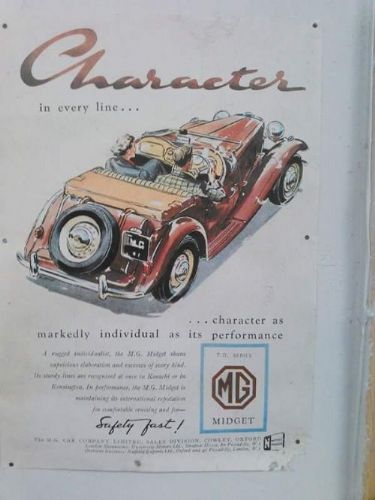
Add an original, roached out 12×16″ sales poster that had been tacked on a wall somewhere. Note it is RHD.
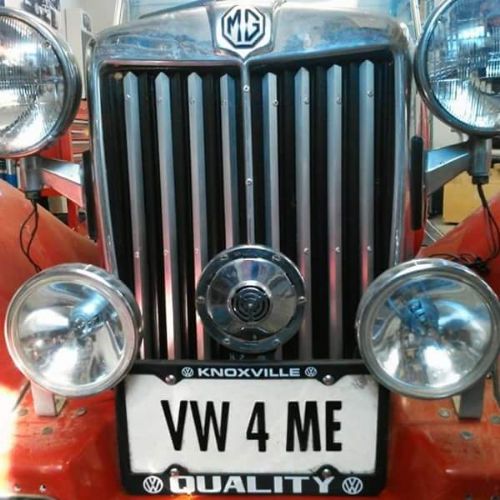
VW-heavy theme kinda fits the theme of my TDr. It would never be an authentic replica, so instead I’ll “celebrate” both aspects of its heritage…
 KentT2016-02-14 13:15:01
Early FF TDr on 69 VW pan
Slowly coming back from the ashes...February 14, 2016 at 2:16 pm #255982It just keeps getting nicer and nicer. Well done!
Vicenç - (bee sense)
Pembroke Pines, FL
1986 Aston - BCW Model 52 - "Montse II"(1983 FiberFab MiGi II - "Montse")
February 14, 2016 at 9:16 pm #255983Love that poster too.
February 23, 2016 at 10:53 am #255984These “electric rats” will build their nests anywhere…
This part of the project started because (1) I needed to remove the external voltage regulator since the new engine has an alternator with built-in regulator, and (2) I needed to modify the original builder’s heat ducting into the center tunnel because it interfered with the seat. I wanted to re-route the heat tubes while the engine is out and I have easier access from the rear.
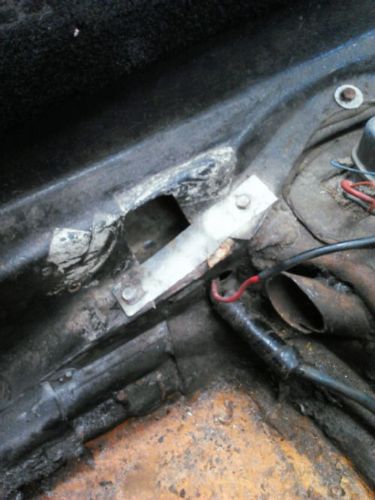
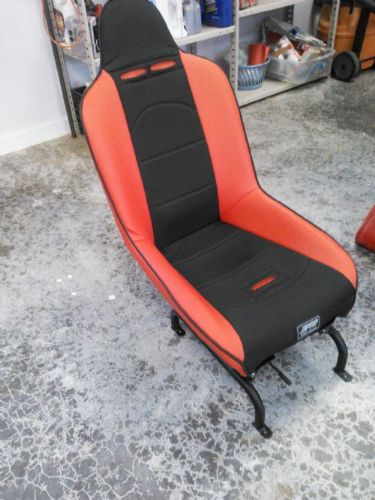
So, I did some preliminary test fitting of the new seats to see how they would mount and fit, in order to re-route those tubes. This required modifying the new universal seat mounts by narrowing them 2″ to fit the narrow (12″ base) of the PRP roadster seats.
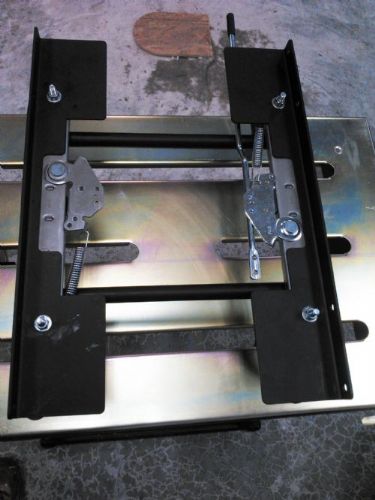
Then, I found that I needed to cut and rotate the rear leg of the new seat bases that fits closest to the center tunnel on each side 180 degrees in order to fit back into that rounded corner of the floorpan.
Unfortunately – or typical Thomas luck – I found that what initially appeared to be surface rust on the floorpan (easily treated with rust converter) actually was rust-through when I removed the old tar boards and started using a wire brush on the grinder. So, I’m now at the point of deciding whether to remove the body and replace the floorpan – or patch them with POR 15 and press on. I’m leaning toward patching it, because I found that if I add 1.5″ spacers under the seats, they will be high enough to slide all the way back to go over the rear body mounting flange, and touch the rear wall of the body tub. So, I’m considering welding in 1.5″ square steel tubing across the floorpan on each side to mount the seats on, then use POR 15 Floor and Trunk Kit to patch it. Strangely, the rust through spots were in front of the seats, underneath the tat boards and carpet padding where moisture had been trapped, rather than the more common original VW battery location.
Early FF TDr on 69 VW pan
Slowly coming back from the ashes...February 23, 2016 at 4:36 pm #255985Kent’s rust problem reminded me of a question I had, and maybe a solution for him. I have never seen floorboard rust on my car, although frankly I haven’t looked that hard by rolling around underneath it. However, the builder of my car made it a moot point anyway, because he fiberglassed in the entire floor. He even used fiberglass cloth, so it is a pretty serious job. I wonder why he did that? I wouldn’t have gone to that much trouble, and I don’t see the need, but what the heck, I see no problem with it, either. It seems to me that Kent might be able to solve his problem with minor patches out of fiberglass, if not the entire floor.johnsimion2016-02-23 16:43:22
February 23, 2016 at 6:57 pm #255986The POR15 Trunk and Pan repair kit comes with long-strand fiberglass cloth that they call Powemesh Reinforcing Mesh. They have you imbed it in the POR15 itself, rather than common fiberglass resin. The POR15 chemically bonds with the rusty metal, supposedly forming a stronger bond that will not crack as easily if it flexes. Should it (or fiberglass) flex and crack, moisture can penetrate and start rusting again.
Floor Pan and Trunk Repair Kit
It’s a band-aid fix, for sure. But if I have to take the body off the frame to repair the floorpan, it won’t be seeing the road any time soon…KentT2016-02-23 18:58:35
Early FF TDr on 69 VW pan
Slowly coming back from the ashes...February 23, 2016 at 7:48 pm #255987The POR 15 kit may be a “band aid”, but it is a darn good one.
February 23, 2016 at 8:09 pm #255988Royal wrote:The POR 15 kit may be a “band aid”, but it is a darn good one.That was my thought. BTW, Walmart now carries POR 15, so you don’t have to oder it from Eastwood or some other high end site and pay MSRP prices. I’ve used it in the past, but never this specific kit. Expensive stuff, but it lasts, if applied correctly. It’s not like sloshing on Rustoleum…
POR 15 at WalmartKentT2016-02-23 20:41:38
Early FF TDr on 69 VW pan
Slowly coming back from the ashes...February 23, 2016 at 9:37 pm #255989Maybe what I have is POR-15. Dunno. Gotta be at least 30 years old and still strong, whether it’s fiberglass or POR-15. But I sure wouldn’t think of it as a Band-Aid.
February 23, 2016 at 10:02 pm #255990John, I agree with you that any “band aid” that lasts 30 years has been mis-named.
I have used POR 15, more than a few times on other cars and have always been impressed.It’s great that one can get it from Walmart now. I wouldn’t have guessed..
February 24, 2016 at 8:46 am #255991During my build of Moneypenny, when I finished the VW chasis and pans, I coated both inside and out with POR-15. Got it at Summit up near Hotlanta. Cost a bunch but well worth it. I use it on all my vehicle repairs where water may come in contact with metal. Glad they sell it at Walmart now. Cost a pretty penny through POR-15 or Summit.
newkitman2016-02-24 08:47:02Allen Caron
VW based 53MGTD - "MoneyPenny"
"If one thing matters, everything matters" - from the book The ShackFebruary 25, 2016 at 11:51 pm #255992Well, I’m committed to the POR15 patch route – my kit arrived today.
Meanwhile, since Roy coined the TDr acronymn, I’d like to propose another…
Sloppy (or Silly, or Stupid) Original Builder — SOB
I muttered that a few times, during hours spent on my knees using an angle grinder with either a cutoff wheel or wire brush cleaning up after the guy. Rather than cut off/out the seat mounts closest to the tunnel on each side, the builder simply hammered them over to lean against the tunnel. Cutting those out of an assembled car was no fun. He also had patched one rust hole by riveting in a piece of a coffee can, then burying it under about a 1/4″ of tar.
Looks like I’ll need to pull the pedal assembly and clean and examine that area, before I open up any chemicals…
The rot on the driver’s side is more extensive than I originally thought. I may end up having to buy more POR 15, but I think I can salvage it, though I’ll definitely have to use the Reinforcing Mesh.
Early FF TDr on 69 VW pan
Slowly coming back from the ashes...February 26, 2016 at 10:13 am #255993I’m curious about your intended use of the POR15. I’ve bit my tongue. But not cannot help but ask before you go further.
Please don’t take offense at this. I’m not trying to insult anyone’s intelligence. And it is very possible I am just reading the posts incorrectly.You’ve described holes, rusted through areas and other weak spots in your floor plans, and indicated you plan to fix the problem areas with POR15.I’m getting that from comments like “…whether it’s fiberglass or POR-15….” and “The rot on the driver’s side is more extensive than I originally thought. I may end up having to buy more POR 15….”But POR15 is a rust proof “coating.” It is not structural.The problem areas needs to be repaired first. And the best approach is to cut out out the rusted areas and welding in new steel. Then you seal the whole thing up with POR15.I’m sure you knew all this. But I feel better having written it.
Paul Mossberg
Former Owner of a 1981 Classic Roadsters Ltd. Duchess (VW)
2005 Intermeccanica RoadsterIf you own a TDr and are not in the Registry, please go to https://tdreplica.com/forums/topic/mg-td-replica-registry/ and register (you need to copy and paste the link)
February 26, 2016 at 10:55 am #255994No offense Paul. The reason I said I may have to buy more POR 15 is because having discovered more holes, I will be using more fiberglass cloth than originally thought, encapsulating it in POR 15 rather than typical fiberglass resin. That will require far more POR 15 than simply applying a protective coating.
The repair kit came with only two pints of POR 15, one silver and one black. Since I’ll need to coat both top and bottom, that likely will not be enough black. The raised ridges of the corrugated floorboard are still solid. The surface rust and holes (whether pinholes or larger) are mostly in the flat areas between the ridges and along the edges of the tunnel and outside flanges.
It’s a band-aid, and not something I would do on an initial build. I’m only doing it to prevent removing the body….KentT2016-02-26 12:04:41
Early FF TDr on 69 VW pan
Slowly coming back from the ashes...February 26, 2016 at 1:08 pm #255995This is what happens. I filled a bit of B’s frame head rot with JB & scrap steel. Should have bit the bullet & had it welded from the get-go. And you should too.
-
AuthorPosts
- You must be logged in to reply to this topic.