
Home › Forums › MGTD Kit Cars › My Project › Refresh "Sammy" Black BCW
Tagged: Answer
- This topic has 62 replies, 11 voices, and was last updated 6 years ago by
 ricrx7.
-
AuthorPosts
-
June 7, 2018 at 7:19 pm #305045
Ric, re oil hoses: you can use regular clamps but most people go with more expensive and better stuff—AN 8 or AN 10 fittings, say. Oil pressure above 80 lbs on startup, and a heat cycle on the hoses that’s worse than your coolant system, means you should get short lengths of heavy-duty neoprene hoses designed for use with hot oil, and preferably braided for abrasion protection and burst strength.
Maybe Billinparts will pipe in with some real knowledge as he just plumbed a new oil cooler in his V8 swap.
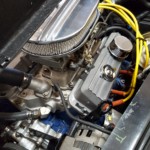
June 13, 2018 at 9:04 pm #305070Installed remote oil filter and adapter for lines from old filter location. After addressing several clearance issues, I finally got everything to clear exhaust and engine. Used swivel 10AN fittings and aeroquip 5/8 hose. Mounted new oil pressure sending unit. MGTDR came with an oil warning light. I don’t have the old engine anymore, but I believe the wire from the warning light went to an oil pressure sending unit. Is that correct? And can I connect the wire from my new sending unit to an oil pressure gauge and the warning light? Or is there a special sending unit for a warning light?
1986 British Coach Works Type 52 (Sammy)
Chevy 2.8 V6, 5 speedJune 13, 2018 at 9:13 pm #305071Good on ya Ric.
And a good question. I think the oil light has its own sending unit which is pretty much universal, and gauges have their own which have to match the gauge. But someone else might have the for-sure answer.
June 13, 2018 at 9:22 pm #305072Checked internet. Different sending unit for warning light. So no more warning light since I have a gauge.
1986 British Coach Works Type 52 (Sammy)
Chevy 2.8 V6, 5 speedJune 13, 2018 at 9:48 pm #305073Hey Ric, if you really want a low oil press light, you can install a T in the line and have both a pressure gauge and a light. The “sending unit” for the light is simply a pressure switch that is closed on low oil pressure. The light is wired hot and the switch provides the ground when sufficient oil pressure is not available. ……at least that is the way mine was hooked up. As I recall (and I’m old and my memory fading) the switch activated at about 7# pressure. I really prefer the gauge.
June 15, 2018 at 9:08 am #305074Hey Kall, et. al. — really good point on rotating the electrical panel 180 degrees so that the terminal strip and wires will not interfere with changing the fuses….
…I made some changes to the layout and will post pics under my Ford TDr build post — (don’t want to hijack the “refresh Sammy” post ……)
Thanks,
Happy Jack
June 18, 2018 at 8:13 pm #305082Drove car for a short distance. All gears worked, brakes worked, steering is very heavy. Clutch has to be all the way in to shift and all the way out to engage. Maybe it will get better with use. Front suspension is very stiff. Chevette spring had two coils cut. May have to get a replacement spring. Any ideas? May also look into power steering.

1986 British Coach Works Type 52 (Sammy)
Chevy 2.8 V6, 5 speedJune 18, 2018 at 8:15 pm #305083Why are all my pictures posting as a square? Part of the picture is being cut off.
1986 British Coach Works Type 52 (Sammy)
Chevy 2.8 V6, 5 speedJune 18, 2018 at 8:47 pm #305084Ric, congratulations! Now it’s just down to sorting.
I don’t know about the photo problem maybe someone else will chime in.
June 19, 2018 at 3:41 am #305085Glad it’s running. New springs are in order. Cutting one coil increased the spring weight by ten percent. Cutting the second coil it went up ten percent from that rate. I did that myself and it rode like a rock.
Two more steps on your pictures. The screen where you clicked on “copy image”, click on “edit” instead. Then click on “ copy image”. This step is not always necessary. It depends on the mood of my computer, but it works.
Bill Ascheman
Fiberfab Ford
Modified 5.0, 5sp., 4:11
Autocross & Hillclimb
"Drive Happy"June 19, 2018 at 3:13 pm #305086Not sure I should even reply on the steering topic because my TDr is VW based but mine had stiff and irregular steering due to- 1. Poor alignment of column and steering box, 2. Flimsy mounting of column at both the dash and chassis ends, 3. Missing bushings inside the outer steering column, 4. Shaft coupling rubbing on the fiberglass side panel, 5. Mis-adjusted limit stops which alowed the tires to rub on the frame, 6. Mismatched rim widths on the same axle, 7. Delaminating tread on the front tires, whew!
Take your pick but they are all cheaper to fix than rebuilding the front axle or adding power steering so you might start with these. You might want to jack up the front end and observe the movement of all the parts of the steering system as you turn the wheel.
😳
-
This reply was modified 8 years ago by
 Rich Kallenberger.
June 20, 2018 at 8:50 pm #305088OK – I think I know what is wrong with my steering. I lowered the front end too much without making any modifications to the steering. My tie rods angle up towards the wheels. I believe I read somewhere that they are supposed to be level. Car needs to be raised back up a little and probably need to remount the steering rack higher. Sound plausible?
1986 British Coach Works Type 52 (Sammy)
Chevy 2.8 V6, 5 speedJune 20, 2018 at 10:02 pm #305089Plausible but I don’t understand why you’d relocate the steering rack. It should be in a pretty positive “stock” location, and if you raise it up won’t it tend to keep your tie-rod angles in the cockeyed condition they’re in?
June 24, 2018 at 4:22 pm #305091I’ll install new springs and see what we have with position of tie rods. seems they should be parallel with the lower A arm. My other issue is that my wider rims hit my shock absorber mount. I’ll see if that can be moved inboard or relocate shock to inside spring.
1986 British Coach Works Type 52 (Sammy)
Chevy 2.8 V6, 5 speedAugust 3, 2018 at 3:00 pm #305306New springs solved steering issue. New high torque starter solved intermittent starting issue. New fuel pump solved rough running issue. Almost had a disaster when top radiator hose came loose on test run. Bought bottled water at convenience store and everything OK. Now ready for a test run on Interstate. Probably have wife follow in her car.
1986 British Coach Works Type 52 (Sammy)
Chevy 2.8 V6, 5 speedAugust 3, 2018 at 9:51 pm #305307Congrats on getting back on the road.
August 13, 2018 at 11:07 pm #305390Well almost. Engine is overheating. Need to find problem. I put a 12 inch fan as a pusher, but I think it was designed as a puller. So I am putting a 12 inch puller fan on the engine side. I could buy a 14 inch fan to cover more of the radiator, but do not want to spend money unless it would make a good bit of difference. I checked thermostat (180) and it works in boiling water. Plan to change to 160 degree just because it might also help. Thoughts?
1986 British Coach Works Type 52 (Sammy)
Chevy 2.8 V6, 5 speedAugust 15, 2018 at 4:24 pm #305396Fan shroud.
Putting a fan over the whole rad is good but the key is getting the air to move through the whole thing–a full shroud and then a way for the air to get out from under the hood. These cars, like most, can develop relatively high pressure under the front. The ope louver idea could work as well.
I made a shroud over the rad and allow the air to exit into the front fender wells, and that works well for me. It also helps, I think, that the fan on this rad is from a stock Subaru and is wired to the ECU and is thus OEM heavy-duty AND thermostatically controlled.
If the air can’t get out, it won’t matter that you put in a lower-temp thermostat. It won’t work even with no thermostat if there’s no good air flow.
August 25, 2018 at 8:30 pm #305467Finally got my new puller fan. So, installed 160 thermostat, added an oil cooler, and installed puller fan. Running out side garage, temperature stays at 175 degrees, but with top hood off. Due to some carb problems, I have not been able to test on the open road. If temp rises much with hood on, I think I’ll add top vents. Not sure I can cut slits in side of hood and do a good job.
1986 British Coach Works Type 52 (Sammy)
Chevy 2.8 V6, 5 speedSeptember 13, 2018 at 9:03 pm #305512Worked on carb and seems much better. Then decided to change distributor to HEI. That is now installed. But no test drive because I had a few minutes available and removed heater. So now I have holes in firewall that need to be covered. I also have a lot of space where heater used to be. Am thinking of putting the radiator overflow tank here and a toolbox similar to original TDs.

1986 British Coach Works Type 52 (Sammy)
Chevy 2.8 V6, 5 speedOctober 1, 2018 at 5:42 pm #305552Car was still running rough, so I took carb to an expert on Holley carbs and he rebuilt it and changed jets. Also set timing by hand rotating engine to proper location. Car is running much better now, has quite a bit of power. Still a little hesitation at higher RPMs, maybe needs larger jets? Anyway, it is time to really start using the car.
-
This reply was modified 7 years, 8 months ago by ricrx7.
1986 British Coach Works Type 52 (Sammy)
Chevy 2.8 V6, 5 speedOctober 1, 2018 at 8:21 pm #305556YES! That looks sweet and your having it sorted is excellent.
November 13, 2018 at 6:30 pm #305670Decided to fix a long standing issue this past weekend – too much play in steering. Removed steering column and gave it to a local race shop to replace the loose universal joint. Then while I was working in the area, decided to remove hood side panel and open up the fake vents. So I have routed them out. It came out pretty good. I’ll post a picture in next post after I upload it.
1986 British Coach Works Type 52 (Sammy)
Chevy 2.8 V6, 5 speedNovember 13, 2018 at 6:33 pm #305672
1986 British Coach Works Type 52 (Sammy)
Chevy 2.8 V6, 5 speedNovember 13, 2018 at 6:49 pm #305674In another post, Travis asked how I routed the hood sides. I drilled a 5/16 hole at the top and bottom of each vent in the depressed area. I used a guide at the top (and bottom) to align the holes. I clamped a guide for the routed by placing the router in a hole and moving the guide to the edge of the router. Then just moved router from top to bottom against the guide. I did make a few mistakes. Next time I will clamp guides on each side of the router to make sure it goes in a straight line.

1986 British Coach Works Type 52 (Sammy)
Chevy 2.8 V6, 5 speed -
This reply was modified 8 years ago by
-
AuthorPosts
- You must be logged in to reply to this topic.