
Home › Forums › MGTD Kit Cars › My Project › Refresh "Sammy" Black BCW
Tagged: Answer
- This topic has 62 replies, 11 voices, and was last updated 6 years ago by
 ricrx7.
-
AuthorPosts
-
August 28, 2017 at 9:53 pm #303976
Since I decided to sell my MGTD, my BCW is going to get a refresh. After a ride with a friend at 60 MPH, he suggested some front end work was in order based on his observation that I was gripping the steering wheel with an uncomfortable look on my face. I brought the problem to this forum and the advice was to consider new tires. So, I decided to get new tires, rebuild my front suspension, and get new brakes. In addition, I plan to move forward with upgrading my engine and transmission. More posts to come.
1986 British Coach Works Type 52 (Sammy)
Chevy 2.8 V6, 5 speedAugust 31, 2017 at 8:30 pm #303981Replaced rear brakes and wheel cylinders. Could only get wheel cylinders on by grinding off metal from the part that goes through the backing plate (or I could have removed the axle to get clearance.) Found one busted spring that needed replacement. Also replaced the flexible line on the rear axle. Now to the front brakes. Today I received my new rotors with hubs. They are grooved and have holes. I was amazed to find a company that made them for a Chevette. The company is Brake Performance if someone is interested. Because of future performance upgrades, I wanted better brakes without a major change to different calipers, etc. Hope this works. Will not be able to start the rebuild until beginning of week.
1986 British Coach Works Type 52 (Sammy)
Chevy 2.8 V6, 5 speedSeptember 1, 2017 at 6:27 pm #303984Found a donor car for new power for Sammy. 1995 Camaro V6 5 sp. Pretty car, don’t you think?

1986 British Coach Works Type 52 (Sammy)
Chevy 2.8 V6, 5 speedSeptember 1, 2017 at 9:46 pm #303985Ooh, now we’re getting serious…
September 2, 2017 at 5:59 pm #303986That should wake it up. Nice project. Keep posting photos.
Bill Ascheman
Fiberfab Ford
Modified 5.0, 5sp., 4:11
Autocross & Hillclimb
"Drive Happy"September 26, 2017 at 8:58 pm #304135Slight delay in progress due to a little bad weather here in Florida. Working on front suspension and decided on urethane bushings. Only kit available is for Fiero which is supposed to have Chevette front suspension. After getting everything installed on arms, realized that lower bushing are too wide and have to be modified. Lower arm should move freely – right? not be binding due to tight bushings. While I am rebuilding things, I increased castor and shortened springs. Should get better steering response.
1986 British Coach Works Type 52 (Sammy)
Chevy 2.8 V6, 5 speedOctober 19, 2017 at 5:56 pm #304205New lower ball joints with a 1 inch riser and cut one more coil from spring has lowered front end about 2 inches. Looks much better. But very stiff. I think I need to redo bushings, they seem to bind too much. Engine and trans has been removed and sold to a fellow replica enthusiast. He has an SS Jaguar replica with Chevette running gear.
1986 British Coach Works Type 52 (Sammy)
Chevy 2.8 V6, 5 speedOctober 19, 2017 at 7:39 pm #304206Progress indeed.
I’d check with a front end shop for advice on how “binding” the bushings might supposed to be. Also maybe find a new spring with less rate. Apparently Datsun Z cars have similarly sized springs with less rate. There may be others.
October 21, 2017 at 3:27 am #304207Yes, check with a spring shop for new ones. Every coil you remove increases the spring rate apx. 10%.
Bill Ascheman
Fiberfab Ford
Modified 5.0, 5sp., 4:11
Autocross & Hillclimb
"Drive Happy"February 18, 2018 at 9:54 pm #304647Sorry for the 4 month delay in posting, but had back surgery and had to stop heavy work. But finally got back to removing engine, trans, and wiring, plus a few parts, from donor Camaro. Engine and trans are now in car for test fit for motor mounts. T-5 trans mount is in same location as the removed Chevette trans and the same drive shaft fits (only 7 inches long). Had to perform surgery on transmission tunnel since parts of T-5 trans were too wide. Also seems I will have to notch part of frame to clear hydraulic clutch mount on trans. I will try to post pictures in the next post.
1986 British Coach Works Type 52 (Sammy)
Chevy 2.8 V6, 5 speedFebruary 18, 2018 at 10:13 pm #304651
right side trans cutout

left side trans cutout
engine positioned in frame
1986 British Coach Works Type 52 (Sammy)
Chevy 2.8 V6, 5 speedMarch 18, 2018 at 10:18 pm #304795Made motor mounts and tack welded in place. Removed engine and trans so welding shop can finish the motor mounts. Drive shaft is at machine shop to add a second universal joint. The car came with a short drive shaft with only one universal. The rubber mount in the torque tube was toast. Luckily I found one for the Chevette rear axle.

1986 British Coach Works Type 52 (Sammy)
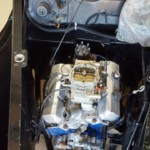
Chevy 2.8 V6, 5 speedMay 19, 2018 at 8:14 pm #304980Have made lots of progress in the past months, just forgot to do any posts. Here is engine mounted in car.
1986 British Coach Works Type 52 (Sammy)
Chevy 2.8 V6, 5 speedMay 19, 2018 at 8:21 pm #304981And here is radiator mounted to shell. I just added a couple aluminum angles and put the fan as a pusher.

It is for a Datsun Fairlady and is about 17 x 17 inches. Supposed to handle up to 400 HP.
1986 British Coach Works Type 52 (Sammy)
Chevy 2.8 V6, 5 speedMay 19, 2018 at 8:27 pm #304982Here are the exhaust headers. There were for an MGB, so required some mods to make work. Also, they exit through the engine compartment side panel.
Right side required some twists to clear engine mount.
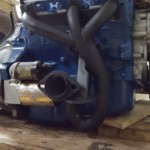
Left side was pretty straight forward.

1986 British Coach Works Type 52 (Sammy)
Chevy 2.8 V6, 5 speedMay 19, 2018 at 8:36 pm #304983Several other modifications made. Removed Chevette pedals and modified Camaro pedals to fit. Added power brake booster and Camaro hydraulic clutch. Rebuilt rear end torque tube. In process of cutting out some fiberglass from the rear floor of passenger compartment so seats can be mounted about 3 inches further back. These little bumps appear to serve on purpose in front engine car, perhaps they were there for VW version.
1986 British Coach Works Type 52 (Sammy)
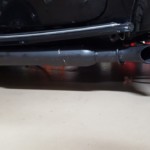
Chevy 2.8 V6, 5 speedMay 19, 2018 at 8:44 pm #304985exhaust is not finished yet, but here is a picture of the muffler mounted under the running board.
1986 British Coach Works Type 52 (Sammy)
Chevy 2.8 V6, 5 speedMay 29, 2018 at 9:22 am #305016Started on wiring yesterday. Quite a challenge. When originally built, the Chevette harness was not used. So I have a mixture of MGTD switches, Chevette wiring, and now Camaro wiring for the engine. First step will be to makes changes from Chevette engine to Camaro engine. Later I plan to redo entire harness incorporating the Camaro under hood relay and fuse box and try to use GM wire colors. One thing I’ve noticed is that the Camaro wires are generally of smaller size. Is this something I need to worry about?
1986 British Coach Works Type 52 (Sammy)
Chevy 2.8 V6, 5 speedMay 29, 2018 at 10:09 am #305019As with many responses, it depends. The heavier gauge wires (AWG 12 & 10) are designed to carry more amperage which is associated with starters and alternators. By extension the smaller gauge wiring (16 & 18) is designed for lower amperage rated components, primarily factory wattage lights. With one exception, when relays are used to control the components a smaller gauge wire can be used to control the relay and a heavier gauge wire is used to connect the contacts in the relay to switch the components on/off. In the original VW MGTD wiring and most older vintage vehicles the design was to have switches control the components and high amperage rated contacts in the switches were used. More modern vehicles tend to use relays for high amperage draw components which reduces the arcing in the switches.
-
This reply was modified 8 years ago by
 Toller.
David B Dixon
Port Perry ON CA
SabineMay 29, 2018 at 9:04 pm #305023Good to see your progress, Ric. Wiring. I wish I liked it more.
June 2, 2018 at 11:51 am #305028Ah Wiring!!
Now which fuse is the yellow wire supposed to go to????????


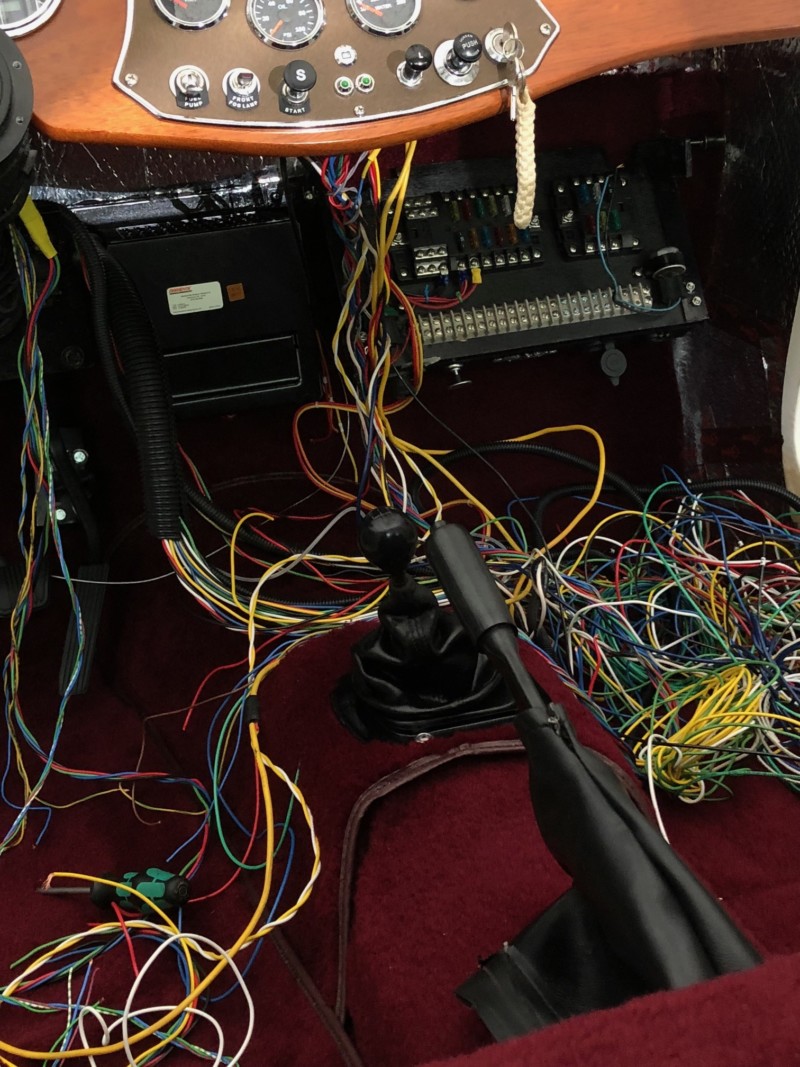
As you can see, I have all of 3 wires attached — and a gazillion to go…….
….Stay tuned — I might be on the road in time for Labor Day!!
“Happy to have a project car” Jack
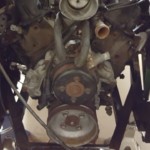
June 6, 2018 at 10:03 pm #305038Wiring will be a piece of art. I was just glad that nothing burned when I turned on the key. Now I am solving the oil pressure issue. As this picture shows, the oil pressure port is between the motor mount and the filter.

Yea, no way to get a sending unit on this. So I am going to go with a remote oil filter and put the sending unit with it. Are there any issues with a remote filter that I need to consider? Do I need special hoses? Or are hose clamps enough?
1986 British Coach Works Type 52 (Sammy)
Chevy 2.8 V6, 5 speedJune 7, 2018 at 7:49 am #305039I retired a telephone splicer/tech after 32years. I’d tell people,”I’m the guy you see by the side of the road with the colored wires in his lap and the confused look on his face!” There IS a color code, so it DOES make sense, but trying to explain it to a layman was a lost cause. GOOD LUCK!
Amor Conquista Todo
June 7, 2018 at 10:52 am #305040Jack
Just remember one circuit at a time. I replaced most of the original wiring in mine two years ago using the wiring diagrams in Bentley and the one posted to the site. Did you make the terminal/fuse/relay block I used marine grade fuse blocks to replace the original Buss style fuse strips. I like what you are starting with much better than what I ended up with
https://tdreplica.com/members/toller/media/621/David B Dixon
Port Perry ON CA
SabineJune 7, 2018 at 2:33 pm #305041I love the electrical panel. I built a much rougher one on plywood and it helped clean up the wiring mess. I have one suggestion, if it isn’t too late. Can you rotate the panel 180 so that the terminal strip is at the top and the fuse block is at the bottom? That way the wires, which hopefully you will never have to access again 😉 will be tucked up under the dash and the fuses, which you hopefully will only have to access rarely, will be at the bottom.
Just a thought
Good work
Rich
-
This reply was modified 8 years ago by
-
AuthorPosts
- You must be logged in to reply to this topic.