
Forum Replies Created
-
AuthorPosts
-
August 1, 2013 at 6:43 pm #256549
All good suggestions. Monday we got the gas tank hooked up and put gas in it, and the car starts fine. It has been a busy week, and it looks like it will be next Monday before I can get back to it.
July 28, 2013 at 7:55 am #256546Thanks guys – I’ve downloaded all the manuals for Classic Roadsters and VW. And for the other replicas as well. One problem I am having is that the color code was not adhered to all that closely in this car. In the worst case example, one spliced wire changes color 3 times before it gets to it’s final destination. In another case, the Classic Roadsters manual says to hook the light blue wire to the Voltage Regulator – and I have no light blue wires anywhere. Sorry to sound like I am whining – this is just new to me, and you know the old dog and new tricks saying. I’ll get it eventually, and I think the one circuit at a time approach will work for me. I’m thinking about putting extra long leads on the probes to my multimeter, so I can identify the wires from end to end.
July 27, 2013 at 9:18 am #256542A little more progress: We started it up (momentarily) last night.
We got enough wiring done to where it should start, and spraying a
little starting fluid in the carburetor got it to fire and run for a few
seconds (there is zero gas in the tank).
A few minutes later I hit the key for just a second to check the
warning light, and it immediately fired again and ran for a second off
of left-over starting fluid. Not bad for the first time in 3 years the
engine has been turned over. It was the first time I saw my wife get
excited about this car project.Now I have to get turn signals,
warning light, horn, headlights, wipers, and fog lights working. I
have built and played with radios and read electronic schematics for
years – but for some reason, the car wiring freaks me out! I think I
will try to find some info on what the various contacts are on the
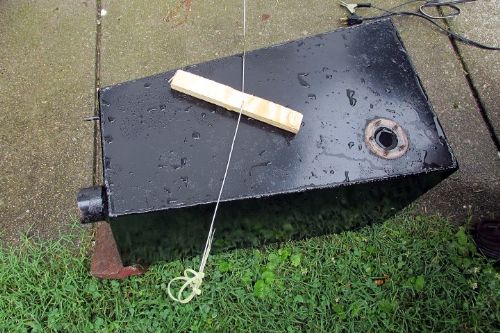
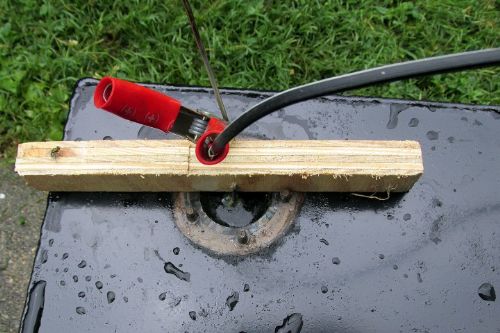
gauges, and maybe that will help.July 22, 2013 at 9:48 pm #256540I got ready to install the gas tank the other day, and found it had rust inside. A search of the internet turned up several methods, but I opted for the scientific approach. Arm and Hammer Washing Soda, a battery charger, and a piece of steel. Not having anything else on hand, I used a coat hanger for the steel. The water started to bubble almost immediately, and the photo showing the rust was after one hour in the solution. I replaced the hanger after a couple of hours, and have cleaned the second hanger a few times. It seems to be working well.
 July 22, 2013 at 9:10 am #256539
Hadn’t thought about using LED’s for any external lights… Might have to look into that. At present, I don’t even know how many external lights work/don’t work. Wiring starts today!
July 21, 2013 at 2:37 pm #256536I didn’t know that – that opens up more possibilities.
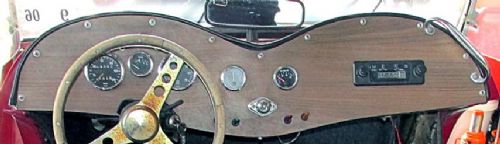
July 19, 2013 at 10:34 pm #256534Thanks Bill. It was quite a learning process, as this whole project has been. The first time we stained the dash, we sprayed it with a “clear coat” with UV protector. Turned the dash milky white. Sanded and stained again. The stain is a red mahogany, a Minwax product. We finished it off with a Minwax Polycrylic. It is supposed to render a high gloss with a hard surface to resist scratches. Seemed like a good idea at the time. We read the label AFTER applying the poly, and it says – don’t use over red mahogany stain! It didn’t hurt anything, it just turned our red mahogany into more of a walnut stain. Wish I’d paid more attention in shop class!
Yes, that is a map light. It still has its original bulb, and the turn signal lights are still original. I read somewhere that turn signals (the flasher) don’t play nice with LED’s unless there is some kind of load resistor or something added. I switched out the dash lights because a couple of the old ones broke when I was trying to remove them. Decided to go with the LED’s for something different. I got them from ebay, and they are already rated for 12 volts. (There is a very tiny resistor in the base). I soldered them in, and used a dab of hot glue to hold them in place. I ended up going with LED’s with 3 emitters, as the light seems to spread out better in the gauges. Here is the type we used; http://www.ebay.com/itm/130922237805?ssPageName=STRK:MEWNX:IT&_trksid=p3984.m1439.l2649 Hopefully Monday we will begin installing the dash and hooking up the wiring harnesses. More learning ahead.July 18, 2013 at 9:28 am #256532Sounds good Dennis! We have gotten down your way a few times, once on the motorcycle. I am hoping the Duchess will be running before too many more weeks, but still lots to do on it.
Jim
July 17, 2013 at 9:19 pm #256530Man is it hot in the Ville! Makes it difficult to get much done, but we have made some progress.
The Duchess lowered back onto the chassis without incident, and all holes lined up – yea! Brakes have been reconnected, as has the steering. We fashioned a new dash out of Lauan, stained and sealed it up, and placed it in front of the original fiberglass dash. Replaced the original lights with blue LED’s.
Next thing on the list is the wiring. I have a feeling there will be hours and hours of trouble-shooting ahead.
 July 11, 2013 at 9:58 pm #256785
I just bought a battery for mine. Went to Firestone to get an Interstate battery, it called for a Size 42 (73 chassis) but they didn’t have any, and it would take two weeks to order. Ended up getting a Size 47 battery, which on occasion is substituted. Haven’t tried sticking it under the seat yet, but it looks like it will fit.
July 3, 2013 at 5:13 pm #256529I used tie down straps – the front strap is attached to a piece of angle iron that is fastened inside the body near the front of the car. The rear straps are attached to where the door hinges are mounted. (Doors have been removed).
The front and rear straps were raised at the same time by using 2 come-alongs and two people.
The come-alongs are attached to 4×4’s, that are laying across several of the roof trusses.I hope to be able to drop (poor choice of words) the body back onto the chassis in the next week. Work keeps interfering with play…
June 24, 2013 at 1:44 pm #256800Thanks, will check it out.
June 20, 2013 at 11:08 am #256527Dick, wish I knew where all that junk in the garage came from. It seems to multiply at night!
Paul, the body pulled up real nice – it was completely removed by just the wife and me. This is actually turning into some good quality time – with both of us working on the Duchess. My wife even tried a little welding. Guess I’ll be naming the car after her…:lol:
June 19, 2013 at 10:30 pm #256524Progress…
 June 13, 2013 at 9:29 pm #256523
Wow – that video reminded me of getting the body off the Duchess!
Only got a couple of hours in tonight, got the rest of the old pans cut out.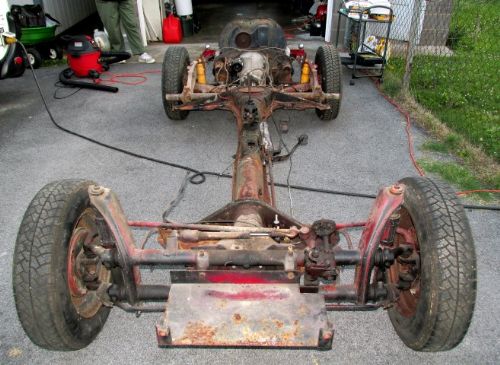 June 13, 2013 at 11:51 am #256520
Thanks guys! It’s good to be back. I am actually thinking about using the Duchess to take a little of the load off our Durango. We need the Durango as a tow vehicle, but it only gets 10 mpg in town and that hurts! I am hoping the Duchess will work for quick trips to the store, etc. plus a few smiles along the way. I plan to add a few photos as the work progresses, but I am humbled by the quality of work I have seen on this forum! It has inspired me to try to limit my Red Green Show fixes.
August 30, 2010 at 5:01 pm #242095Paul, this is great news! Especially for a newbie like me… I’ll PM you my e-mail address. Thanks for all your work in this – this will help our efforts immeasurably!
Jim
August 30, 2010 at 4:58 pm #242087Yep, I remember the rivets but was thinking it was primarily to the other body sections. Do most folks put rivets back in during re-assembly, or replace with sheet metal screws?
August 30, 2010 at 1:44 pm #242085Since we are guessing that this is one of the early Classic Roadsters kits (manufactured in 1979, serial #0064) maybe there are some differences in this kit than later ones?
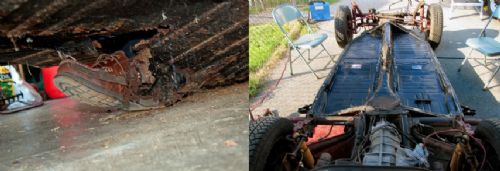
I am taking my first good look at removing the body. Inside, there are a lot of rivets, not just holding the pieces of the body together, but a number of rivets holding the body to the frame. Under the hood, the strap that holds down the gas tank is riveted to the hump. The main body under the hood and in the passenger compartment is riveted to the hump and cross pieces of the frame. Are the other kits like this, or am I just lucky? It looks like there will be a lot of drilling before the body is ready to come off. I was thinking these were primarily bolted onto the frame.
Jim
August 29, 2010 at 10:20 pm #241288I wondered about that. The top that came with mine is in bad shape and will have to be redone. But it has 2 bows, if by bows you mean the ribs that support the top. So I guess it would come closer to a 52. That was the year I was born, and would be easier to be remember!
August 29, 2010 at 5:34 pm #241285Here’s a question on the Duchess – How can you tell how old the old girl is? My title says it is a 53. I have seen a number of Duchess’ listed as 52, and even saw one or two that said 54. Mine was made in 1979. Were there variations of this model, or what year replica were they supposed to be?
August 28, 2010 at 6:27 pm #242082You’re right about that! At this point, a sheet of tin foil would be an improvement. I will miss the cool breeze, though!
August 28, 2010 at 10:31 am #241993Sorry, Pink MG – too late. I had already ordered from JC Whitney before reading all the horror stories.
I did read an interesting post on The Samba where someone ordered from Wolfsburg (in 2007) and got the same thin floor pans from Brazil that everyone else was selling. The post said that only the Danish floor pans were the heavy ones now. I don’t know how accurate any of that is – in fact, up until a couple of weeks ago I didn’t know what a floor pan was!
August 28, 2010 at 10:25 am #242080Thanks Will – I may take you up on that. I had already looked at the beautiful job you did with the pan replacement. In fact, that is what helped give me the confidence to tackle this job.
August 27, 2010 at 8:25 pm #242078We are actually looking forward to the “adventure”. I plan to take photos as we go along, and document our learning experience. My wife is almost as psyched about this as I am.
-
AuthorPosts